 by
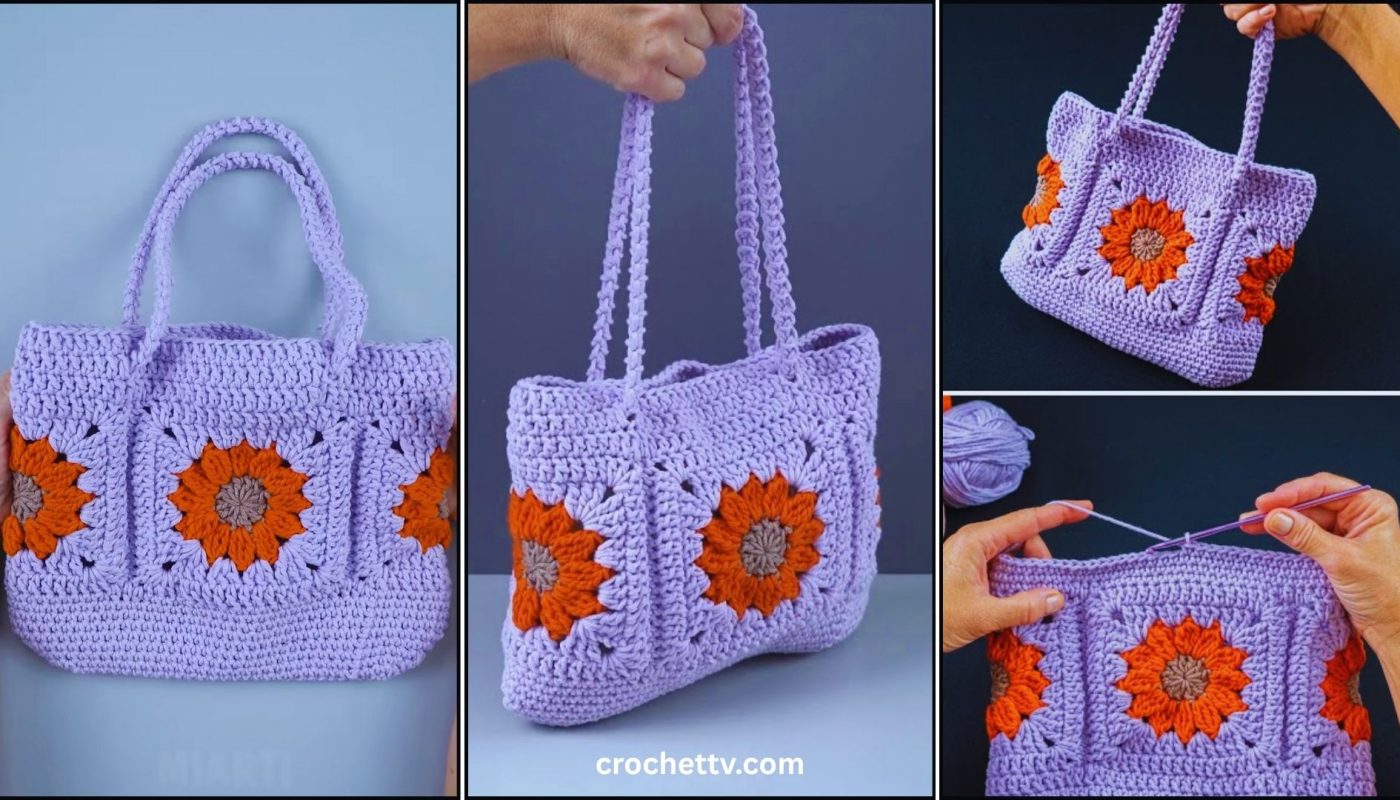
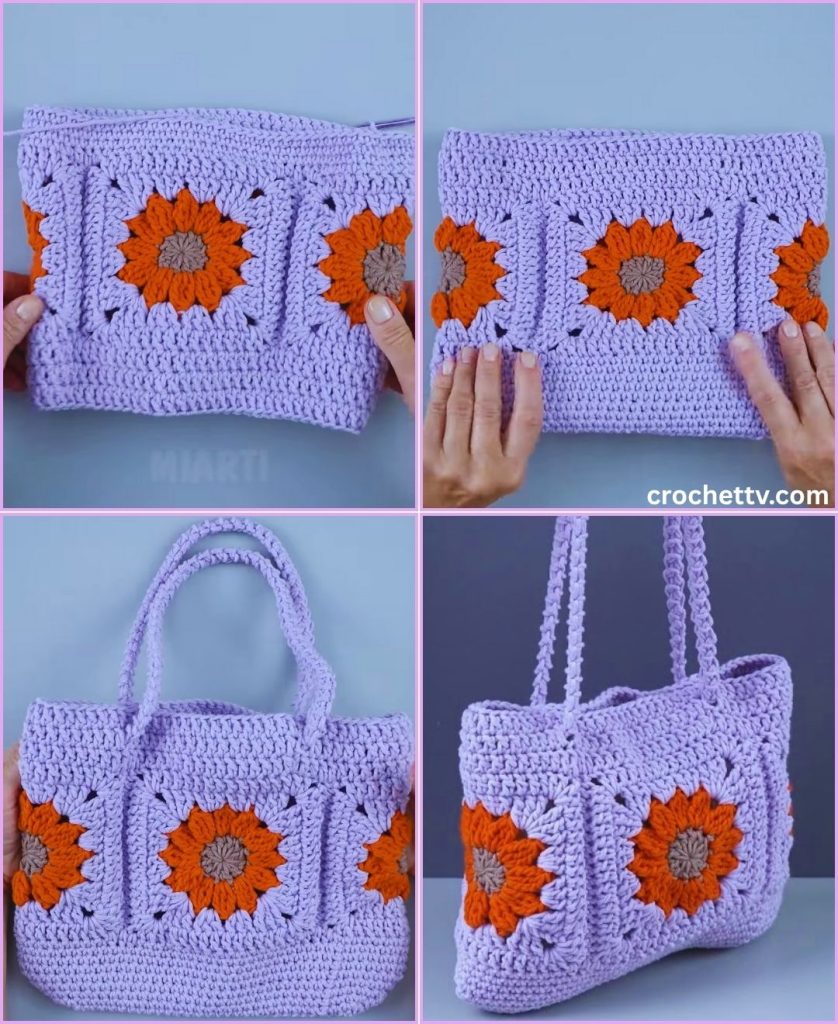
by A granny square tote bag is a classic, colorful, and practical accessory that’s perfect for shopping, carrying yarn projects, or as an everyday purse. This detailed tutorial will guide you through creating the individual squares and assembling them into a sturdy, stylish tote. This project is highly customizable with endless color possibilities.
Materials You’ll Need
- Yarn: Approximately 300–400 grams of worsted weight (aran/10-ply) yarn. Cotton or a cotton blend is highly recommended for a bag as it provides structure and durability. Choose 2-4 colors for your squares, plus one solid color for joining and the handles.
- Colors A, B, C: For the squares.
- Color D (Main/Joining Color): For seaming, base, and handles.
- Crochet Hook: A hook size appropriate for your yarn, typically a 4.0mm (G/6) or 5.0mm (H/8) hook.
- Scissors
- Yarn Needle (Tapestry Needle): Essential for weaving in ends and seaming the squares together.
- Stitch Markers: Helpful for marking corners and handle placement.
Part 1: Crocheting the Granny Squares
The number of squares you need depends on the desired size of your bag and the size of your squares. For a medium-sized tote, you will typically need 13 squares (4 for the front, 4 for the back, 4 for the sides, and 1 for the base).
Basic Granny Square Pattern:
- Foundation (Color A): Start with a magic ring (or ch 4 and sl st to join).
- Round 1: Ch 3 (counts as 1 dc), 2 dc into the ring.
(Ch 2, 3 dc into the ring)Repeat from()two more times. Ch 2, sl st to the top of the initial Ch 3 to join. (Four 3-dc clusters). Fasten off Color A.
- Round 1: Ch 3 (counts as 1 dc), 2 dc into the ring.
- Round 2 (Color B): Join Color B with a sl st to any corner ch-2 space.
- Ch 3,
(2 dc, ch 2, 3 dc)into the same corner space. Ch 1, (3 dc, ch 2, 3 dc)into each remaining corner space.- Ch 1, sl st to the top of the initial Ch 3 to join. Fasten off Color B.
- Ch 3,
- Round 3 (Color C): Join Color C with a sl st to any corner ch-2 space.
- Ch 3,
(2 dc, ch 2, 3 dc)into the same corner space. Ch 1, 3 dcinto the next ch-1 space along the side.Ch 1.- Repeat the corner and side pattern around. Sl st to join. Fasten off Color C.
- Ch 3,
Continue adding rounds until your squares measure about 4–6 inches wide. Make all 13 squares the same size.
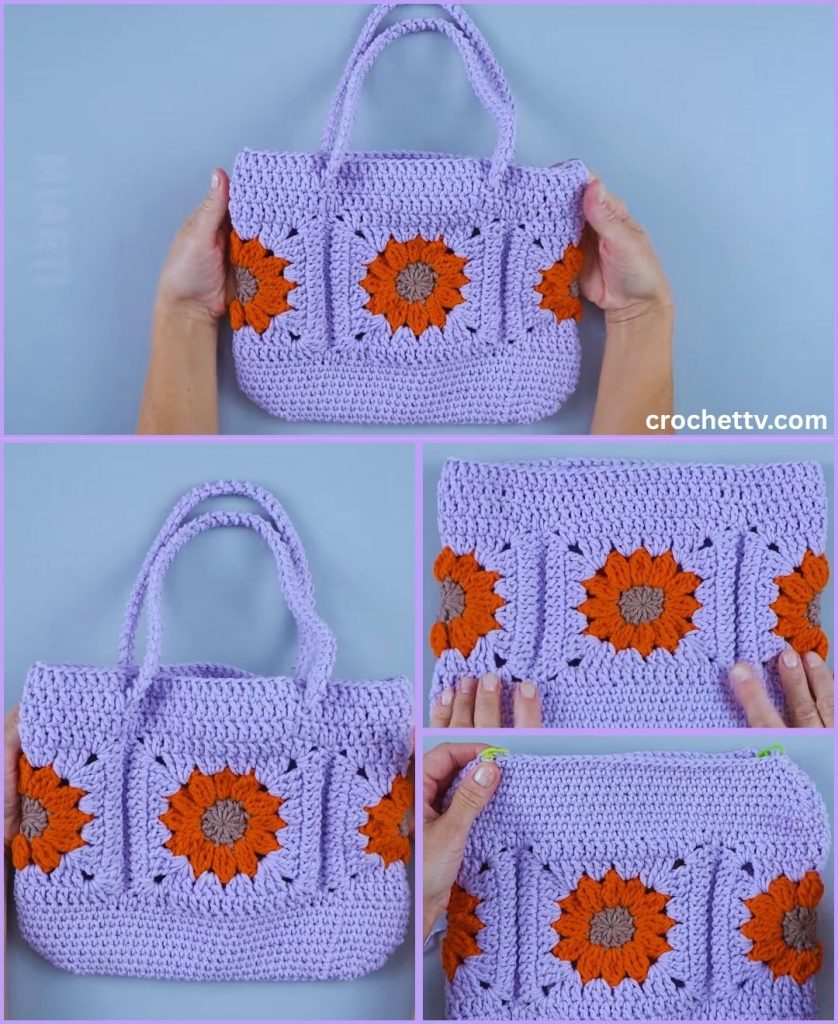
Part 2: Assembling the Bag Body
The bag is assembled by joining the 12 side/front squares and then attaching the base square. Use your Color D (Main/Joining Color) for all seaming.
Seaming Technique (Recommended): The Single Crochet Join (SC Join) is sturdy and creates a nice texture on the outside of the bag. Alternatively, the Whipstitch with a yarn needle provides a flatter, more invisible seam.
- Layout: Arrange your squares into a long strip (4 squares long) and a second strip (4 squares long). These are the front and back. Lay the remaining four squares in a row. These are the sides and bottom transition.
- Create the Box:
- Front/Back: Join the four squares for the front together along the edges. Repeat for the back.
- Sides: Join the four squares for the sides together in a long strip.
- Form the Sides: Attach the side strip to the edges of the front panel, forming a shallow box. Repeat on the back panel. This creates a rectangular tube.
- Attach the Base: Seam the remaining single square to the bottom open edges of the rectangular tube. This forms the base of the bag.
Part 3: Creating the Lining and Top Edge
Because crochet fabric stretches, adding a sturdy top edge and optionally a fabric lining is highly recommended.
A. Stiffening the Top Edge (Color D)
- Base Round: Join Color D with a sl st at any corner of the bag’s top opening. Ch 1. Work 1 single crochet (sc) into each stitch and ch-space around the entire opening. Sl st to join.
- Straight Rounds: Ch 1. Work 1 sc in each stitch around for 3–5 more rounds. This creates a sturdy, non-stretching top band.
- Final Edge (Optional): Finish the top with a round of slip stitches or reverse single crochet (crab stitch) for a clean, professional edge. Fasten off.
B. Optional Fabric Lining
A fabric lining prevents items from falling out and adds durability.
- Cut a piece of fabric (like cotton or canvas) slightly larger than the crocheted bag.
- Sew the fabric into a bag shape, mirroring the dimensions of the crocheted tote.
- Place the fabric lining inside the crocheted bag and hand-sew the top edge of the fabric securely to the inner edge of the crocheted top band.

Part 4: The Shoulder Straps
A strong, comfortable handle is essential. We will make two simple, reinforced handles.
- Crocheting the Straps (Make 2 – Color D):
- Chain 8 (adjust width as desired).
- Single crochet (sc) in the 2nd chain from the hook and in each chain across (7 sc).
- Ch 1, turn. Sc in each stitch across.
- Repeat this process until your strap is the desired length (24-30 inches is standard for a shoulder tote). Fasten off, leaving a long tail for sewing.
- Attaching the Straps:
- Lay your bag flat and mark the desired placement for the handles on the inner edge of the top band. They should be positioned symmetrically on the front and back.
- Using your yarn needle and the long tail, securely sew the strap ends to the inside of the bag’s top edge. Stitch through the fabric multiple times in a rectangle shape to create a strong anchor point that can handle heavy items.
- Repeat for the second strap.
Part 5: Finishing
- Weave in All Ends: This is the most important final step. Use your yarn needle to carefully weave in every single loose end on the inside of the bag. Weave them securely through the stitches in different directions.
- Blocking (Optional): Gently mist the bag with water and reshape it. Allowing it to air dry will help the seams lie flat and the overall structure look cleaner.
Congratulations! You have successfully created a beautiful, one-of-a-kind granny square tote bag that’s ready to carry all your essentials.