 by
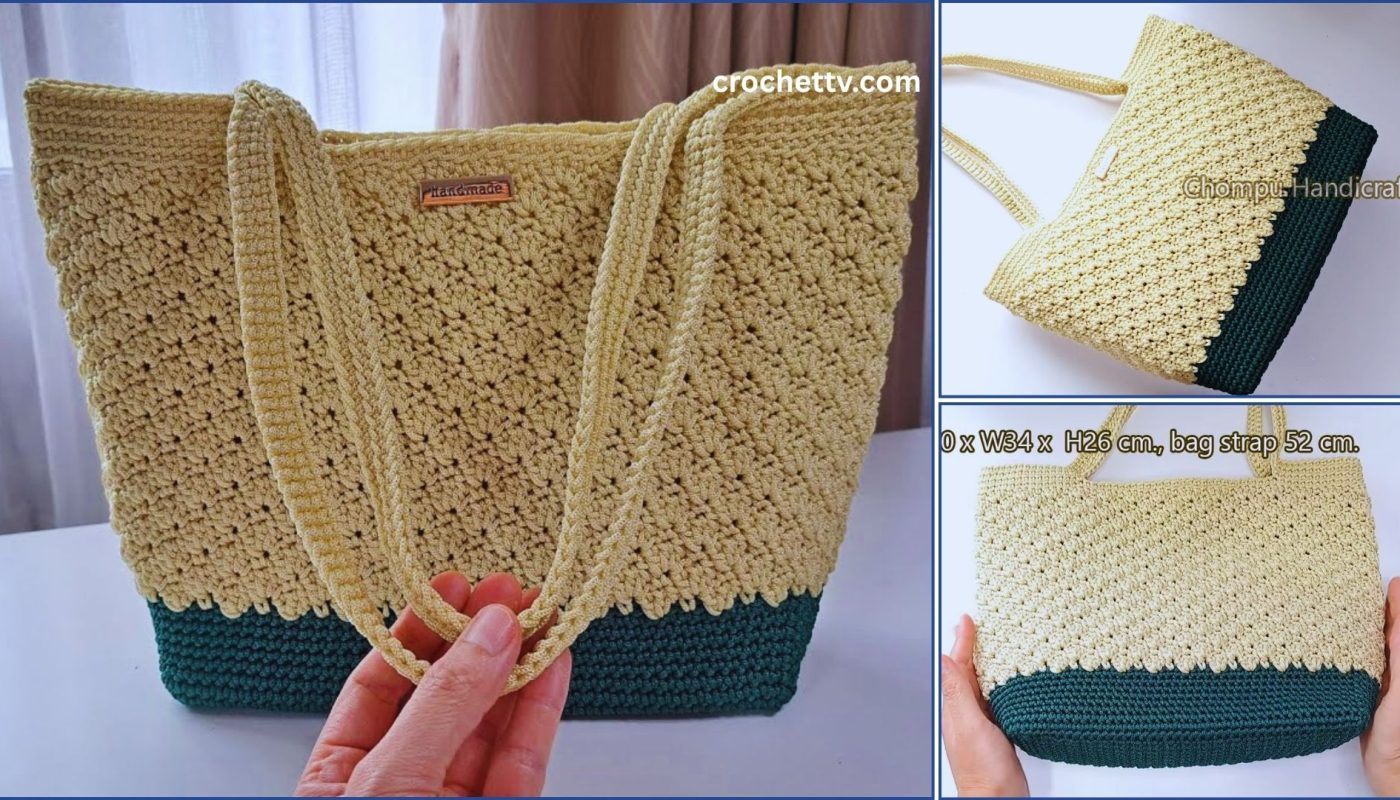
by Welcome! Here is a detailed, step-by-step guide to crocheting a versatile and sturdy tote bag. This pattern is designed to be beginner-friendly but also offers plenty of room for customization for more experienced crafters.
Craft Your Own Style: A Detailed Step-by-Step Guide to Crocheting the Perfect Tote Bag
There’s a unique satisfaction in creating something both beautiful and functional. A crocheted tote bag is the perfect project for this, combining practical use with endless creative possibilities. It’s an eco-friendly alternative to plastic bags, a stylish accessory for a trip to the market, and a wonderful handmade gift.
This comprehensive guide will walk you through every step of creating a durable and chic tote bag. We will build it from the ground up: starting with a solid rectangular base, working up the textured body, and finishing with strong, integrated straps.
Before You Begin: Gathering Your Supplies & Knowledge
Proper preparation is key to a smooth and enjoyable crochet experience. Let’s get everything in order.
Materials You’ll Need:
- Yarn: Worsted weight (Category 4) cotton or a cotton blend yarn is highly recommended. Cotton is sturdy, holds its shape well, has minimal stretch, and is washable. You will need approximately 400-500 yards (about 200-250 grams). Using two strands of a lighter weight yarn held together can also create a wonderfully robust fabric.
- Crochet Hook: A 5.0mm (H-8) hook is a good starting point for worsted weight yarn. If you crochet tightly, you might consider a 5.5mm (I-9) hook to achieve a fabric that isn’t too stiff.
- Stitch Markers: These are invaluable for marking the beginning of rounds and the corners of your base.
- Scissors: For cutting your yarn.
- Yarn Needle (or Tapestry Needle): Essential for weaving in your ends securely for a professional finish.
Essential Stitches & Abbreviations (US Terms)
This pattern uses basic stitches. If you are a complete beginner, it’s a good idea to practice these before you start.
- ch: chain
- st(s): stitch(es)
- sl st: slip stitch
- sc: single crochet
- hdc: half double crochet
- sk: skip
- BLO: back loop only
- rep: repeat
- * … ;: repeat the instructions between the asterisks
A Note on Gauge
Gauge refers to how many stitches and rows you make per inch. For a bag, exact gauge isn’t as critical as for a fitted garment, but it’s still important for determining the final size.
- Gauge Swatch: With a 5.0mm hook, create a small square using the body stitch pattern (alternating sc and ch 1). A 4×4 inch square should be approximately 16 stitches wide and 16 rows tall.
- If your swatch is larger, use a smaller hook. If it’s smaller, use a larger hook.
The Pattern: Let’s Start Crocheting!
This bag is worked in a continuous spiral for the base and then in joined rounds for the body. This method creates a seamless and sturdy construction.
Part 1: The Rectangular Base
The base is the foundation of your bag. We create a rectangle by crocheting around a starting chain.
Round 1: Ch 26.
- Work 2 sc in the 2nd ch from the hook (this is your first corner).
- Sc in the next 23 chains.
- Work 3 sc in the last ch (this is your second corner).
- Now, working along the opposite side of the foundation chain: sc in the next 23 chains.
- Work 1 sc in the same chain as your very first stitches.
- Sl st to the top of the first sc to join. You should have 52 sts.
Round 2: Ch 1 (does not count as a stitch).
- Work 2 hdc in the first st and the next st.
- Place a stitch marker in the first and last hdc of these increases.
- Hdc in the next 23 sts.
- Work 2 hdc in each of the next 3 sts. Move your stitch markers to the first and last hdc of this group of 6.
- Hdc in the next 23 sts.
- Work 2 hdc in the last st.
- Sl st to the first hdc to join. (60 sts)
Round 3: Ch 1.
- Hdc in the first st. Work 2 hdc in the next st.
- Hdc in the next 2 sts. Work 2 hdc in the next st.
- Hdc in the next 23 sts.
- *Hdc in the next st, 2 hdc in the next st; rep from * two more times (3 times total).
- Hdc in the next 23 sts.
- Hdc in the next st, 2 hdc in the last st.
- Sl st to the first hdc to join. (68 sts)
Round 4-7 (or until desired base width): Continue in this manner, working hdc stitches around and placing 2 hdc in each of the 4 corner stitches of your growing rectangle. This even increase of 4 stitches per round will keep your base flat.
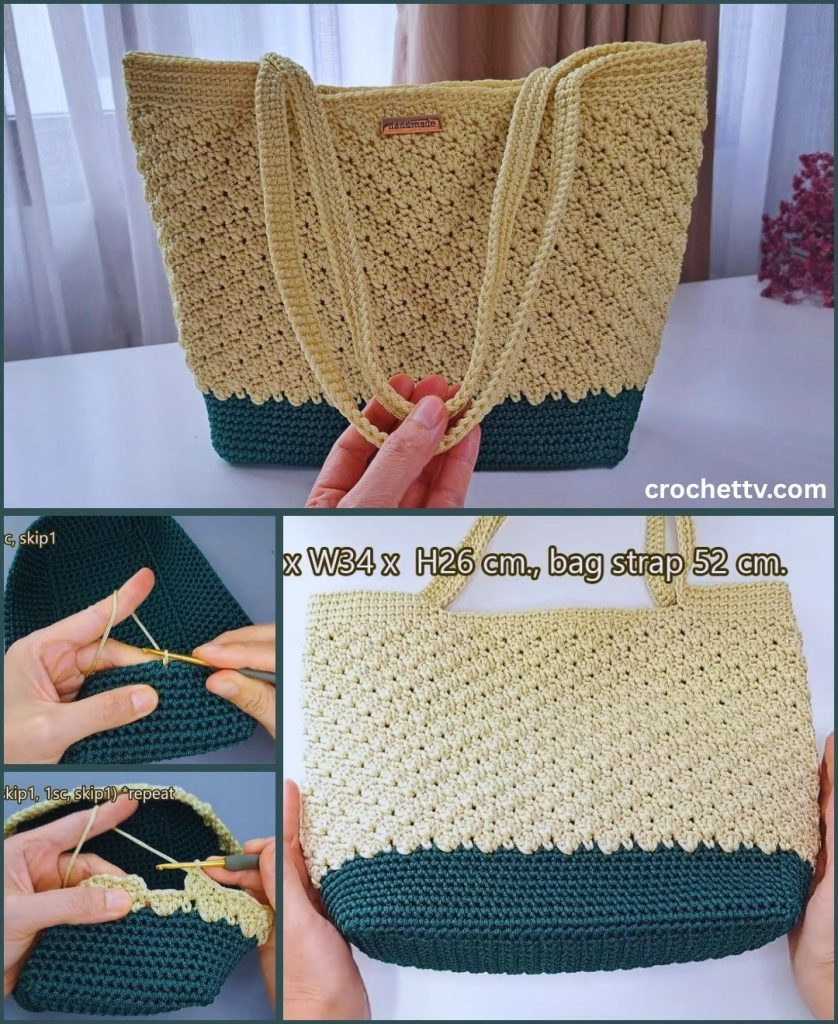
Your finished base should measure approximately 10-12 inches long and 3-4 inches wide. For this pattern, let’s stop after Round 7. The final stitch count will be 84 sts.
Part 2: The Body of the Bag
Now we will build the walls of the tote bag, working upwards from the base.
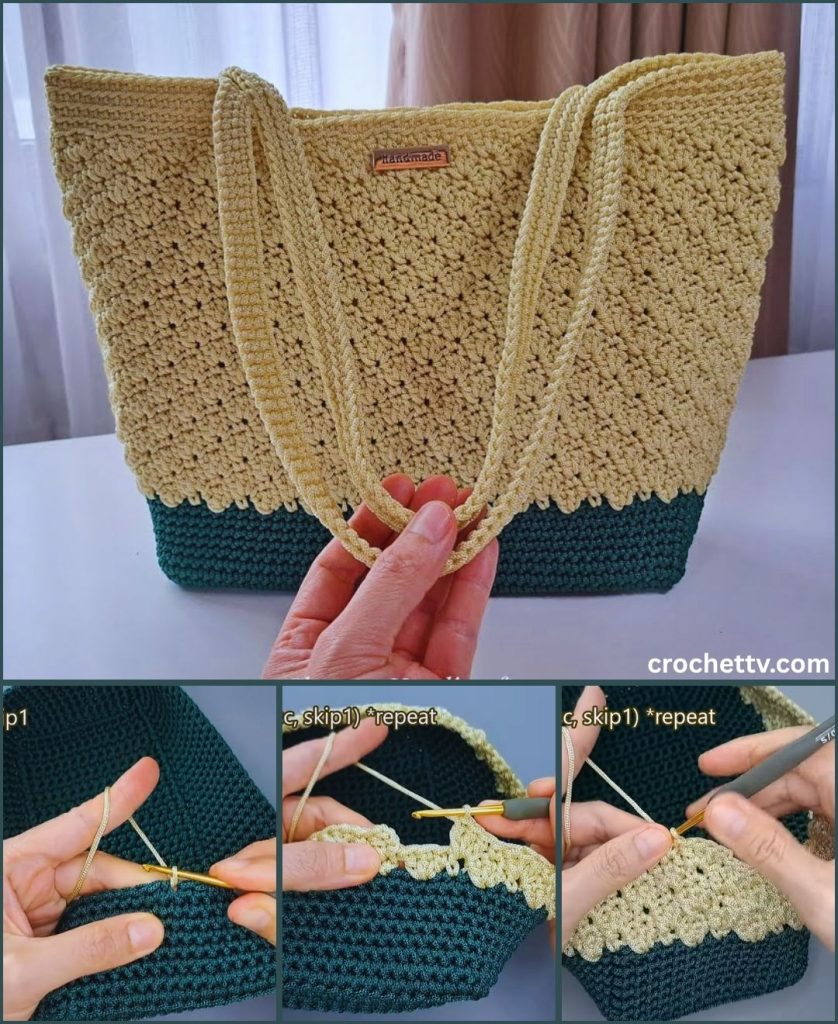
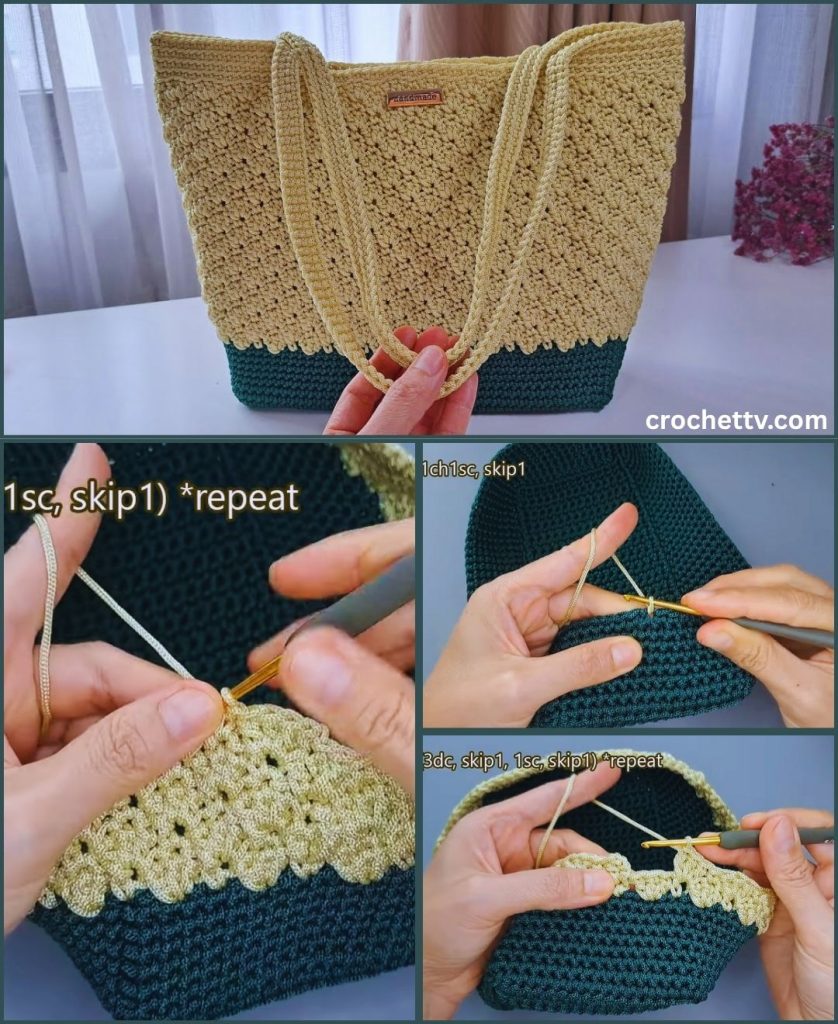
Transition Round (Round 8): Ch 1. Work 1 sc in the Back Loop Only (BLO) of each stitch around. Sl st to the first sc to join. (84 sts) Working in the back loop only creates a defined, sharp edge between the base and the body of the bag, helping it to stand up straight.
Body Stitch (Granite or Moss Stitch): This stitch creates a beautiful, dense, and modern-looking fabric that’s perfect for a bag.
Round 9: Ch 1. Sc in the first st. *Ch 1, sk the next st, sc in the next st; rep from * all the way around. On the last repeat, you will ch 1 and sk the final st. Sl st to the first sc to join. (42 sc, 42 ch-1 spaces)
Round 10: Ch 1. Sc in the first ch-1 space from the previous round. *Ch 1, sk the next sc, sc in the next ch-1 space; rep from * all the way around. Sl st to the first sc to join.
Rounds 11 and beyond: Repeat Round 10 until the body of your bag measures approximately 12-14 inches tall, or your desired height. The beauty of this stitch is its simple, meditative repetition.
Part 3: The Straps and Top Edging
We will create the straps directly onto the bag for a seamless and very strong finish.
Step 1: Placement Lay your bag flat. You need to decide where you want your straps. For a bag with 84 stitches, a good placement is to have 20 stitches for the front, 22 for each side (which will be skipped for the handle), and 20 for the back.
- Count 10 stitches from the start of your round and place a marker.
- From that marker, count 22 stitches and place another marker. This is where your first strap will go.
- Count 20 stitches from the second marker and place a third marker.
- Count 22 stitches from the third marker and place your final marker. You should have 10 stitches remaining to get back to the start of the round.
Step 2: Crocheting the Straps We’ll do a few rounds of single crochet to create a sturdy top border before making the straps.
Top Border Round 1: Ch 1. Sc in each sc and each ch-1 space around. Sl st to join. (84 sc)
Top Border Round 2: Ch 1. Sc in each st around. Sl st to join. (84 sc)
Strap Round: Ch 1. Sc in each st until you reach your first stitch marker.
- Create the strap: Ch 60-80, depending on how long you want your strap (a shoulder strap needs more chains than a handle). Be careful not to twist your chain.
- Attach the strap: Sk all the stitches between your first and second stitch markers, and sc into the stitch with the second marker.
- Continue to sc across the side of the bag until you reach your third stitch marker.
- Create the second strap: Ch the same number of stitches as your first strap.
- Attach the second strap: Sk all stitches between your third and fourth markers, and sc into the stitch with the fourth marker.
- Continue to sc until you reach the beginning of the round. Sl st to join.
Finishing the Straps (Rounds 4, 5, & 6 of top border): Now we will work a few more rounds to secure and thicken the straps.
- Ch 1. Sc in each sc and in each chain of the straps all the way around. This is the most time-consuming part, but it’s crucial for strength. When you get back to the beginning, sl st to join.
- Repeat for 2 more rounds: Ch 1, sc in every stitch around. Sl st to join.
After the final round, cut your yarn, leaving a 6-inch tail. Fasten off.
Finishing Touches & Customization
Your bag is almost complete! These final steps will give it a polished, professional look.
Weaving in Ends
This is the most important finishing step. Use your yarn needle to thread the yarn tails. Weave them back and forth through the stitches on the inside of your bag, changing direction a few times to ensure they are secure and won’t come undone with use.
Ideas for Customization
This pattern is a fantastic blank canvas. Here are some ideas to make it uniquely yours:
- Stripes: Change colors every few rows on the body of the bag to create bold or subtle stripes.
- Tassels or Pompoms: Add a fun, bohemian-style tassel or a few colorful pompoms to the side of the bag.
- Lining Your Bag: For a truly professional finish, consider sewing in a fabric lining. This prevents small items from poking through the crochet stitches and adds another layer of durability.
- Add a Pocket: You can crochet a small rectangle and sew it onto the inside or outside of the bag for your phone or keys.
- Vary the Straps: Make wider straps by working rows of single crochet back and forth on the strap chains before attaching. You could also use leather or canvas straps for a different look.
Care Instructions
If you used 100% cotton yarn, your bag is machine washable.
- Place the bag in a mesh laundry bag to prevent snagging.
- Wash on a gentle cycle with cold water and mild detergent.
- Do not put it in the dryer. Lay it flat on a towel and reshape it, then allow it to air dry completely.
Congratulations on completing your crocheted tote bag! You’ve created a durable, stylish, and practical item that you can be proud to use and show off. Enjoy the compliments that are sure to come your way!