 by
by Here is a detailed, step-by-step guide to creating a beautiful and sturdy crochet handbag using polyester cord with a stylish striped pattern. This article will cover everything from material selection to the final finishing touches.
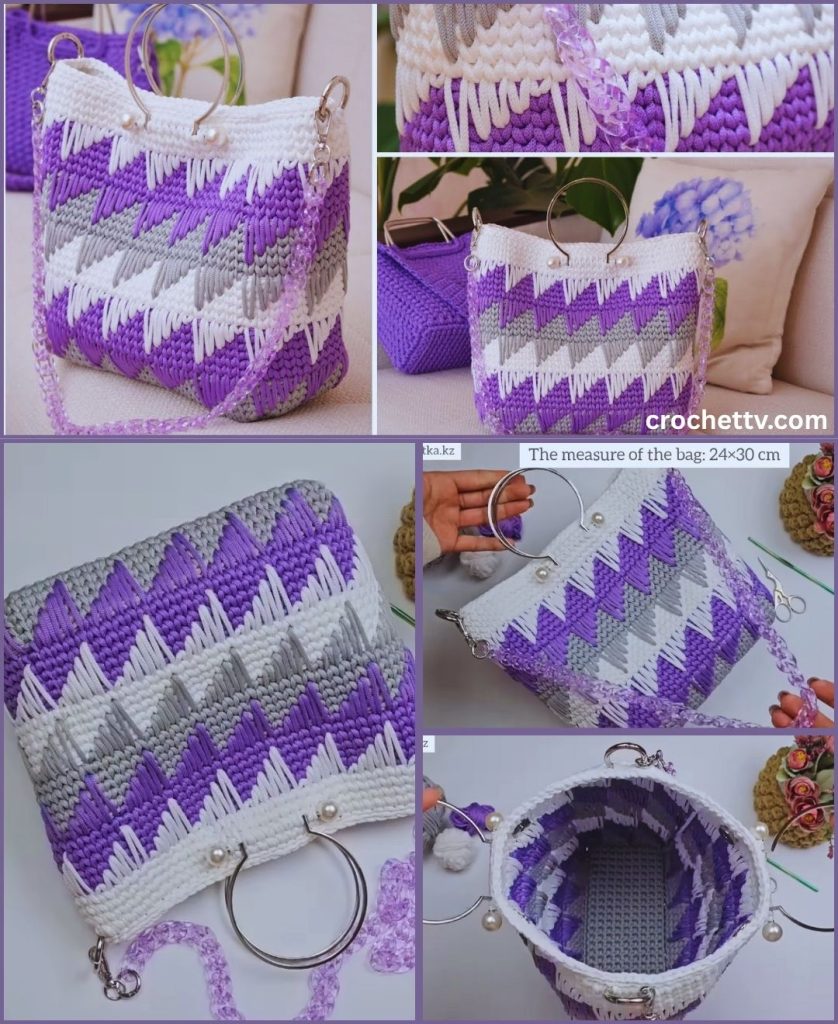
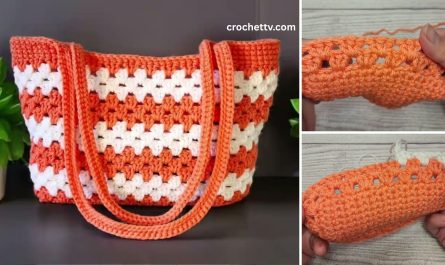
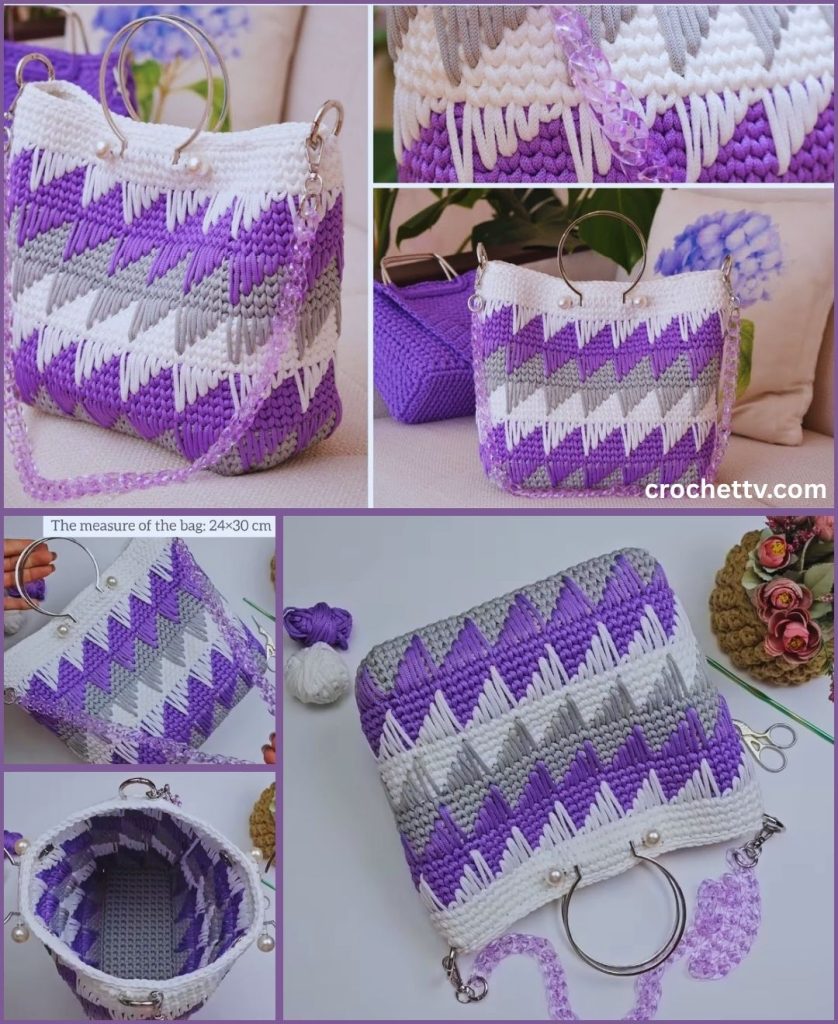
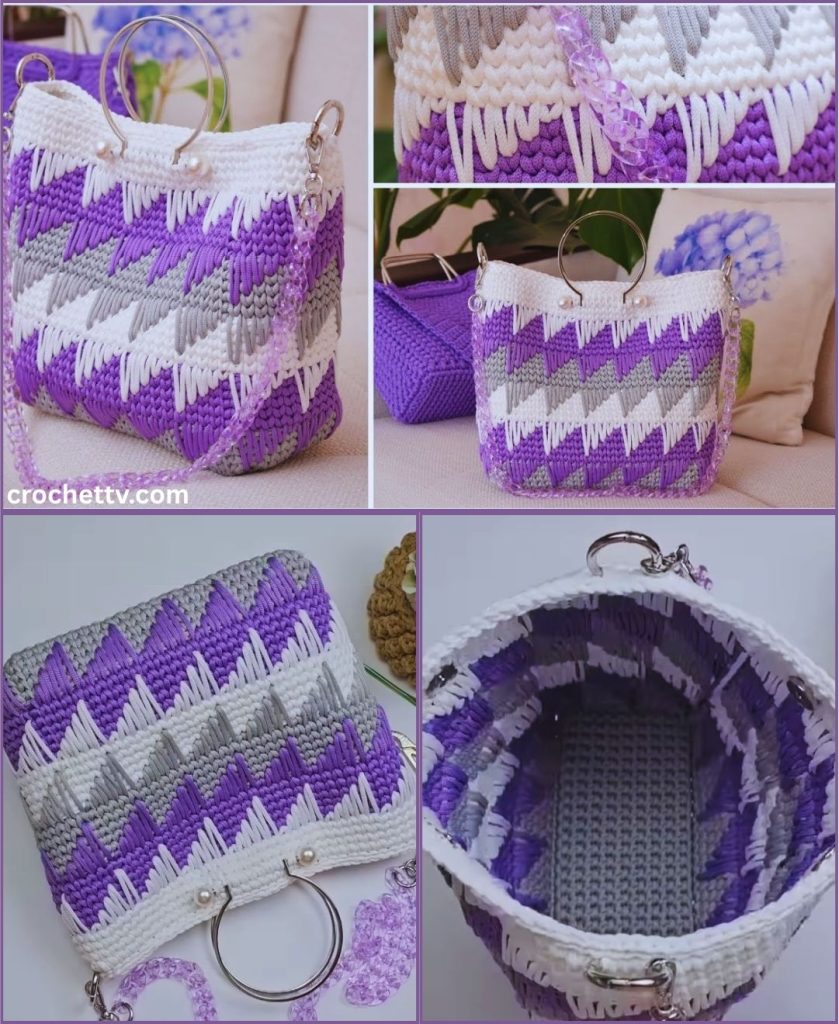
Craft Your Own Stunning Striped Crochet Handbag: A Step-by-Step Guide with Polyester Cord
There is a unique satisfaction that comes from using a beautiful, functional item you’ve made with your own hands. This crochet handbag project is the perfect blend of style, durability, and creative expression. By using polyester cord, you’ll create a structured, modern-looking bag that holds its shape beautifully and can withstand daily use. The striped color pattern adds a chic, custom-made touch that you can tailor to your personal style.
This detailed guide is designed for the advanced beginner or intermediate crocheter who is comfortable with basic stitches and is ready to tackle a rewarding project. We will walk you through creating an oval base, building up the striped body, forming integrated handles, and adding professional finishing touches.
Why Choose Polyester Cord for Your Handbag?
Before we dive into the pattern, let’s talk about the star of the show: polyester cord. Unlike traditional yarn, this material has unique properties that make it ideal for projects like bags and baskets.
- Structure and Durability: Polyester cord is stiff and strong, meaning your bag will stand up on its own and won’t sag, even when filled. It’s incredibly resistant to wear and tear.
- Vibrant, Fade-Resistant Color: The colors available are often rich and saturated. Polyester is less prone to fading from sun exposure compared to natural fibers.
- Water Resistance: While not fully waterproof, polyester doesn’t absorb water as readily as cotton or wool, making it a practical choice for an everyday bag.
- Modern Aesthetic: The clean stitch definition and smooth texture of the cord give the finished project a contemporary, high-end look.
A Note on Working with Cord: Crocheting with polyester cord requires more hand strength than working with soft yarn. Be sure to take frequent breaks to stretch your hands and wrists.
Project Overview & Specifications
- Skill Level: Advanced Beginner / Intermediate
- Finished Dimensions (Approximate):
- Base: 12 inches (30 cm) long x 5 inches (13 cm) wide
- Height: 10 inches (25 cm) without handles
- Total Height: 13 inches (33 cm) with handles
- Gauge: Approximately 10 stitches and 10 rows in single crochet = 4 inches x 4 inches (10 cm x 10 cm). Gauge is important for size, but slight variations are acceptable for a bag.
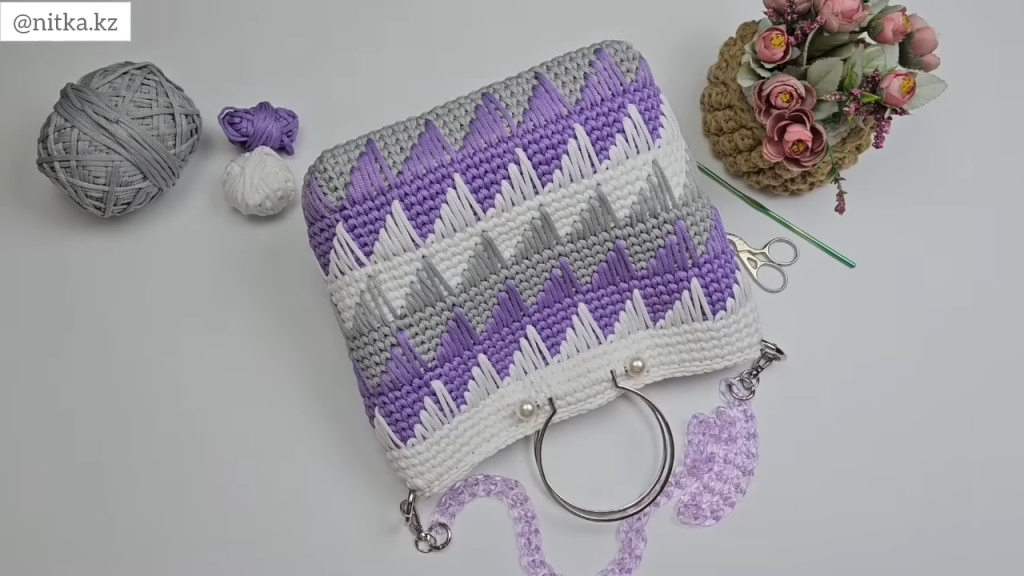
Materials & Tools
- Yarn: 3mm or 4mm Polyester Cord.
- Color A (Main Color): Approx. 200 meters (e.g., Navy Blue)
- Color B (Accent Stripe 1): Approx. 100 meters (e.g., White)
- Color C (Accent Stripe 2): Approx. 100 meters (e.g., Beige)
- Crochet Hook: 5.0mm (H−8) or 6.0mm (J−10). The hook size depends on your cord thickness and tension. Use a hook that creates a stiff fabric with no large gaps.
- Stitch Markers: At least two, to mark the ends of the oval base.
- Scissors: Sharp scissors for cutting the cord.
- Tapestry Needle: A large-eyed needle for weaving in the thick ends.
- Measuring Tape: To check your dimensions.
- (Optional) for Finishing:
- Lining fabric (cotton or canvas)
- Magnetic snap closure
- Sewing needle and thread
- Tassel or bag charm
Stitches & Abbreviations (US Crochet Terms)
- ch: chain
- st(s): stitch(es)
- sl st: slip stitch
- sc: single crochet
- inc: increase (work 2 single crochet stitches in the same stitch)
- BLO: back loop only
- Rnd: round
- […]: repeat instructions within brackets as directed
The Pattern: Step-by-Step Instructions
Part 1: The Oval Base
We will begin with the main color (Color A) and create a sturdy oval base by working in a continuous spiral. Place a stitch marker in the first stitch of each round to keep track of your starting point.
With Color A:
Foundation: Chain 21 (ch 21).
Rnd 1:
- Work 2 sc in the 2nd ch from the hook (this is your first increase).
- Sc in the next 18 chains.
- Work 4 sc in the last chain. This will turn your work so you can crochet along the opposite side of the foundation chain.
- Sc in the next 18 chains on the opposite side.
- Work 2 sc in the last chain (which was the first chain you worked into).
- (Total: 44 sts)
Rnd 2:
- Inc in the first two stitches.
- Sc in the next 18 sts.
- Inc in the next 4 sts.
- Sc in the next 18 sts.
- Inc in the last two stitches.
- (Total: 52 sts)
Rnd 3:
- [Sc in the next st, inc] two times.
- Sc in the next 18 sts.
- [Sc in the next st, inc] four times.
- Sc in the next 18 sts.
- [Sc in the next st, inc] two times.
- (Total: 60 sts)
Rnd 4:
- [Sc in the next 2 sts, inc] two times.
- Sc in the next 18 sts.
- [Sc in the next 2 sts, inc] four times.
- Sc in the next 18 sts.
- [Sc in the next 2 sts, inc] two times.
- (Total: 68 sts)
Rnd 5:
- [Sc in the next 3 sts, inc] two times.
- Sc in the next 18 sts.
- [Sc in the next 3 sts, inc] four times.
- Sc in the next 18 sts.
- [Sc in the next 3 sts, inc] two times.
- (Total: 76 sts)
Your base should now be a flat, neat oval. If it’s starting to curl, your tension might be too tight. If it’s ruffling, you are adding too many increases, and your tension is too loose. Check that it lays flat before proceeding. You can add one more round of increases if you desire a wider base.
Part 2: Building the Body & Creating the Stripes
Now we will transition from the base to the sides of the bag. This first round creates a defined edge.
Rnd 6 (Transition Round):
- Sc in the back loop only (BLO) of every stitch around. Do not increase.
- At the end of this round, join with a slst to the first sc. This is the only time you will join in this manner until the top of the bag. From now on, we will work in joined rounds to keep the color changes clean.
- (Total: 76 sts)
Rnd 7-11 (First Color Block):
- Ch 1 (does not count as a stitch).
- Sc in the same stitch and in every stitch around.
- Join with a slst to the first sc.
- Repeat for a total of 5 rounds in Color A.
How to Change Colors Cleanly: On the very last stitch of your current color block (the final slip stitch of Rnd 11), insert your hook, yarn over with the old color (Color A), and pull up a loop. You will have two loops on your hook. Now, drop the old color and yarn over with your new color (Color B). Pull the new color through both loops on the hook to complete the stitch. You have now seamlessly changed colors. Cut the old yarn, leaving a 6-inch tail to weave in later.
Rnd 12-14 (Stripe 1):
- With Color B, ch 1.
- Sc in every stitch around.
- Join with a slst to the first sc.
- Repeat for a total of 3 rounds in Color B. Change to Color C on the final slip stitch.
Rnd 15-17 (Stripe 2):
- With Color C, ch 1.
- Sc in every stitch around.
- Join with a slst to the first sc.
- Repeat for a total of 3 rounds in Color C. Change back to Color A on the final slip stitch.
Continue the Stripe Pattern: Now, repeat the color sequence until your bag reaches the desired height (approximately 9-10 inches). A suggested pattern:
- Rnds 18-27: 10 rounds in Color A.
- Rnds 28-30: 3 rounds in Color B.
- Rnds 31-33: 3 rounds in Color C.
- Rnds 34-36: 3 rounds in Color A.
Do not fasten off after the final round. We will now create the handles.
Part 3: Creating the Integrated Handles
For a strong and seamless look, we will crochet the handles directly into the body of the bag.
Step 1: Mark Handle Placement
- Lay your bag flat. The seam from your joined rounds should be on one of the short sides.
- Count your total stitches (should be 76).
- Place a stitch marker 15 stitches in from the left edge and another 15 stitches in from the right edge. This marks the inside of your handles.
- Flip the bag over and do the exact same on the other side. You should have two sections of 20 stitches for the handles and two sections of 18 stitches on the sides.
- (Side: 18 sts, Handle: 20 sts, Side: 18 sts, Handle: 20 sts = 76 total)
Rnd 37 (Handle Foundation):
- Continuing with Color A, ch 1.
- Sc in the first 18 stitches until you reach your first marker.
- Chain 25 (or more for longer handles). This chain will be the handle opening.
- Skip the 20 stitches between your markers.
- Sc in the next stitch (the one after your second marker).
- Sc in the next 18 stitches until you reach the third marker.
- Chain 25.
- Skip the 20 stitches between your markers.
- Sc in the next stitch and join with a slst to the first sc of the round.
Rnd 38:
- Ch 1.
- Sc in each of the 18 stitches on the side.
- Work 30 sc evenly around the chain-25 space of the handle. (Working more stitches than chains creates a fuller, more rounded handle).
- Sc in each of the next 18 stitches on the other side.
- Work 30 sc evenly around the second chain-25 space.
- Join with a slst.
Rnd 39-40:
- Ch 1.
- Sc in every single stitch around, including the stitches you just made over the handles.
- Join with a slst.
Final Round (Finishing):
- To create a clean, sturdy top edge, work one final round of slip stitches in every stitch around. Keep your tension loose to prevent the opening from cinching.
- Once you’ve slip stitched all the way around, cut the cord, leaving an 8-inch tail.
- Fasten off and use your tapestry needle to weave the end in securely and invisibly.
Part 4: Finishing Touches
This is where your project goes from handmade to professionally finished.
- Weave in All Ends: This is the most crucial step. Polyester cord ends are slippery. Use your tapestry needle to weave each tail back and forth through the backs of stitches for at least 2-3 inches. Go in multiple directions to lock it in place.
- A Note on Securing Ends (Advanced/Optional): For ultimate security, you can very carefully melt the tip of the polyester cord with a lighter for just a split second and press it flat against the inside of the bag. WARNING: Polyester is flammable. Do this with extreme caution in a well-ventilated area, away from flammable materials, and at your own risk. This step is not necessary if you weave your ends in well.
- Add a Lining (Optional but Recommended): A fabric lining protects your crochet work, prevents small items from poking through, and gives the bag a high-end feel.
- Measure the inside of your bag and cut two pieces of fabric to size, adding a seam allowance.
- Sew the fabric pieces together to form a bag shape that will fit snugly inside.
- Fold the top edge of the lining down and press it with an iron.
- Hand-sew the lining into the bag just below the top edge.
- Install a Closure (Optional): Sew a magnetic snap closure to the inside top center of the bag (or onto the lining before you sew it in) for added security.
- Accessorize: Add a leather tassel, a pom-pom, or a custom bag charm to the handle for a final touch of personality.
Congratulations! You have now created a gorgeous, durable, and one-of-a-kind crochet handbag. Enjoy the compliments and the pride of knowing you made it yourself.