 by
by Here is a detailed, step-by-step guide to creating a beautiful and trendy Hollow Crochet Granny Square Bucket Hat. This article covers everything from materials and basic stitches to the final finishing touches, perfect for an ambitious beginner or intermediate crocheter.
How to Crochet the Perfect Hollow Granny Square Bucket Hat: A Detailed Step-by-Step Pattern
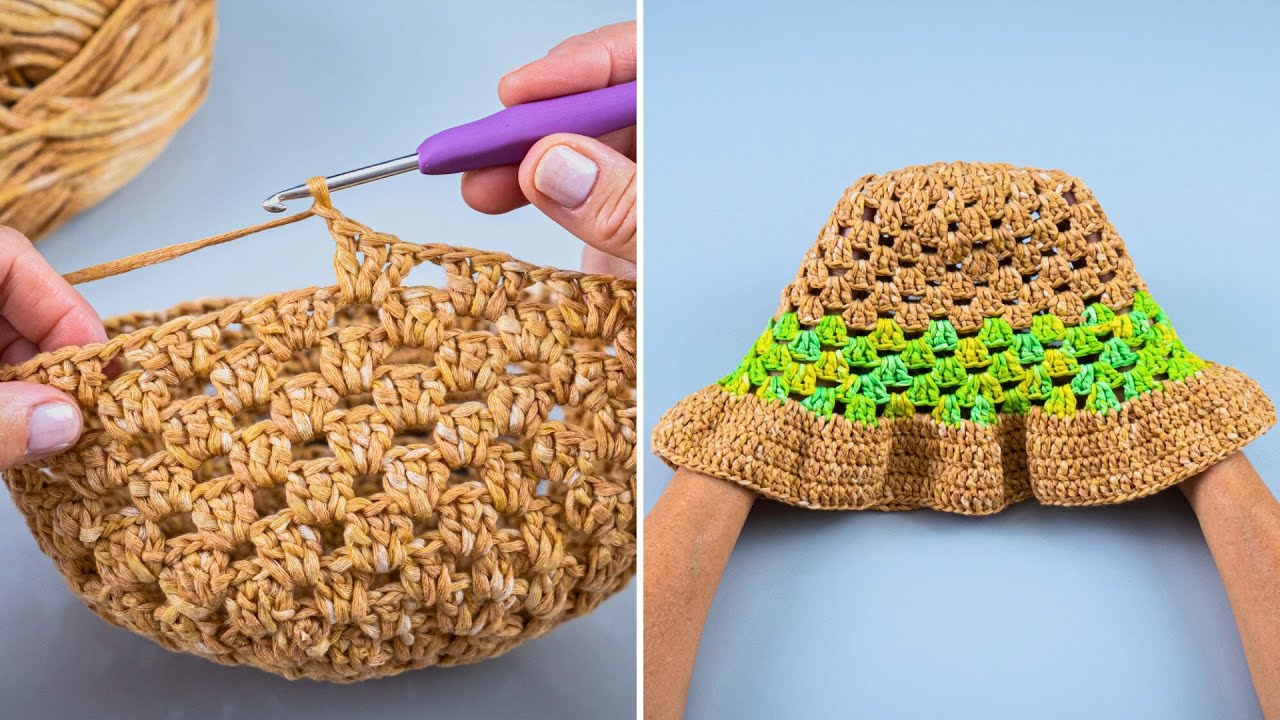
The bucket hat has made a triumphant return to the fashion scene, and what better way to embrace the trend than by creating your own? This pattern takes the classic, cozy granny square and gives it a modern, airy twist, resulting in a “hollow” or “sunburst” design. This hollow effect makes the hat lightweight, breathable, and perfect for sunny days.
This long-form guide will walk you through every stage of the process, from creating the individual components—the crown, the hollow granny squares, and the brim—to assembling them into a stylish, wearable piece of art.
I. Understanding the Project Anatomy
Before we begin, let’s break down the construction of the hat. It’s made in four main parts:
- The Crown: A flat, solid circle made with double crochet stitches that sits on the top of your head.
- The Hollow Granny Squares: These special squares form the vertical sides of the hat. Their open-work design is the star of the show.
- Assembly: The process of joining the granny squares into a band and then attaching that band to the crown.
- The Brim: Crocheted in rounds around the bottom edge of the granny square band to create the hat’s iconic shape.
II. Materials and Tools
Choosing the right materials is key to a successful project.
- Yarn: 100% cotton yarn is highly recommended. It’s breathable, holds its shape well, and is comfortable to wear in warmer weather.
- Weight: DK (Double Knitting) or a light Worsted Weight (Aran) yarn works best.
- Quantity: Approximately 200-250 yards (180-230 meters) in total.
- Color A (Main Color): ~150 yards. For the crown, brim, and final round of the granny squares.
- Color B (Accent Color): ~100 yards. For the center of the granny squares.
- Crochet Hook: A size that corresponds to your yarn weight. For DK/Worsted yarn, a 4.00 mm (G-6) or 4.50 mm (G-7) hook is a good starting point.
- Scissors: For cutting yarn.
- Yarn Needle (or Darning Needle): Essential for weaving in ends neatly.
- Stitch Markers: Very helpful for marking the beginning of rounds.
- Measuring Tape: To ensure correct sizing.
III. Abbreviations and Stitches (US Terminology)
This pattern uses standard US crochet terminology.
- ch: chain
- st(s): stitch(es)
- sl st: slip stitch
- sc: single crochet
- hdc: half double crochet
- dc: double crochet
- tr: treble crochet
- sp: space
- beg: beginning
- MR: Magic Ring (or Magic Circle). A technique to start crocheting in the round with a tightly closable center.
Special Stitches:
- Puff Stitch (puff st): [Yarn over, insert hook into stitch, yarn over, pull up a loop] 4 times in the same stitch. You will have 9 loops on your hook. Yarn over and pull through all 9 loops. ch 1 to close the stitch.
- Granny Cluster: 3 double crochet stitches (3 dc) worked into the same stitch or space.
- Corner: (3 dc, ch 2, 3 dc) worked into the same corner space.
IV. Gauge and Sizing
Gauge is crucial for a hat that fits!
- Gauge Swatch: Create one complete Hollow Granny Square using the pattern below. It should measure approximately 4×4 inches (10×10 cm).
- If your square is too big, use a smaller hook. If it’s too small, use a larger hook.
Sizing Chart (Approximate):
- Small (S): Head circumference 21-22 inches. You will need 5 granny squares for the sides. Crown diameter should be ~6.5 inches.
- Medium (M): Head circumference 22-23 inches. You will need 6 granny squares for the sides. Crown diameter should be ~7 inches.
- Large (L): Head circumference 23-24 inches. You will need 6 granny squares for the sides, but you may need to make a larger crown. Crown diameter should be ~7.5 inches.
This pattern will be written for a size Medium (6 squares). Adjustments for other sizes will be noted.
V. The Pattern: Step-by-Step Instructions
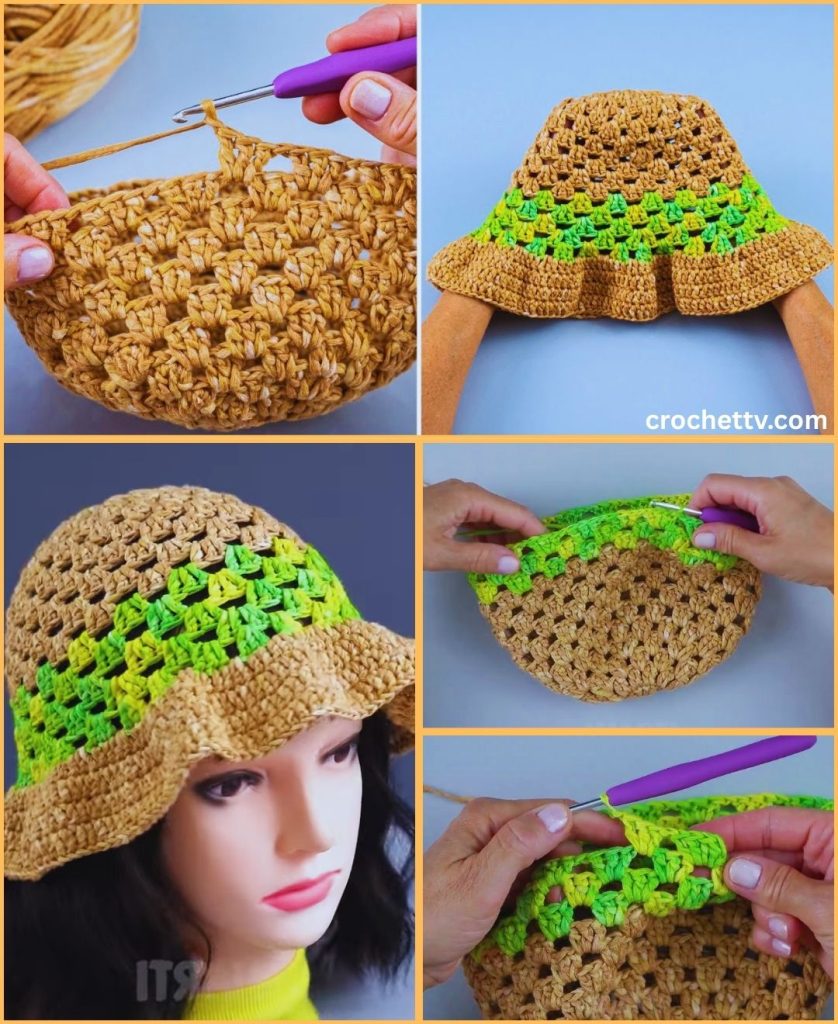
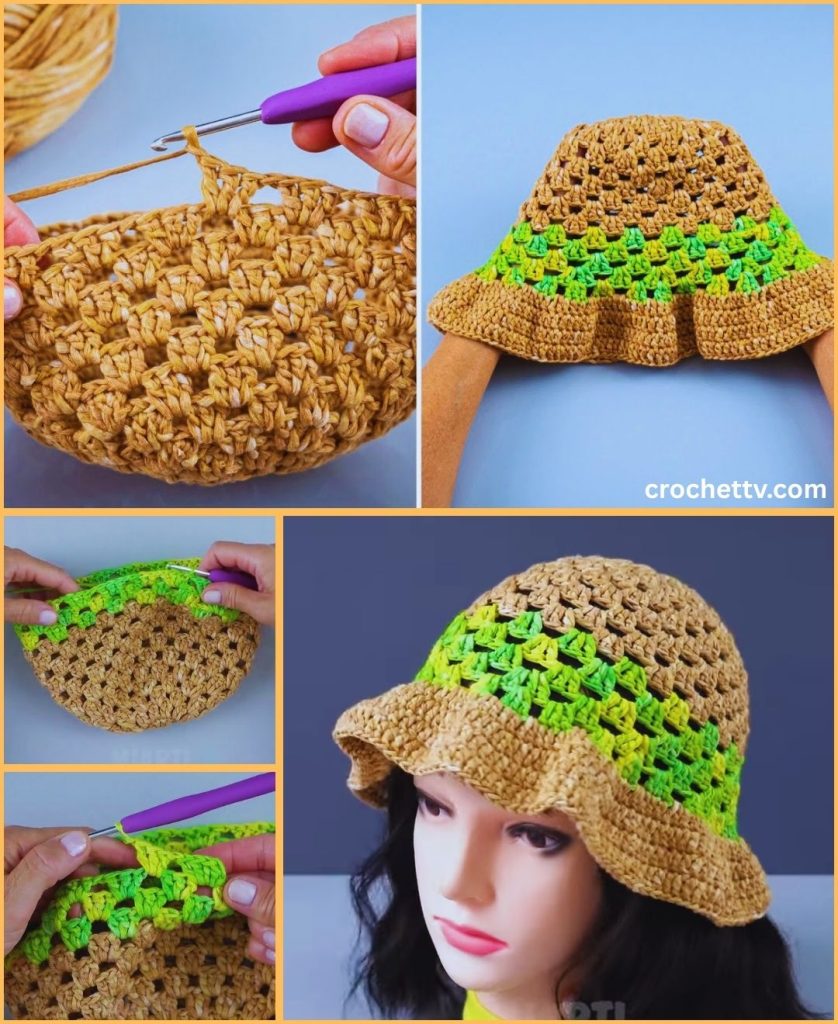
Part 1: The Hollow Granny Square (Make 5 or 6)
Using Color B.
Round 1: Start with a Magic Ring (MR). ch 1 (does not count as a stitch). Work 8 puff sts into the MR. Join with a sl st to the top of the first puff stitch. Pull the ring tight. (You should have 8 puff stitches and 8 ch-1 spaces).
Round 2: sl st into the next ch-1 sp. ch 3 (counts as first dc), work 2 dc in the same space. Work a Granny Cluster (3 dc) in each of the next 7 ch-1 spaces around. Join with a sl st to the top of the beginning ch-3. Fasten off Color B. (8 Granny Clusters, 24 dc total).
Change to Color A.
Round 3: Join Color A in any space between two Granny Clusters. ch 4 (counts as a tr). In the same space, work (2 tr, ch 2, 3 tr) to form the first corner. In the next space between clusters, work 3 dc. In the next space, work (3 tr, ch 2, 3 tr) to form the next corner. Repeat from * to * two more times. Work 3 dc in the final space. Join with a sl st to the top of the beginning ch-4. (4 corners, 4 sides of 3 dc).
Round 4: ch 3 (counts as first dc). Work 1 dc in each of the next 2 stitches. In the corner ch-2 sp, work a Corner ((3 dc, ch 2, 3 dc)). Work 1 dc in each of the next 9 stitches. In the next corner ch-2 sp, work a Corner. Repeat from * to * two more times. Work 1 dc in each of the final 6 stitches. Join with a sl st to the top of the beginning ch-3.
Fasten off and weave in your ends. You now have one completed Hollow Granny Square. Repeat this process until you have the required number of squares for your size (5 for Small, 6 for Medium/Large).
Part 2: The Crown of the Hat
Using Color A.
Round 1: Start with a MR. ch 3 (counts as first dc). Work 11 dc into the ring. Join with a sl st to the top of the beginning ch-3. (12 sts).
Round 2: ch 3. Work 1 dc in the same stitch. Work 2 dc (an increase) in every stitch around. Join with a sl st to the top of the beginning ch-3. (24 sts).
Round 3: ch 3. Work 2 dc in the next stitch. 1 dc in the next stitch, 2 dc in the next. Repeat from * to * around. Join with a sl st to the top of the beginning ch-3. (36 sts).
Round 4: ch 3. Work 1 dc in the next stitch, 2 dc in the next. 1 dc in each of the next 2 stitches, 2 dc in the next. Repeat from * to * around. Join with a sl st to the top of the beginning ch-3. (48 sts).
Round 5: ch 3. Work 1 dc in each of the next 2 stitches, 2 dc in the next. 1 dc in each of the next 3 stitches, 2 dc in the next. Repeat from * to * around. Join with a sl st to the top of the beginning ch-3. (60 sts).
Round 6: ch 3. Work 1 dc in each of the next 3 stitches, 2 dc in the next. 1 dc in each of the next 4 stitches, 2 dc in the next. Repeat from * to * around. Join with a sl st to the top of the beginning ch-3. (72 sts).
Check your size: At this point, your flat circle should be close to the target diameter for your size.
- For Size S (~6.5″): You may stop here.
- For Size M (~7″): This is likely the correct size.
- For Size L (~7.5″): You will need one more increase round.
- Round 7 (for L): ch 3. 1 dc in each of the next 5 stitches, 2 dc in the next. Repeat around. Join. (84 sts).
Do not fasten off the yarn yet.
Part 3: Assembly
Step 1: Join the Granny Squares into a Band
Lay your completed squares side-by-side in a straight line. Using Color A and your yarn needle, use the whip stitch or mattress stitch to sew the squares together. Insert your needle through the back loops only of the stitches on the edge of each square for a flatter, neater seam. Sew them into a long strip, then sew the two ends of the strip together to form a circular band.
Step 2: Attach the Band to the Crown
Place the crown on a flat surface. Place the granny square band around the edge of the crown, with the right sides of both pieces facing you. The number of stitches along the top of your band should be very close to the number of stitches in the final round of your crown (e.g., 6 squares with 21 stitches on a side = 126 stitches; the crown for size M has 72 stitches, so we need to adjust).
To join, we will use single crochet.
- ch 1. Align the first stitch of the crown with a stitch on the band.
- Insert your hook through a stitch on the crown AND a stitch on the band and work a single crochet (sc).
- You will need to evenly decrease to make the band fit the crown. A good pattern would be: sc in the next 4 stitches (joining both layers), then work a decrease by inserting your hook through the next stitch on the crown and the next two stitches on the band to make one sc.
- Continue this pattern of single crocheting and periodic decreases all the way around. The key is to make it look even without puckering.
- Once you have worked all the way around, join with a sl st to the first sc. Do not fasten off.
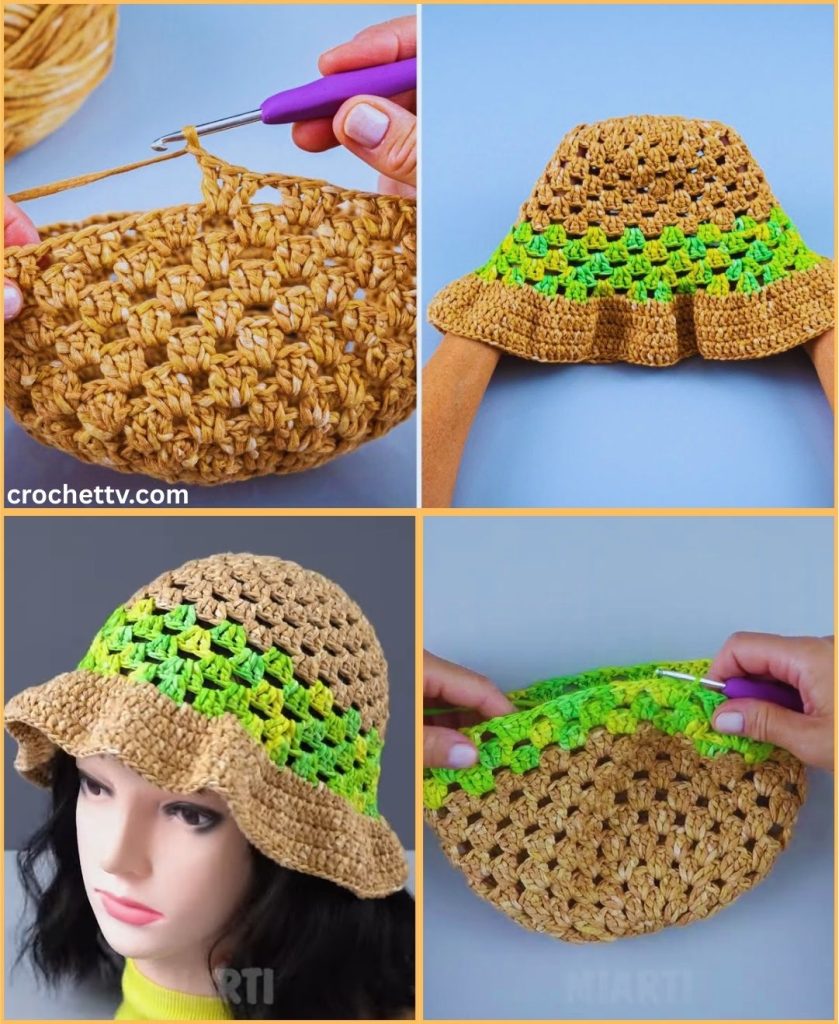
Part 4: The Brim
Now we will work in continuous rounds along the bottom edge of the granny square band.
Round 1: ch 1. Work 1 sc in each stitch around the bottom edge of the hat. Join with a sl st to the first sc. Count your stitches.
Round 2 (Increase Round): ch 3 (counts as first dc). 1 dc in each of the next 8 stitches, 2 dc in the next stitch. Repeat from * to * around. Join with a sl st.
Round 3: ch 3. Work 1 dc in each stitch around. No increases. Join.
Round 4 (Increase Round): ch 3. 1 dc in each of the next 9 stitches, 2 dc in the next stitch. Repeat from * to * around. Join.
Round 5: ch 3. Work 1 dc in each stitch around. No increases. Join.
For a wider brim: Continue this pattern, adding one more stitch between increases on each increase round (e.g., “1 dc in next 10, increase”, followed by a plain dc round). Repeat until the brim is your desired width. A typical bucket hat brim is 4-6 rounds long.
Final Round (Optional but recommended): ch 1. Work 1 sc in each stitch around. This creates a clean, sturdy edge. Join with a sl st.
Fasten off and weave in all remaining ends meticulously with your yarn needle.
VI. Finishing Touches & Customization
- Blocking: Wet blocking your finished hat can make a huge difference. Gently wash it, squeeze out excess water (do not wring), and shape it over a bowl or mannequin head that matches your head size. Let it air dry completely. This will even out your stitches and define the shape of the granny squares.
- Stiffer Brim: For a less floppy brim, you can work the final round of single crochet with a smaller hook, or even crochet over a piece of millinery wire or fishing line.
- Color Play: Don’t be afraid to experiment! Use a different color for every round of the granny square, or make each square a different color for a patchwork look.
- Add a Strap: You can braid some yarn and attach it to the sides of the hat to create a chin strap.
You have now completed your beautiful, custom-made Hollow Granny Square Bucket Hat. It’s a testament to your skill and a unique accessory that you won’t find in any store. Enjoy the compliments!