 by
by Here is a detailed, long-form guide on how to crochet a beautiful square with a 3D flower motif in the center. This pattern is perfect for creating stunning afghans, pillows, bags, and more.
How to Crochet a Stunning 3D Flower Granny Square: A Detailed Step-by-Step Pattern
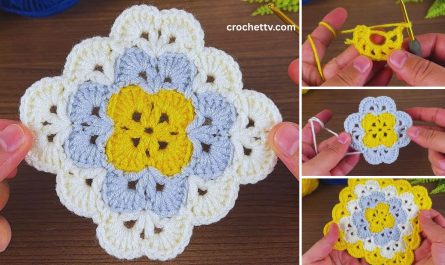
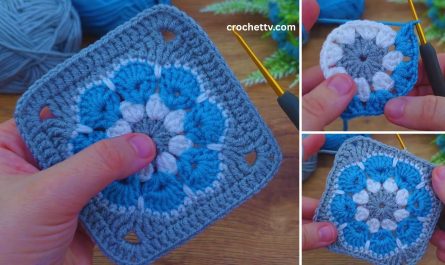
The classic granny square is a cornerstone of crochet, beloved for its simplicity and versatility. But what if you could elevate it, making it the centerpiece of your project? This guide will walk you through creating a breathtaking 3D Flower Granny Square, where a textured, multi-layered flower blossoms from the center, framed by a traditional square border.
This pattern is designed to be visually impressive yet achievable for a crocheter with basic skills. We will build the square layer by layer, color by color, resulting in a small work of art you can replicate for any project you can dream of.
I. Anatomy of the Flower Square
Understanding the construction will help you visualize the process. Our square is built in distinct stages:
- The Flower Center: A simple circle forms the pistil of our flower.
- The 3D Petals: A round of special, textured stitches (Popcorn Stitches) creates the blooming, three-dimensional petals.
- The Leafy Frame: A transitional round that begins the “squaring off” process, often done in a green color to resemble leaves peeking out from behind the flower.
- The Square Border: The final rounds that use classic granny stitch techniques to build out the square shape around the central floral motif.
II. Materials and Tools
The right materials will make your flower pop. Using different colors for each part is highly recommended.
- Yarn: Worsted weight (Aran) or DK (Double Knitting) yarn works beautifully. 100% Cotton gives great stitch definition, while Acrylic is soft, durable, and comes in many colors.
- Color A: Flower Center (e.g., Yellow, Brown) – small amount
- Color B: Flower Petals (e.g., Pink, Purple, White) – small amount
- Color C: Leaf Frame (e.g., Sage Green, Olive Green) – small amount
- Color D: Background/Border (e.g., Cream, Grey, Blue) – largest amount
- Crochet Hook: A size that corresponds to your yarn. For worsted weight yarn, a 5.00 mm (H-8) hook is a great starting point. For DK, try a 4.00 mm (G-6).
- Scissors: For cutting yarn between color changes.
- Yarn Needle (or Darning Needle): Absolutely essential for neatly weaving in the many ends you will create.
- Stitch Markers (Optional): Can be helpful for marking corners as you learn the pattern.
III. Abbreviations and Stitches (US Terminology)
This pattern uses standard US crochet terms.
- ch: chain
- st(s): stitch(es)
- sl st: slip stitch
- sc: single crochet
- dc: double crochet
- tr: treble crochet
- sp: space
- beg: beginning
- MR: Magic Ring (or Magic Circle)
Special Stitch: The Popcorn Stitch (pc)
The Popcorn Stitch creates the incredible 3D texture of our flower petals.
- Work 5 double crochet (5 dc) stitches all into the same stitch or space.
- Remove your hook from the active loop.
- Insert your hook from front to back through the top of the first double crochet you made in that group of five.
- Grab the dropped loop with your hook and pull it through the first stitch.
- This bunches the five stitches together, causing them to “pop” forward. A Popcorn Stitch is now complete. Often, you will ch 1 to secure it.
IV. Gauge and Planning
- Gauge: For a single square, gauge is less critical. However, if you’re making a blanket, you’ll want all your squares to be the same size. A finished 5-round square using worsted weight yarn and a 5.00 mm hook should be approximately 5×5 inches (12.5×12.5 cm).
- Color Planning: Choose your colors before you start. A light background (Color D) will make a brightly colored flower (Colors A, B, C) stand out beautifully.
V. The Pattern: Step-by-Step Instructions
Let’s begin creating our flower!
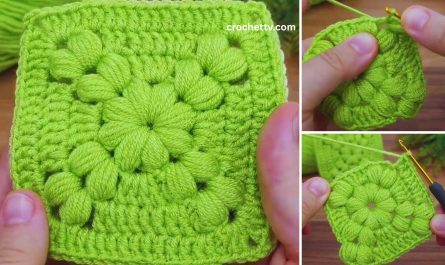
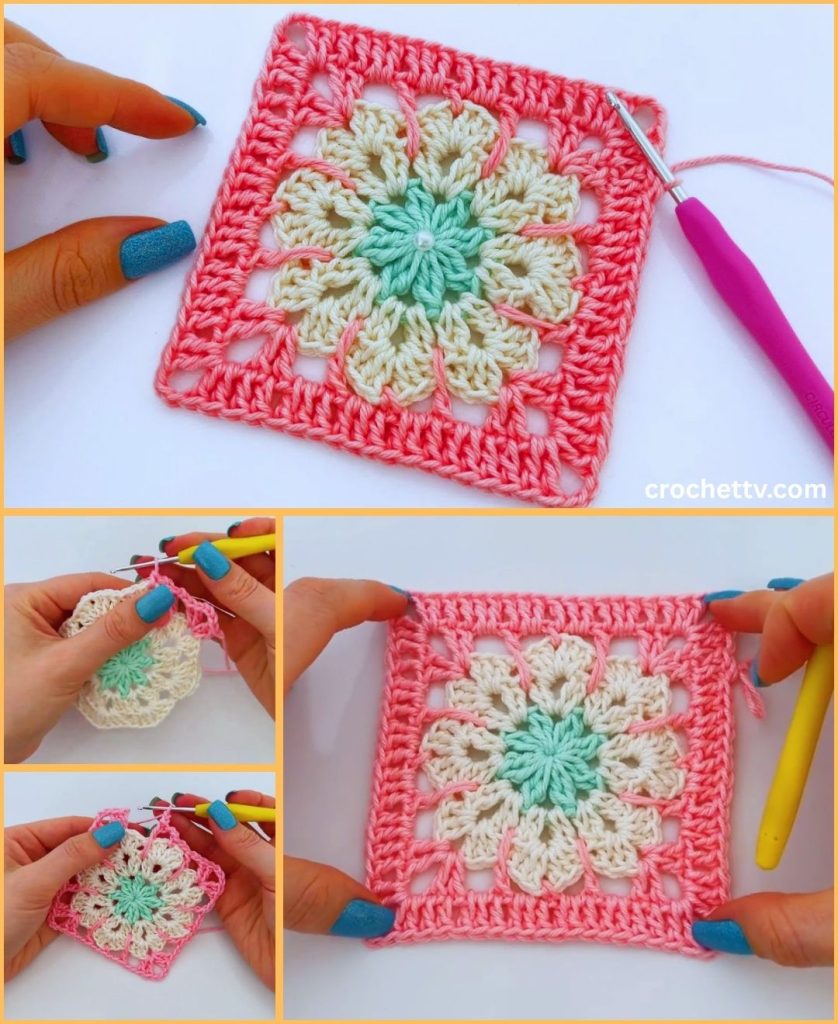
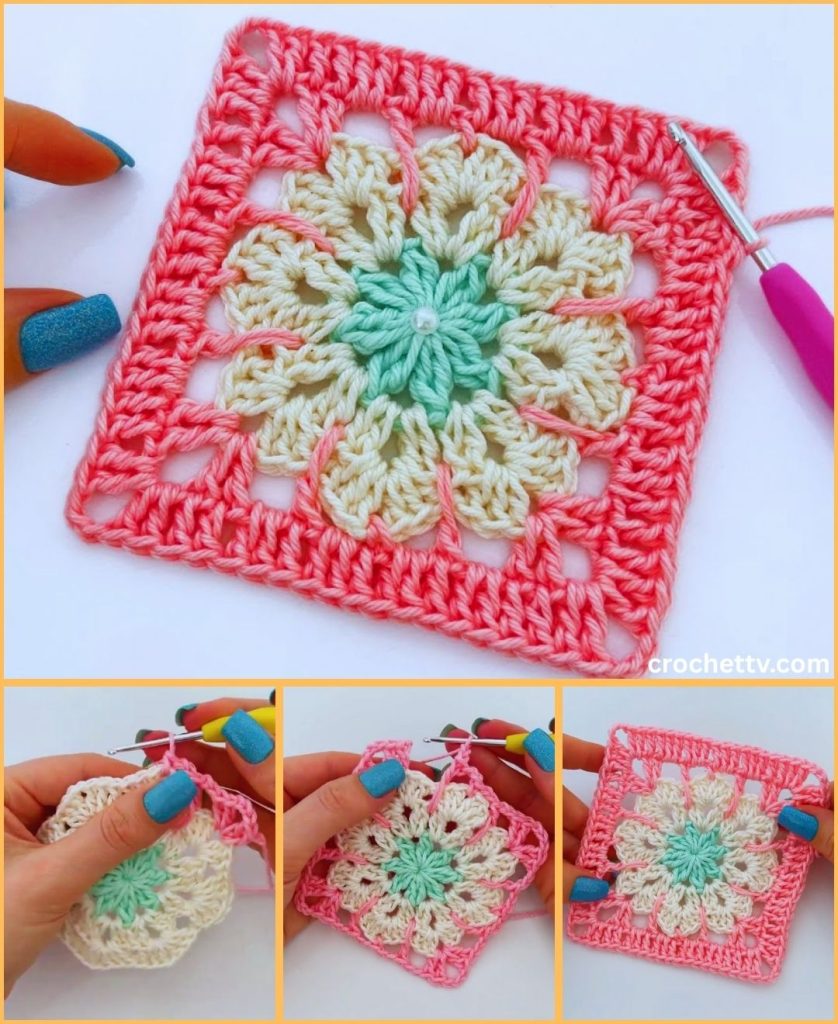
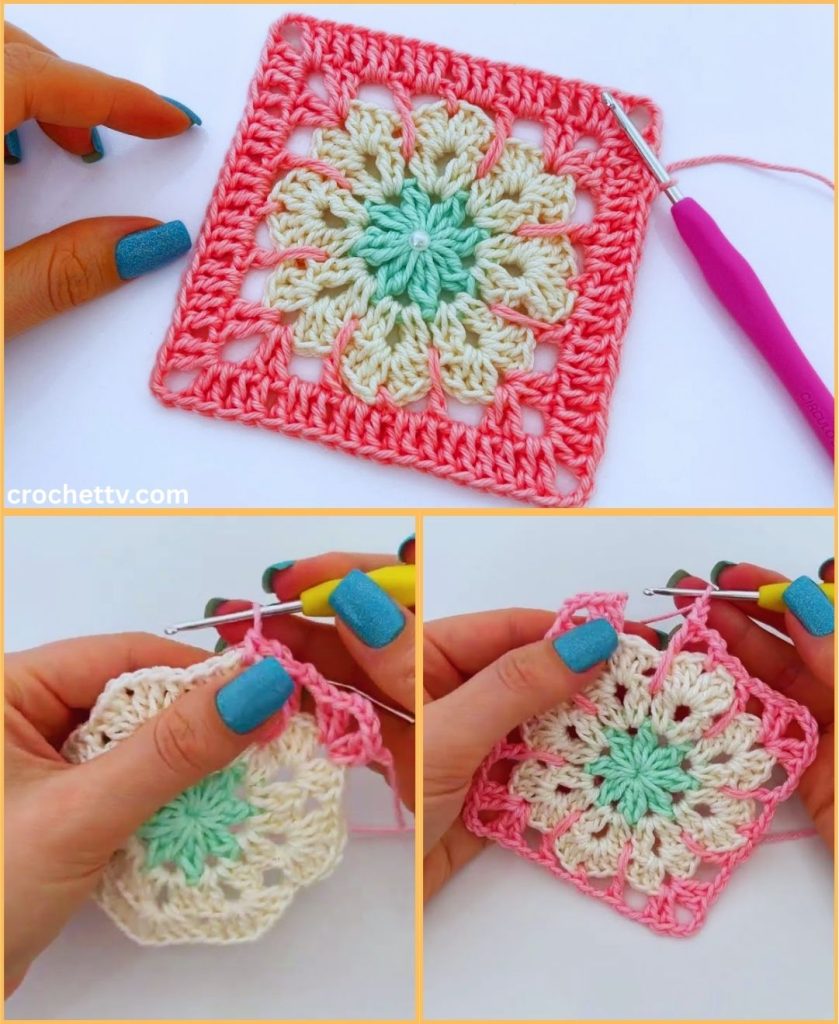
Part 1: The Flower Center
Using Color A.
Round 1: Start with a Magic Ring (MR). ch 3 (counts as your first dc). Work 15 dc into the MR. Join with a sl st to the top of the beginning ch-3. Pull the ring tight to close the center. Fasten off Color A. (16 sts).
Part 2: The 3D Petals
Join Color B with a sl st in any stitch from Round 1.
Round 2: ch 3 (counts as the first dc of your first popcorn). Work 4 dc into the same stitch. Complete the Popcorn Stitch as described above. ch 2. Skip the next stitch. In the following stitch, work one Popcorn Stitch (pc). ch 2. Repeat from * to * all the way around. You will end with a ch-2 space. Join with a sl st to the top of the first Popcorn Stitch (not the ch-3). Fasten off Color B. (You should have 8 popcorn petals and 8 ch-2 spaces).
Gently push the popcorns forward to emphasize their 3D shape.
Part 3: The Leafy Frame (Beginning to Square Off)
Join Color C with a sl st in any ch-2 space from the previous round.
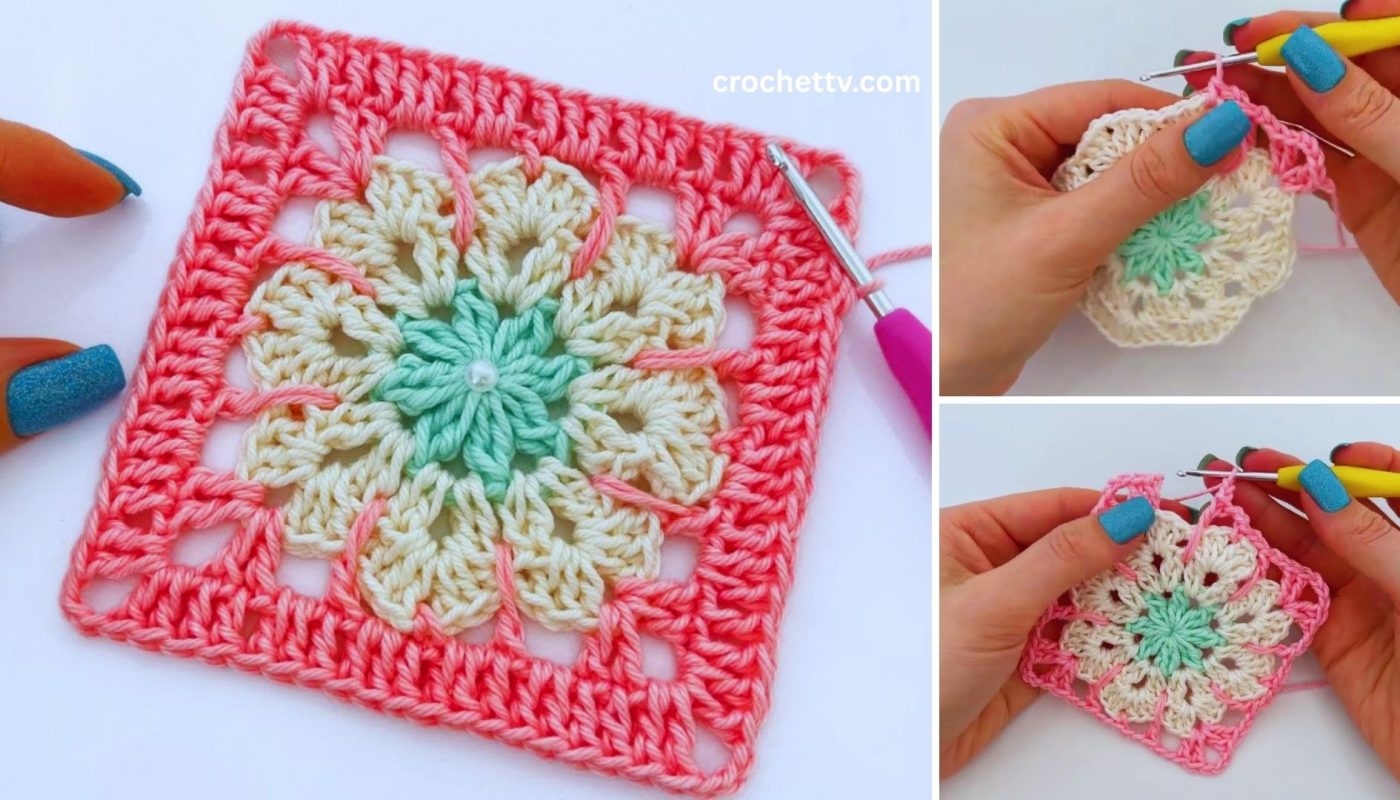
Round 3: ch 4 (counts as the first tr). In the same space, work (2 tr, ch 2, 3 tr) to create the first corner. In the next ch-2 space, work 3 dc. In the next ch-2 space, work (3 tr, ch 2, 3 tr) to create the second corner. Repeat from * to * two more times. In the last ch-2 space, work 3 dc. Join with a sl st to the top of the beginning ch-4. Fasten off Color C. (You now have a small, rounded square shape with 4 corners made of treble crochet clusters and 4 sides made of double crochet clusters).
Part 4: The Square Border
Join Color D with a sl st in any ch-2 corner space.
Round 4: ch 3 (counts as first dc). In the same corner space, work (2 dc, ch 2, 3 dc). This is your first full granny square corner. In the next space between the clusters of the previous round, work 3 dc. In the next corner ch-2 space, work a corner: (3 dc, ch 2, 3 dc). Repeat from * to * two more times. In the last space between clusters, work 3 dc. Join with a sl st to the top of the beginning ch-3. (You now have a proper square with 4 corners and two 3 dc clusters along each side).
Round 5: sl st across the next two stitches until you reach the corner ch-2 space. ch 3 (counts as first dc). In the same corner space, work (2 dc, ch 2, 3 dc). In each of the next two spaces between clusters, work 3 dc. In the next corner ch-2 space, work a corner: (3 dc, ch 2, 3 dc). Repeat from * to * all the way around. Join with a sl st to the top of the beginning ch-3.
Fasten off and proceed to the final step.
VI. Finishing Touches
This is the most critical step for a professional-looking square!
- Weave in Your Ends: Due to the multiple color changes, you will have many yarn tails. Use your yarn needle to carefully weave each tail into the back of your work, hiding it within stitches of the same color. Trim any excess. Do not just tie knots, as they can come undone.
- Blocking: Blocking is the secret to perfectly flat, uniform squares.
- Wet Blocking: Submerge your finished square in cool water and let it soak for 15 minutes. Gently squeeze out the excess water (do not wring it).
- Pinning: Lay the damp square on a foam blocking mat or a thick towel. Gently stretch it into a perfect square shape, using rust-proof pins to secure the corners and sides.
- Drying: Let it air dry completely. Once you unpin it, it will hold its shape beautifully, making it much easier to join with other squares.
VII. Project Ideas and Inspiration
Now that you’ve mastered the 3D Flower Granny Square, what can you do with it?
- Pillow Cover: Make two large squares or join several smaller ones to create a vibrant and textured cushion.
- Tote Bag: Join squares together to form the body of a beautiful market or project bag.
- Blanket or Afghan: This is the ultimate project. Create dozens of squares, experimenting with different color combinations, and join them to make a stunning, heirloom-quality blanket.
- Table Runner: Join squares in a single long strip for a beautiful decorative piece.
- Cardigan or Wall Hanging: For the more ambitious crafter, these squares can be incorporated into wearable art or home decor.
This floral square is more than just a pattern; it’s a building block for endless creativity. Take your time, enjoy the process of watching the flower bloom under your hook, and create something truly special. Happy crocheting!