 by
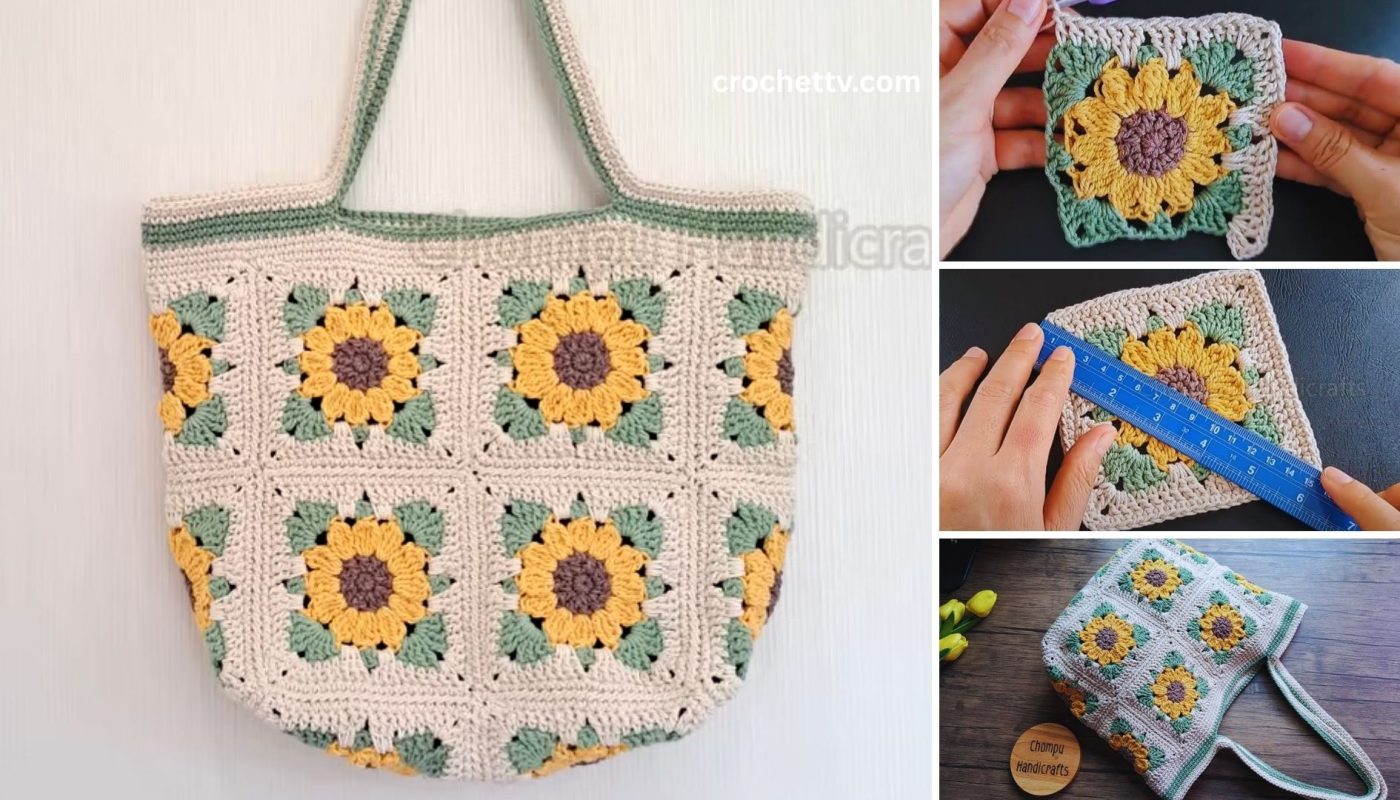
by Let’s crochet a vibrant and cheerful Sunflower Granny Square Bag! This project is a fantastic way to combine two beloved crochet elements: the classic granny square and the joyful sunflower motif. It’s an intermediate project, perfect for those comfortable with basic stitches and joining techniques.
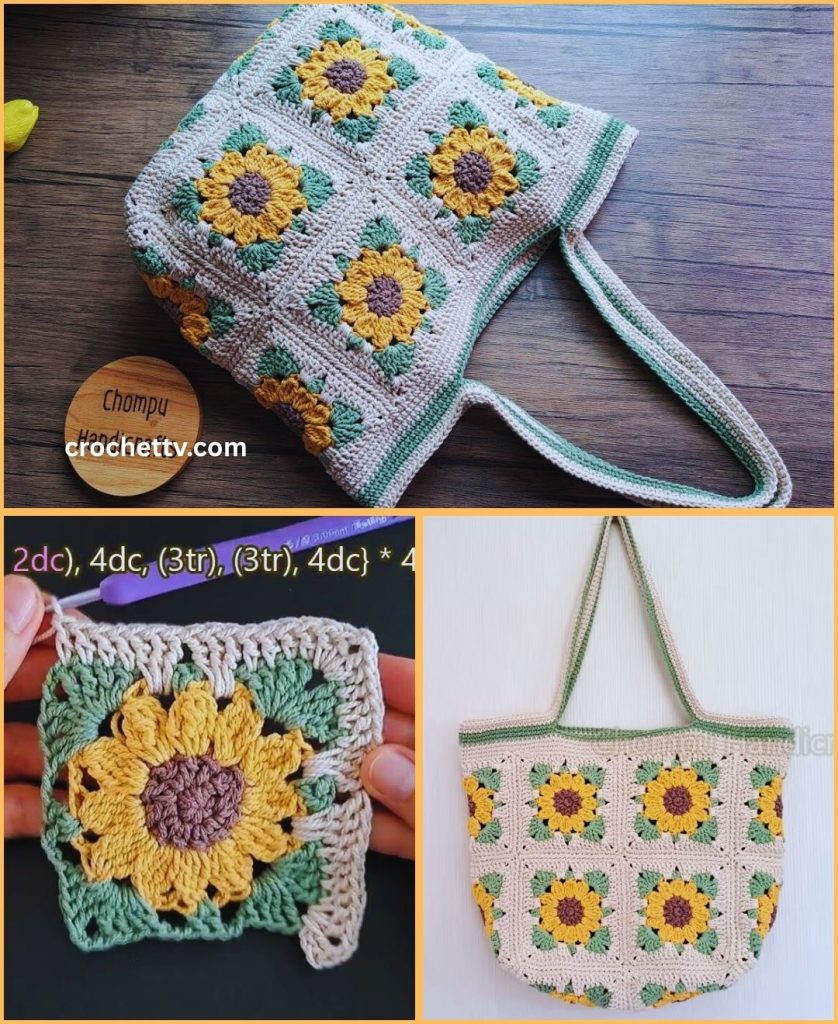
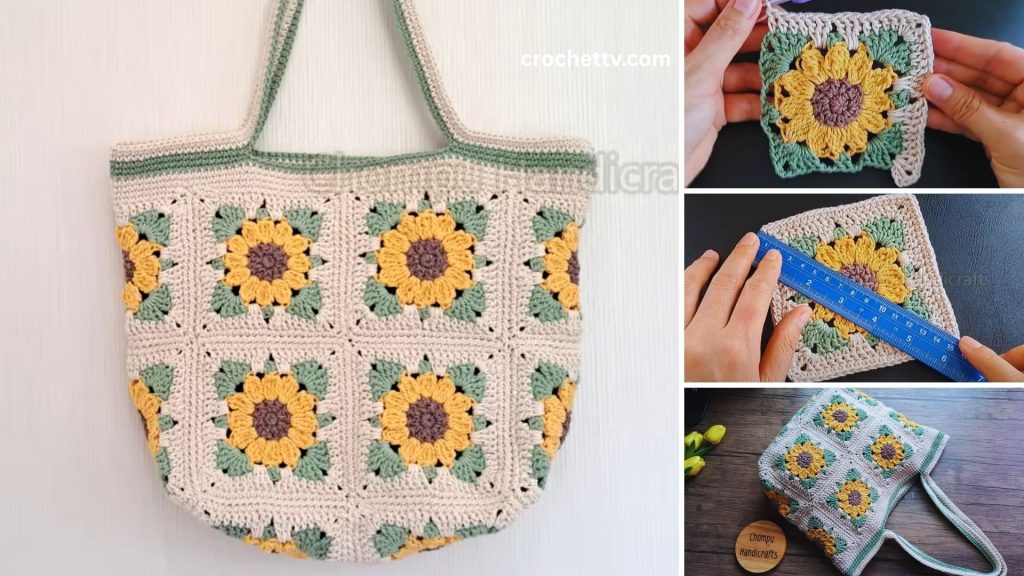
How to Crochet a Sunflower Granny Square Bag
This detailed tutorial will guide you through making individual sunflower granny squares and then assembling them into a beautiful and functional bag.
Skill Level: Intermediate
This project is ideal if you’re comfortable with:
- Chain (ch): The foundation of most crochet.
- Slip Stitch (sl st): For joining and neat finishes.
- Single Crochet (sc): A compact stitch.
- Half Double Crochet (hdc): A medium-height stitch.
- Double Crochet (dc): A taller stitch, common in granny squares.
- Treble Crochet (tr) / Triple Crochet: An even taller stitch, often used for petals.
- Puff Stitch (or similar textured stitch): Essential for the sunflower’s center.
- Magic Ring (MR) / Chain-2 Start: For a neat center hole.
- Working in rounds: Crocheting in a circular fashion.
- Color changes: Neatly switching between yarn colors.
- Fastening off: Securing your yarn.
- Weaving in ends: The essential finishing touch.
- Basic seaming: Joining squares with a yarn needle or slip stitch.
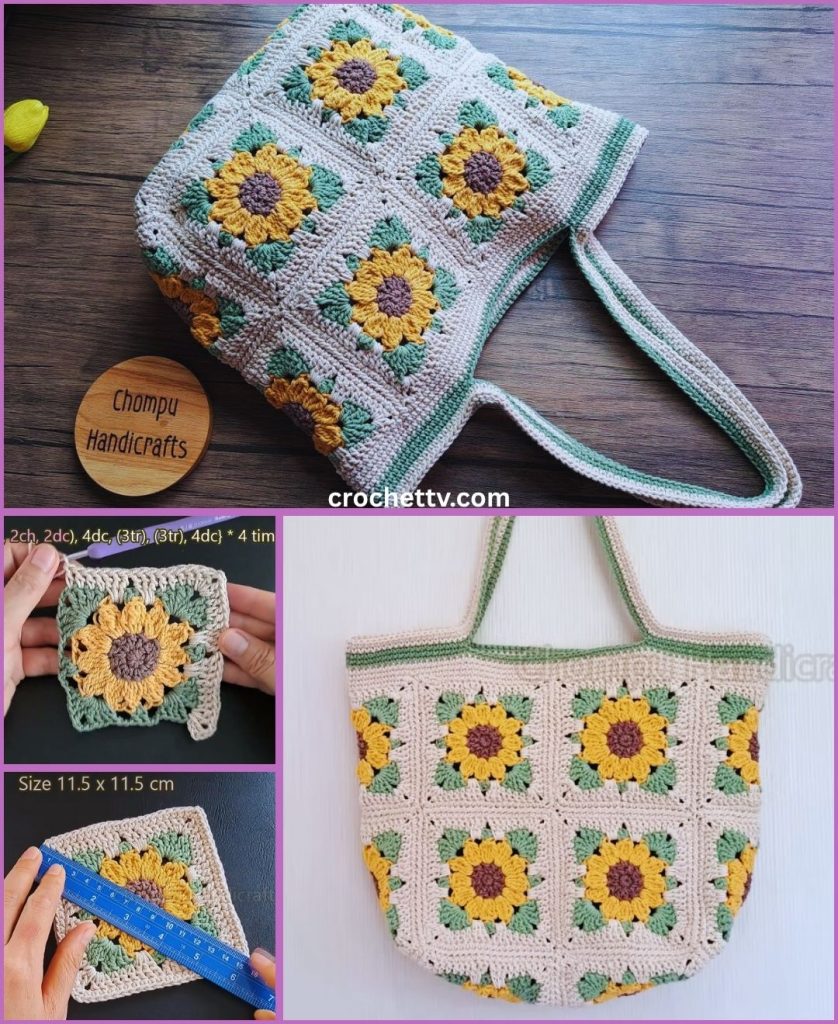
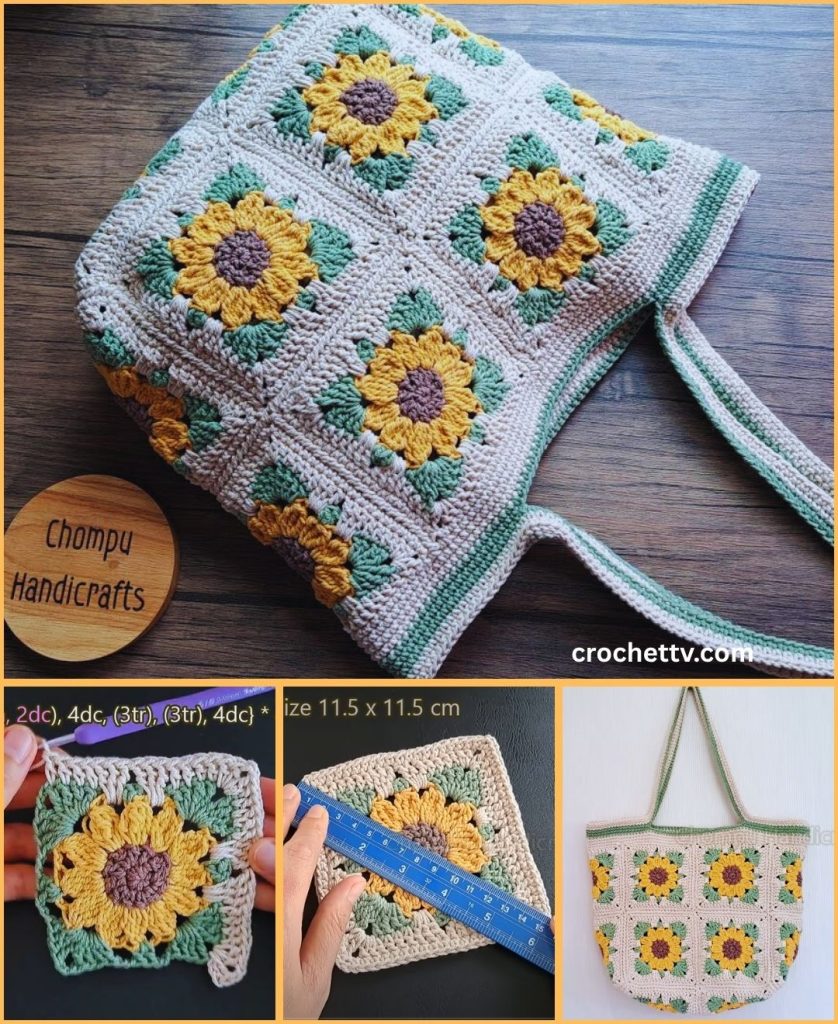
Finished Bag Dimensions (Approximate):
A bag made with 13 sunflower granny squares (12 for the body, 1 for the base) using 6-inch (15 cm) squares will result in a bag roughly:
- Width: 12 inches (30 cm)
- Height: 12 inches (30 cm) (excluding handles)
- Depth: 6 inches (15 cm)
You can adjust the size of your bag by making larger or smaller squares, or by making more or fewer squares.
Materials You’ll Need:
Gathering your materials beforehand ensures a smooth and enjoyable crocheting session.
- Yarn: Approximately 500-700 yards (457-640 meters) of Worsted Weight (Medium #4) Cotton or Cotton Blend Yarn.
- Why Cotton/Blend? Cotton is excellent for bags as it provides good structure, durability, and minimizes stretch.
- Color Choices:
- Sunflower Center Color: Small amount of brown or dark brown (e.g., 50-70 yards).
- Petal Color: Small amount of yellow or golden yellow (e.g., 80-100 yards).
- Leaf/Accent Green Color: Small amount of green (e.g., 70-90 yards).
- Granny Square Background Color: The majority of your yarn. This could be cream, white, black, or a complementary color (e.g., 300-400 yards).
- Crochet Hook: Size H/5.0mm. This hook size generally works well with worsted weight yarn for a sturdy fabric. Adjust if your tension is very loose or very tight.
- Yarn Needle (Tapestry Needle): Essential for seamlessly weaving in all your loose yarn tails (you’ll have quite a few with color changes!) and for joining the granny squares. It has a blunt tip and a large eye.
- Scissors: Any sharp pair.
- Stitch Markers (Optional but Recommended): Helpful for marking corners or the first stitch of a round.
Part 1: How to Crochet a Sunflower Granny Square
This is the main component of your bag. We’ll create a textured sunflower within a classic granny square border. You will need 13 of these squares for the suggested bag size.
Let’s Crochet a Sunflower Granny Square!
A. The Sunflower Center (Brown Yarn)
This forms the textured middle of your sunflower. We’ll use a puff stitch (or a similar cluster stitch for texture).
- Starting Ring (Magic Ring method – Recommended for neat center):
- Make a Magic Ring (MR) with your Sunflower Center Color yarn (e.g., Brown).
- (Alternative start): Chain 4, then slip stitch (sl st) into the first chain to form a ring.
- Round 1 (Puff Stitches):
- Chain 2 (ch 2 – does NOT count as a stitch, just height).
- Work 8 Puff Stitches into the magic ring.
- How to make a Puff Stitch (example): Yarn over, insert hook into ring, yarn over, pull up a loop (3 loops on hook). Yarn over, insert hook into ring, yarn over, pull up a loop (5 loops on hook). Yarn over, insert hook into ring, yarn over, pull up a loop (7 loops on hook). Yarn over, pull through all 7 loops on hook. Chain 1 to close the puff stitch.
- After the 8th puff stitch, gently pull the tail of the magic ring tight to close the center hole.
- Slip stitch (sl st) into the top of the first puff stitch (or the ch-1 closing if you prefer) to join the round. (8 puff stitches, 8 ch-1 spaces).
- Fasten off Brown yarn, leaving a 4-inch (10 cm) tail.
B. The Petals (Yellow Yarn)
This layer forms the bright yellow petals of your sunflower.
- Joining Yellow Yarn:
- Join Petal Color yarn (e.g., Yellow) with a slip stitch (sl st) into any chain-1 space from Round 1.
- Round 2 (Petals):
- Chain 2 (ch 2 – does NOT count as a stitch).
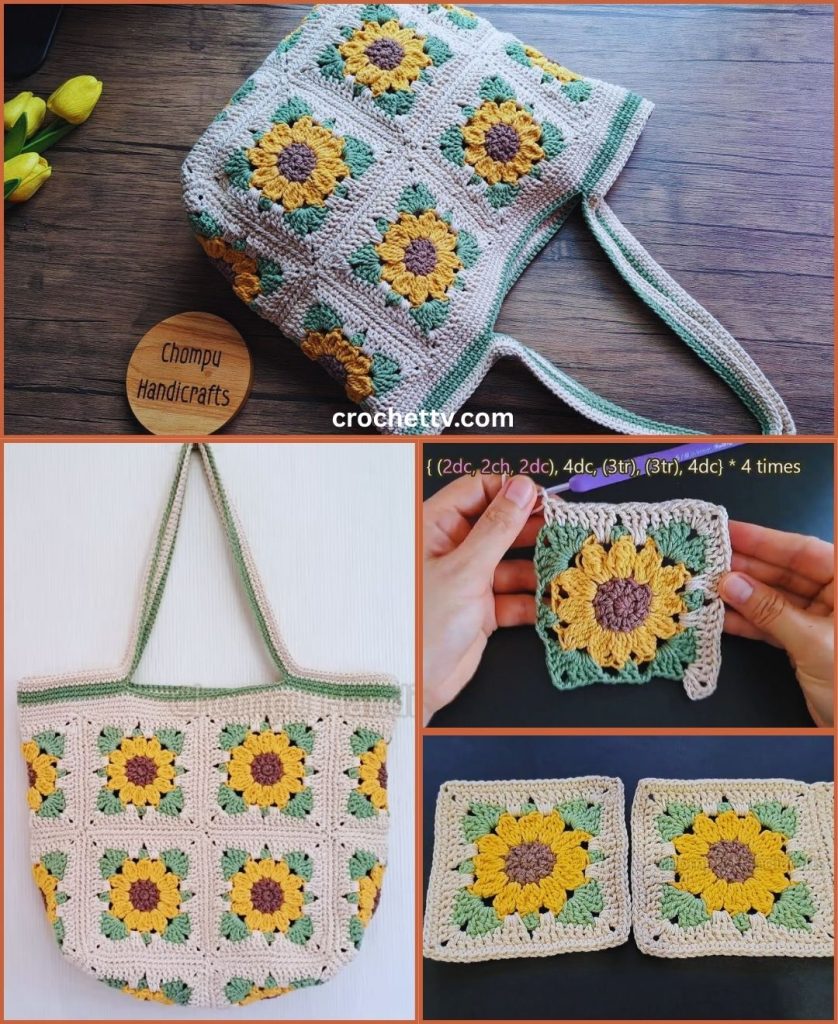
- Work (2 dc, ch 2, 2 dc) into the same chain-1 space. (This creates your first petal group, sort of).
- *Work (2 dc, ch 2, 2 dc) into the next chain-1 space.*
- Repeat from * to * around the entire round. (You should have 8 petal groups).
- Slip stitch (sl st) into the top of the beginning ch 2 to join the round.
- Fasten off Yellow yarn, leaving a 4-inch (10 cm) tail.
C. The Green Layer (Green Yarn)
This layer starts to square off your circle, creating the green “leafy” base for the sunflower.
- Joining Green Yarn:
- Join Green Color yarn with a slip stitch (sl st) into any chain-2 space from Round 2.
- Round 3 (Squaring Off with Green):
- Chain 3 (ch 3 – counts as 1 dc).
- Work (2 dc, ch 2, 3 dc) into the same chain-2 space. (This is your first corner cluster).
- *Chain 1 (ch 1 – side space).
- Work 3 hdc into the next chain-2 space.
- Chain 1.
- In the next chain-2 space: Work (3 dc, ch 2, 3 dc).* (This forms your next corner).
- Repeat from * to * around. You should have 4 corners (3 dc, ch 2, 3 dc) and 4 side sections (3 hdc) separated by ch-1 spaces.
- Slip stitch (sl st) into the top of the beginning ch 3 to join the round.
- Fasten off Green yarn, leaving a 4-inch (10 cm) tail.
D. The Granny Square Border (Background Color)
This transforms your sunflower motif into a full granny square, making it easy to join to others.
- Joining Background Color:
- Join your Background Color yarn with a slip stitch (sl st) into any chain-2 corner space from the green Round 3.
- Round 4 (First Granny Round):
- Chain 3 (ch 3 – counts as your first dc). Work 2 dc into the same corner space.
- Chain 2 (ch 2 – corner space).
- Work 3 dc into the same corner space. (Completes first corner).
- *Chain 1 (ch 1 – side space).
- Work 3 dc into the next chain-1 space (from Round 3).
- Chain 1.
- In the next chain-2 corner space: Work (3 dc, ch 2, 3 dc).* (Completes a corner).
- Repeat from * to * around the remaining two sides and corners.
- Chain 1 (for the last side space).
- Slip stitch (sl st) into the top of the beginning ch 3 to join the round.
- Round 5 (Second Granny Round – Optional, for larger squares):
- Chain 3 (ch 3 – counts as your first dc). Work 2 dc into the same corner space.
- Chain 2.
- Work 3 dc into the same corner space.
- *Chain 1.
- Work 3 dc into the next chain-1 space (from Round 4).
- Chain 1.
- Work 3 dc into the next chain-1 space.
- Chain 1.
- In the next chain-2 corner space: Work (3 dc, ch 2, 3 dc).*
- Repeat from * to * around.
- Chain 1 (for the last side space).
- Slip stitch (sl st) into the top of the beginning ch 3 to join the round.
- Fasten off, leaving a 6-inch (15 cm) tail.
- Repeat!
- Make a total of 13 Sunflower Granny Squares following these steps.
- Weave in all ends for each square as you finish them. This is crucial! With many color changes, doing it as you go saves a lot of time and effort at the end.
Part 2: Assembling Your Sunflower Granny Square Bag
Once you have all your beautiful squares, it’s time to put them together!
- Layout Your Squares:
- Lay out your 13 finished squares on a flat surface in your desired arrangement.
- Bag Body: You’ll use 12 squares for the main body. Arrange them as a flat rectangle, 4 squares wide and 3 squares tall. This forms the front, back, and two sides.
- Bag Base: The remaining 1 square will be for the base of the bag.
- Joining the Squares:
- There are several methods for joining granny squares. For a sturdy bag, the Whip Stitch (using a yarn needle) or Slip Stitch Join (using your hook) are good choices. A slip stitch join creates a slight ridge, which can add to the bag’s structure.
- Whip Stitch (using a yarn needle – for a flatter seam):
- Cut a long piece of yarn (about 3 times the length of the edge you’re joining) in your background color. Thread it onto your yarn needle.
- Place two squares right sides facing each other (so the backs are facing out). Align the stitches along the edge you want to join.
- Insert your needle from back to front through both loops of the first stitch/space on both squares. Pull the yarn through, leaving a tail to weave in later.
- Continue by inserting your needle from back to front through both loops of the next corresponding stitch/space on both squares. Pull the yarn through.
- Repeat this process, always going in the same direction, through both loops of each corresponding stitch/space along the edge. Keep your tension consistent but not too tight, or it will pucker.
- Slip Stitch Join (using your hook – for a more defined seam):
- Place two squares wrong sides facing each other (so the right sides are facing out). Align the stitches along the edge you want to join.
- Join your background yarn with a slip stitch into the corner space of both squares.
- *Insert your hook through both loops of the next corresponding stitch on both squares, yarn over, and pull through all loops on your hook (creating a slip stitch).*
- Repeat from * to * across the entire edge, joining into each stitch and and working into the corner spaces.
- This creates a slightly raised seam.
- Assemble the Bag Body:
- First, join your 12 body squares into a long strip (e.g., three rows of four squares each). Join them horizontally.
- Then, join these strips vertically to each other until you have a flat panel of 4×3 squares.
- Fold this panel into a tube, joining the short ends to form the side seams of your bag.
- Attach the Base:
- Take your single base square. Align it with the bottom opening of your bag body.
- Using either the whip stitch or slip stitch join, carefully attach the base square to all four sides of the bag body. This will require working around corners, making sure your stitches line up.
Part 3: Adding the Handles
For a sturdy bag, we’ll crochet strong, integrated handles directly onto the top edge.
- Prepare for Handles:
- With the bag’s right side facing out, join your Background Color yarn with a slip stitch (sl st) into any stitch at the top edge of the bag.
- Chain 1 (does NOT count as a stitch).
- Work 1 round of single crochet (sc) evenly around the entire top edge of the bag. Work 1 sc into each dc stitch and 1 sc into each ch-1 space. In the corners (where squares meet), work a sc, skip the join, then a sc into the next corner. Aim for a smooth, even edge. Slip stitch (sl st) into the first sc to join.
- Handle Placement Round:
- Chain 1.
- Work a number of sc stitches (e.g., 10-15 sc) to create the space before the first handle. The exact number will depend on your square size and desired handle position. You want them to be centered.
- Chain 60 (ch 60 – this creates a good shoulder-length handle. Adjust this length for a shorter or longer handle).
- Skip 20-25 stitches on the bag’s top edge (this creates the opening for the arm).
- Work a number of sc stitches (e.g., 20-30 sc) across the top of the bag to create the space between the handles.
- Chain 60 (ch 60 – for the second handle, matching the first).
- Skip 20-25 stitches on the bag’s top edge.
- Work the remaining sc stitches back to the start of the round.
- Slip stitch (sl st) into the first sc to join.
- Handle Strengthening Rounds (2-3 rounds recommended):
- Chain 1.
- Work 1 sc into each sc stitch along the top edge of the bag.
- When you reach a chain-handle loop, work 1 sc into each chain of the loop. (e.g., 60 sc around the chain). This creates a very sturdy and thick handle.
- Continue working sc stitches into the bag top and around the second handle.
- Slip stitch (sl st) into the first sc to join.
- Repeat this round one or two more times to make the handles even stronger and more comfortable.
- Fasten Off:
- Cut your yarn, leaving a 6-inch (15 cm) tail.
- Yarn over with your hook, pull the cut tail completely through the loop left on your hook, and gently tug to secure the knot.
Part 4: Final Finishing Touches
- Weave in ALL Remaining Ends:
- This is the most time-consuming but crucial step for a beautiful and durable bag. With all the color changes and joining, you’ll have many ends. Take your time to weave them neatly and securely into the corresponding color stitches.
- Blocking (Highly Recommended):
- Blocking will help your individual squares lie flat, make your seams look neater, and allow the bag to hold its shape beautifully.
- Method: Gently mist the entire bag evenly with cool water using a spray bottle until it’s damp (not soaking wet). You can also gently wash it according to your yarn’s care instructions and then gently squeeze out excess water.
- Stuff the bag lightly with towels or tissue paper to help it hold its intended shape. Gently tug and shape the corners and handles.
- Allow the bag to air dry completely and thoroughly. This might take a day or two. Do not move it until it’s bone dry.
- Optional: Add a Fabric Lining:
- For extra durability and to prevent small items from slipping through stitches, consider adding a fabric lining. This requires basic sewing skills. Measure the finished dimensions of your crocheted bag. Cut fabric pieces slightly larger, sew them into a matching pouch, and then hand-stitch or machine-stitch it inside your crocheted bag.
Congratulations! You’ve successfully crocheted and assembled a gorgeous and unique Sunflower Granny Square Bag! This project is a wonderful way to express your creativity and create a practical, cheerful accessory. Enjoy using your beautiful handmade creation!