 by
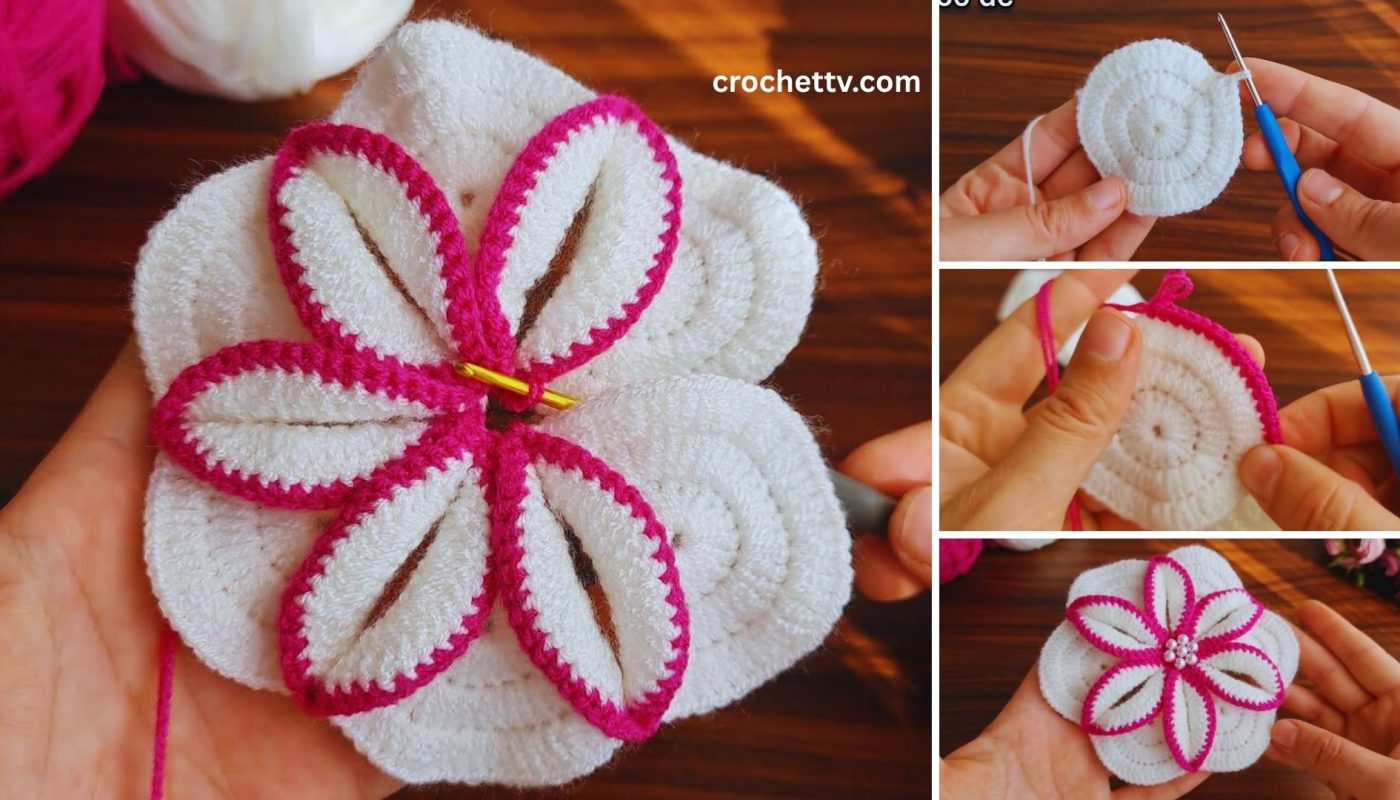
by Let’s create a beautiful and captivating 3D flower with two colors! This tutorial is designed for beginners who want to add a new dimension to their crochet skills. You’ll learn how to build up layers of petals, using two different colors to create a stunning, realistic flower that truly pops. These 3D flowers are perfect for embellishing hats, bags, blankets, or even as stand-alone decorative pieces.
How to Crochet a 3D Flower with Two Colors (Step-by-Step Tutorial)
This detailed guide will walk you through making a lovely, textured flower using basic crochet stitches and a clever layering technique. We’ll focus on creating dimension and showcasing your chosen colors beautifully.
Skill Level: Advanced Beginner / Intermediate
This project is ideal if you’re comfortable with:
- Chain (ch): The basic foundation stitch.
- Slip Stitch (sl st): For joining rounds and neatening.
- Single Crochet (sc): A dense stitch.
- Half Double Crochet (hdc): A stitch taller than single crochet.
- Double Crochet (dc): A common, taller stitch.
- Magic Ring (MR) / Chain-2 Start: For a neat center hole.
- Working in rounds: Crocheting in a circular manner.
- Color changes: Neatly switching between yarn colors.
- Working into specific stitches/spaces (e.g., behind stitches): This adds the 3D effect.
- Fastening off: Securing your yarn.
- Weaving in ends: The essential finishing touch.
Finished 3D Flower Dimensions (Approximate):
Using worsted weight yarn and the suggested hook, your finished 3D flower will typically measure around 2.5-3.5 inches (6-9 cm) in diameter, depending on your tension and how much you fluff the petals.
Materials You’ll Need:
Gathering your materials beforehand ensures a smoother crocheting experience.
- Yarn: Approximately 15-25 yards (14-23 meters) of Worsted Weight (Medium #4) Yarn.
- Color A (Center & Base): This will be the innermost color of your flower and the foundation for the petals (e.g., yellow for a classic center, or a contrasting color like green if you want it to look like a sepals layer).
- Color B (Petals): This will be the main color for your beautiful, full petals (e.g., pink, red, purple, white).
- Crochet Hook: Size H/5.0mm. This hook size works well with worsted weight yarn to create a nice stitch definition and texture.
- Yarn Needle (Tapestry Needle): Essential for seamlessly weaving in your loose yarn tails. It has a blunt tip and a large eye, making it easy to thread yarn through.
- Scissors: Any sharp pair of scissors for cutting your yarn.
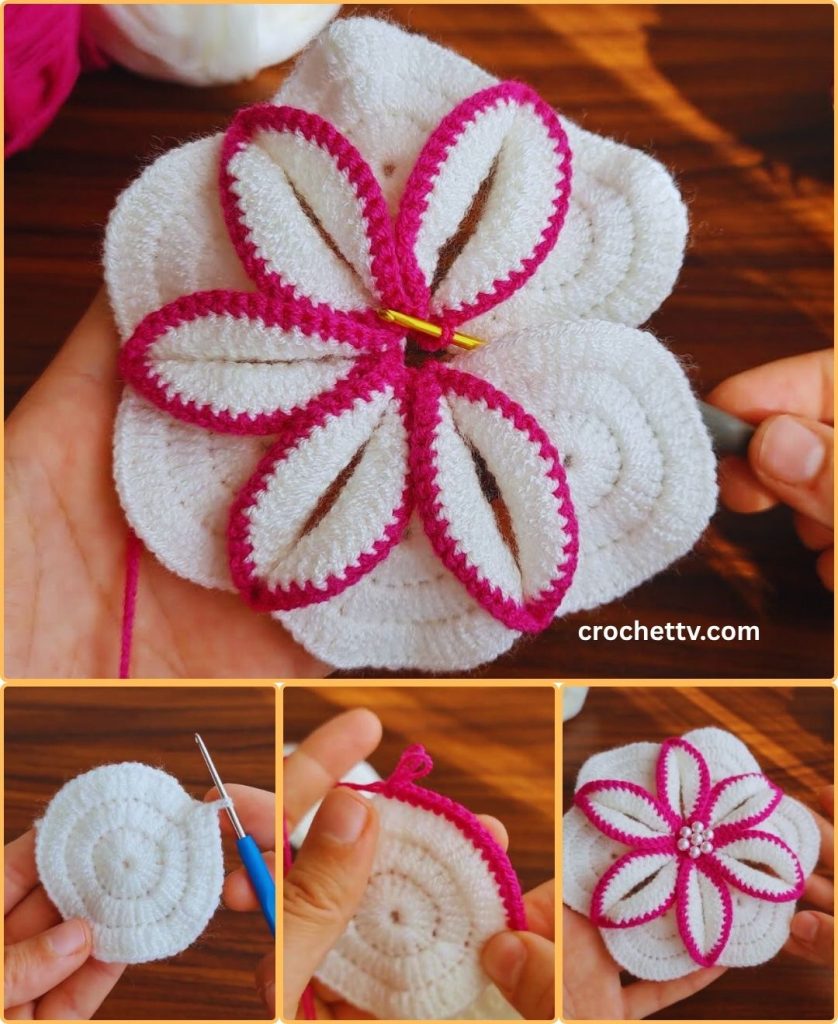
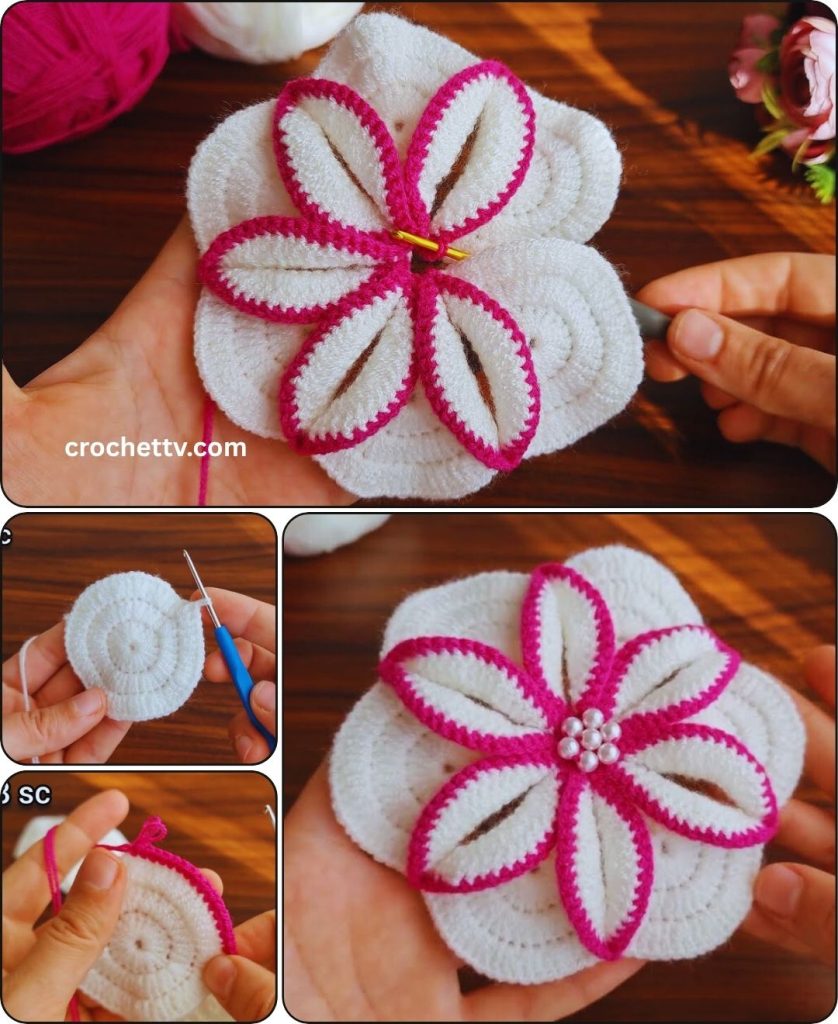
Understanding the 3D Flower Construction: Layered Petals
This 3D flower is built in distinct layers, using clever techniques to make the petals stand out.
- Center: You’ll start with a flat center in Color A.
- Petal Base (Back Loop Only/Behind Stitches): The next round, in Color A, creates the foundation for your first layer of petals. By working into specific parts of the stitches (like the back loop or behind stitches), you leave the front loops free for the next petal layer.
- First Petal Layer: You’ll attach Color B and work a series of shells into the spaces created in the previous round, forming the first, smaller layer of petals.
- Second Petal Layer: You’ll work behind the first layer of petals, into the stitches from an even earlier round, to create a larger, fuller second layer of petals, pushing the first layer forward for a true 3D effect.
Let’s Crochet Your 3D Flower!
Follow these steps carefully. The key to a beautiful 3D flower is understanding where to place your hook for each layer and maintaining consistent tension.
Part 1: The Flower Center (Color A)
We’ll start with the very middle of your flower, forming a neat, flat circle.
- Starting with Color A:
- Begin with a slip knot and place it onto your H/5.0mm crochet hook.
- Magic Ring (MR) Start: Create a magic ring. This makes a nice, tight center.
- (Alternative start if Magic Ring is tricky): Chain 4, then slip stitch (sl st) into the first chain to form a small ring.
- Round 1: Chain 2 (ch 2 – counts as your first half double crochet (hdc)). Work 9 more half double crochet (hdc) stitches into the center of the ring. You’ll have 10 hdc stitches total.
- (If using Chain-4 start): Work 10 hdc stitches into the center of the chain-4 ring.
- If using a magic ring, gently pull the tail tightly to close the center hole.
- Slip stitch (sl st) into the top of the beginning Chain 2 to join the round.
- Do NOT fasten off Color A yet!
Part 2: Petal Foundation (Color A)
This round creates the “backbone” for your petals. We’ll work into specific parts of the stitches to prepare for the 3D effect.
- Round 2 (Working in Back Loops Only / Preparing for Petals):
- Chain 1 (ch 1 – does NOT count as a stitch).
- Work 2 single crochet (sc) stitches into the back loop only (BLO) of the same stitch where you just joined (the top of the beginning ch 2 from Round 1).
- Work 2 sc into the BLO of each remaining hdc stitch around the round. You’ll have 20 sc stitches total.
- Why BLO? Working into the back loop leaves the front loop of each stitch visible on the right side of your work. These front loops will be used later to attach the larger, second layer of petals, which is how we get the 3D effect!
- Slip stitch (sl st) into the first single crochet stitch you made at the beginning of this round to join.
- Fasten off Color A, leaving a 4-inch (10 cm) tail for weaving in.
Part 3: First Layer of Petals (Color B)
Now we’ll add your first set of beautiful petals, using your second color.
- Join Color B:
- Locate the chain-1 space where you joined Round 2.
- Join Color B yarn with a slip stitch (sl st) into any of the single crochet stitches from Round 2. You will be working your petals into these stitches.
- Round 3 (Small Petals):
- *In the same stitch where you just joined: (Chain 2, 2 double crochet (dc), Chain 2, slip stitch). This forms one petal.
- Skip the next stitch.
- Slip stitch into the next stitch.*
- Repeat from * to * around the round. You should create 10 petals evenly spaced around your coaster.
- Tip: If you find your petals are too close or too far apart, adjust the “skip” count slightly. The goal is 10 petals.
- After the 10th petal, slip stitch one last time into the very first slip stitch you made when joining this color at the beginning of this round, to really secure the round.
- Fasten Off:
- Cut your yarn, leaving a 4-6 inch (10-15 cm) tail.
- Yarn over with your hook, pull the cut tail completely through the loop left on your hook, and gently tug to secure the knot.
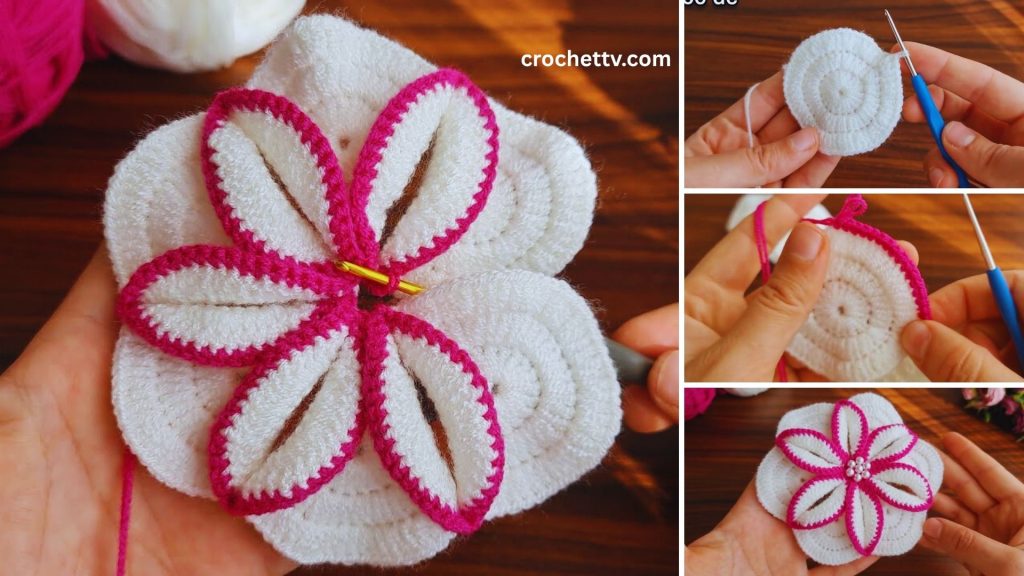
Part 4: Second Layer of Petals (Color B)
This is where the true 3D effect comes in! You’ll create a second, larger layer of petals behind the first layer.
- Re-Join Color B (or use a fresh piece):
- Turn your flower over to the back side slightly. You will see the unused front loops from Round 1 (the 10 hdc stitches). These are the key to attaching your second layer.
- Join Color B yarn with a slip stitch (sl st) into any of the unused front loops from Round 1.
- Round 4 (Large Petals – working behind Round 3):
- *In the same unused front loop where you just joined: (Chain 3, 3 double crochet (dc), Chain 3, slip stitch). This forms one larger petal.
- Skip the next unused front loop.
- Slip stitch into the next unused front loop.*
- Repeat from * to * around the round. You should create 5 petals in this layer, as you only have 10 front loops from Round 1 (each petal uses 2 front loops to spread out).
- Tip: This might feel a little awkward at first as you’re working “behind” the previous petals. Be patient and take your time to locate the correct front loops.
- After the 5th petal, slip stitch one last time into the very first slip stitch you made when joining this color at the beginning of this round, to really secure the round.
- Fasten Off:
- Cut your yarn, leaving a 4-6 inch (10-15 cm) tail.
- Yarn over with your hook, pull the cut tail completely through the loop left on your hook, and gently tug to secure the knot.
Part 5: Final Finishing Touches
- Weave in All Ends:
- This is crucial for a neat, durable, and professional-looking 3D flower. You’ll have tails from your starting ring, your color changes, and the final fasten-off.
- Thread each yarn tail onto your yarn needle.
- Carefully weave the tail into the stitches of the same color on the back of your flower. Go in one direction for a few stitches (about 1-2 inches / 2.5-5 cm), then subtly change direction (e.g., weave back through some of the same stitches diagonally or perpendicularly) to “lock” the tail in place and prevent it from unraveling.
- Trim any excess yarn close to the fabric, being careful not to cut any of your actual stitches.
- Fluff and Shape:
- Gently use your fingers to fluff and arrange the petals. Push the inner petals forward and let the outer petals spread out to enhance the beautiful 3D effect.
- Blocking (Optional):
- While not as critical as for flat coasters, light blocking can help even out tension. Gently mist with water and let air dry, shaping with your fingers as it dries. Avoid pinning too tightly, as you want to maintain the 3D quality.
Congratulations! You’ve successfully crocheted a beautiful and intricate 3D flower with two colors! This project demonstrates some more advanced techniques like working into specific loops and creating layered effects. Your finished flower is ready to add a gorgeous, textured accent to any of your crochet creations or stand alone as a decorative piece!