by
by It looks like you’re interested in making a crochet tote bag and a crochet wallet! These are both fantastic projects for crocheters of all skill levels, and they’re incredibly practical.
Since you’ve asked for both a tote bag and a wallet, I’ll provide a detailed, step-by-step tutorial for each. You can choose which one you’d like to make first, or even make both to create a coordinating set!
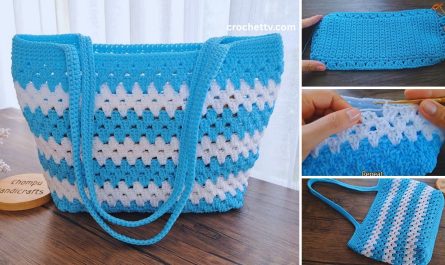
How to Make a Crochet Tote Bag (Step-by-Step Tutorial)
This tutorial will guide you through creating a sturdy and stylish tote bag, perfect for groceries, beach days, or everyday use. We’ll focus on a strong base, simple body stitches, and comfortable handles, making it very beginner-friendly.
Skill Level: Beginner
This project is ideal if you’re comfortable with (or ready to learn!):
- Chain (ch): The basic foundation.
- Slip Stitch (sl st): For joining rounds.
- Single Crochet (sc): A dense and sturdy stitch, great for bags.
- Half Double Crochet (hdc): A slightly taller stitch that creates a nice fabric.
- Working in rounds: Crocheting in a circular fashion.
- Fastening off: Securing your yarn.
- Weaving in ends: The essential finishing touch.
Finished Tote Bag Dimensions (Approximate):
Using worsted weight yarn and the suggested hook, your finished tote bag will typically measure around:
- Base: 10 inches (25 cm) wide by 3 inches (7.5 cm) deep oval
- Height: 10-12 inches (25-30 cm) (excluding handles)
- Handles: 8-10 inches (20-25 cm) tall loop
You can easily adjust the size by changing the starting chain length for the base or the number of rounds for the body.
Materials You’ll Need:
- Yarn: Approximately 400-500 yards (365-457 meters) of Worsted Weight (Medium #4) Cotton or Cotton Blend Yarn. Cotton is highly recommended for bags due to its durability and shape retention.
- Crochet Hook: Size H/5.0mm.
- Yarn Needle (Tapestry Needle): For weaving in ends.
- Scissors:
- Stitch Marker (Optional but Recommended): Helpful for marking the first stitch of each round when working in continuous spirals.
Let’s Crochet Your Tote Bag!
We’ll build this bag from the bottom up: starting with an oval base, then working the body of the bag upwards, and finally adding simple, integrated handles.
Part 1: The Oval Base
This creates a strong, flat bottom for your tote.
- Starting Chain:
- Make a slip knot and place it onto your H/5.0mm crochet hook.
- Chain (ch) 21.
- Round 1 (Working around the chain):
- Work 2 single crochet (sc) stitches into the 2nd chain from your hook. Optionally, place a stitch marker in the first sc you just made.
- Work 1 sc into each of the next 18 chains.
- In the last chain (the 21st chain from your hook), work 4 sc stitches. This turns the corner neatly.
- Now, work back down the other side of your starting chain, into the bottom loops: 1 sc into each of the next 18 stitches.
- In the the same chain where you placed your first 2 sc, work 2 sc stitches. This completes the turn.
- You should have 44 sc stitches total. Do NOT join with a slip stitch yet; you’ll work in continuous rounds for the base.
- Round 2 (Continuing the Oval Shape):
- Work 2 sc into the first stitch of the round (where your stitch marker is). Move your stitch marker to this new first sc.
- Work 1 sc into the next stitch.
- Work 1 sc into each of the next 18 stitches.
- Work 2 sc into each of the next 3 stitches.
- Work 1 sc into each of the next 18 stitches.
- Work 2 sc into each of the next 2 stitches.
- You should have 50 sc stitches total. Continue in continuous rounds.
- Round 3 (Final Base Round):
- Work 2 sc into the first stitch of the round (where your stitch marker is). Move your stitch marker to this new first sc.
- Work 1 sc into the next 2 stitches.
- Work 1 sc into each of the next 18 stitches.
- Work 2 sc into each of the next 3 stitches.
- Work 1 sc into each of the next 2 stitches.
- Work 1 sc into each of the next 18 stitches.
- Work 2 sc into each of the next 2 stitches.
- You should have 56 sc stitches total.
- Remove your stitch marker.
- Slip stitch (sl st) into the first sc of this round to join. This flattens the end of the round and prepares for working up the sides.
Part 2: Building the Body of the Bag
Now, work straight up the sides of the bag.
- Round 4 (First Side Round):
- Chain 1 (ch 1 – does NOT count as a stitch).
- Work 1 single crochet (sc) into the back loop only (BLO) of each stitch around the entire round. (56 sc)
- Working BLO creates a defined ridge that helps the bag sides stand up straight.
- Slip stitch (sl st) into the first sc to join the round.
- Rounds 5 and Onwards (Body Height):
- Chain 1.
- Work 1 sc into both loops of each stitch around the round. (56 sc)
- Slip stitch (sl st) into the first sc to join the round.
- Repeat this round until your bag reaches your desired height (approximately 20-25 more rounds for a total of 24-29 rounds from the base).
Part 3: Creating the Handles
The handles will extend directly from the top of your bag.
- Round for Handle Placement:
- After your last body round, chain 1 (does not count as a stitch).
- Work 8 single crochet (sc) stitches.
- Chain 30 (ch 30 – this creates the length of your first handle; adjust this number for shorter/longer handles).
- Skip the next 12 stitches. (This creates the open space for the bag’s opening).
- Work 16 sc stitches.
- Chain 30 (ch 30 – for your second handle).
- Skip the next 12 stitches.
- Work 8 sc stitches.
- Slip stitch (sl st) into the first sc of this round to join.
- Round for Handle Finishing (Strengthening):
- Chain 1.
- Work 1 sc into each of the 8 sc stitches from the previous round.
- Now, work 30 sc stitches around your chain-30 handle loop. This reinforces the handle.
- Work 1 sc into each of the 16 sc stitches between the handles.
- Work 30 sc stitches around the second chain-30 handle loop.
- Work 1 sc into each of the remaining 8 sc stitches.
- Slip stitch (sl st) into the first sc of the round to join.
- Fasten Off:
- Cut your yarn, leaving a 6-inch (15 cm) tail.
- Yarn over with your hook, pull the cut tail completely through the loop left on your hook, and gently tug to secure the knot.
Part 4: Final Finishing Touches
- Weave in All Ends:
- Use your yarn needle to meticulously weave in every loose yarn tail. Weave into the fabric, changing direction once or twice to secure, then trim neatly.
- Blocking (Optional):
- Gently mist the bag with cool water. Stuff it lightly to help it hold its shape. Allow it to air dry completely. This helps define the shape and even out stitches.
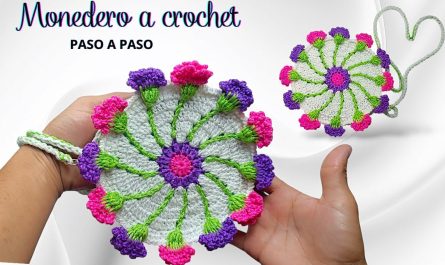
How to Make a Crochet Wallet (Step-by-Step Tutorial)
This detailed guide will walk you through crocheting a charming and practical wallet, perfect for keeping your essentials organized. We’ll focus on a simple rectangular design, using sturdy stitches for durability, and adding a flap and closure.
Skill Level: Beginner
This project is ideal if you’re comfortable with (or ready to learn!):
- Chain (ch): The basic foundation.
- Slip Stitch (sl st): For joining and neatening.
- Single Crochet (sc): A dense and sturdy stitch, excellent for wallets.
- Working in rows: Crocheting back and forth.
- Fastening off: Securing your yarn.
- Weaving in ends: The essential finishing touch.
Finished Wallet Dimensions (Approximate):
Using worsted weight yarn and the suggested hook, your finished wallet will typically measure around:
- Closed: 4.5-5 inches (11-13 cm) wide by 4 inches (10 cm) tall
- Open: 4.5-5 inches (11-13 cm) wide by 8-9 inches (20-23 cm) long
You can easily adjust the size by changing the starting chain length or the number of rows.
Materials You’ll Need:
- Yarn: Approximately 50-70 yards (45-65 meters) of Worsted Weight (Medium #4) Cotton or Acrylic Yarn. Cotton is excellent for wallets due to its structure.
- Crochet Hook: Size G/4.0mm or H/5.0mm. A smaller hook will create a tighter, denser fabric.
- Yarn Needle (Tapestry Needle): For weaving in ends and attaching the button.
- Scissors:
- Button (Optional): One button, roughly 0.5-0.75 inches (1.25-2 cm) in diameter, for the closure. A small magnetic snap can also be used.
Let’s Crochet Your Wallet!
We’ll build this wallet as a single rectangular piece, then fold and seam it to form the pockets and body, and finally add a flap and closure.
Part 1: The Main Body of the Wallet (Rectangle)
This rectangular piece will form the wallet’s body and internal pocket.
- Starting Chain:
- Make a slip knot and place it onto your hook.
- Chain (ch) 21. (This will be the height of your open wallet.)
- Row 1:
- Work 1 single crochet (sc) into the 2nd chain from your hook.
- Work 1 sc into each remaining chain across the row. (You should have 20 sc stitches).
- Chain 1 (ch 1), turn your work.
- Rows 2 – 40 (or until desired length):
- Work 1 sc into each stitch across the row. (20 sc)
- Chain 1, turn your work.
- Repeat this row until your piece measures approximately 9-10 inches (23-25 cm) long when laid flat. This will allow for the body, a pocket, and the flap. Aim for a total of 40 rows for typical wallet dimensions.
- Fasten off, leaving a tail of about 12-15 inches (30-38 cm) for seaming later.
Part 2: Assembling the Wallet (Seaming)
Now, fold and seam your crocheted rectangle to create the wallet shape.
- Folding for Pockets:
- Lay your long rectangular piece flat.
- Fold one end of the rectangle up by about 3.5 inches (9 cm). This will form your main internal pocket.
- You can use a stitch marker or clip to hold this fold in place.
- Seaming the Sides:
- Thread the long tail you left at the end of your rectangle onto your yarn needle.
- Align the side edges of the folded pocket with the main body.
- Using a whip stitch or mattress stitch, seam up both sides of this folded pocket. Stitch through both layers (the folded pocket and the main body layer).
- Once both sides of the pocket are seamed, knot off the tail and weave it into the fabric securely.
- Forming the Flap:
- The remaining unseamed part of your rectangle will be the wallet flap.
Part 3: Adding the Flap and Closure
Reinforce the flap and add a functional closure.
- Reinforcing the Flap (Optional but Recommended):
- Join your yarn with a slip stitch (sl st) to any corner of the flap where you just seamed.
- Chain 1 (ch 1).
- Work single crochet (sc) stitches evenly around the entire edge of the flap. Work 2 sc in corner stitches to create neat turns.
- Slip stitch to join your first sc.
- Fasten off, leaving a tail for weaving in. Weave in all loose ends.
- Creating the Button Loop (if using a button):
- Locate the center of the flap’s edge.
- Join your yarn with a slip stitch in the center stitch.
- Chain (ch) 8-12 (adjust this number so the loop fits around your button comfortably).
- Slip stitch into the same stitch where you started the chain loop. This forms a small loop.
- Fasten off, leaving a 6-inch (15 cm) tail. Weave this tail securely into the flap, ensuring the loop is sturdy.
- Attaching the Button (or Magnetic Snap):
- Fold the flap down over the front of the wallet.
- Mark the spot where the button loop naturally falls on the front of the wallet.
- Using your yarn needle and a new piece of yarn, sew your button securely onto the marked spot. Go through the button holes and the wallet fabric multiple times. Knot off the yarn on the inside and weave in the ends.
- (If using a magnetic snap, follow the instructions that come with your snap to sew it onto the flap and wallet body.)
Part 4: Final Finishing Touches
- Weave in All Ends:
- Use your yarn needle to meticulously weave in every loose yarn tail. This is crucial for a neat and professional-looking wallet.
- Blocking (Optional):
- Gently mist the wallet with cool water. Gently shape the wallet with your hands, ensuring the edges are straight and the flap lays flat. Allow it to air dry completely.
You now have a beautifully handmade crochet tote bag and/or wallet! Which one are you excited to start first?