by
by Let’s create a vibrant and eye-catching three-color flower coaster! This tutorial is designed for beginners eager to explore colorwork and add a delightful, handmade touch to their home. You’ll learn how to seamlessly incorporate three different yarn colors to create a beautiful, layered floral design that’s both practical and decorative.
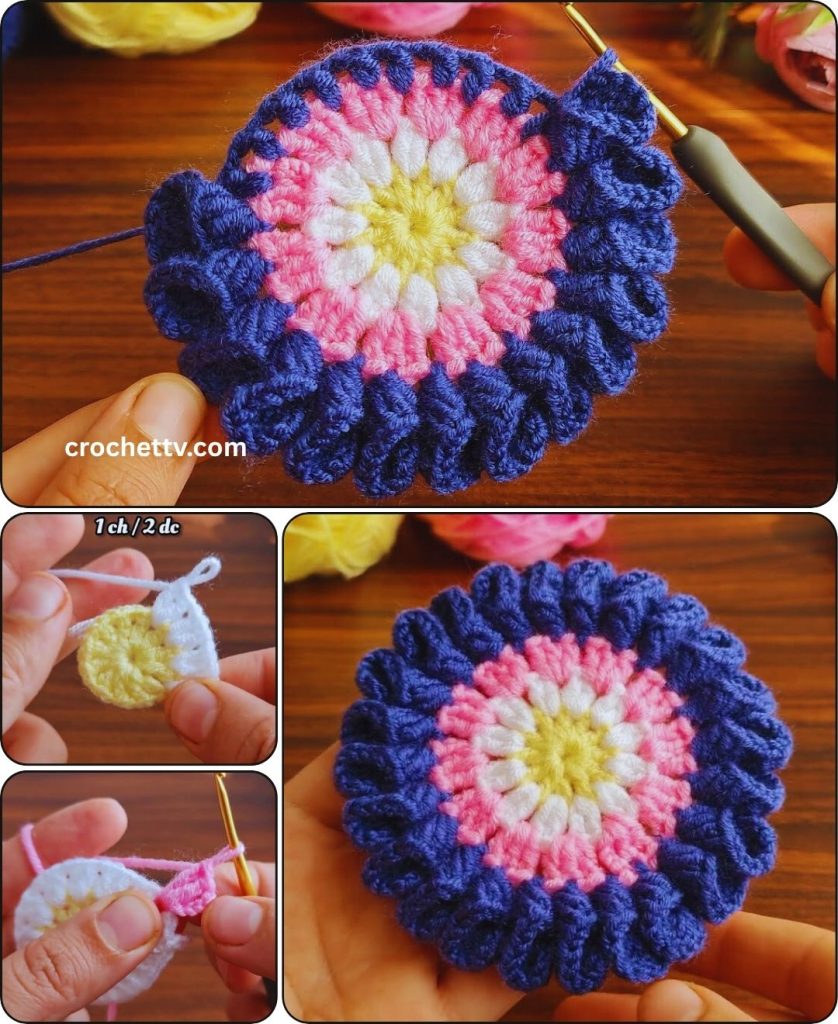
How to Crochet a Three-Color Flower Coaster (Step-by-Step Tutorial)
This detailed guide will walk you through making a charming flower-shaped coaster using three distinct colors. We’ll focus on fundamental crochet techniques and clear instructions to ensure a successful and enjoyable project.
Skill Level: Beginner
This project is ideal if you’re comfortable with (or ready to learn!):
- Chain (ch): The basic foundation stitch.
- Slip Stitch (sl st): For joining rounds and neatening.
- Single Crochet (sc): A dense stitch, great for sturdy items.
- Half Double Crochet (hdc): A stitch taller than single crochet.
- Double Crochet (dc): A common, taller stitch.
- Magic Ring (MR) / Chain-2 Start: For a neat center hole.
- Working in rounds: Crocheting in a circular manner.
- Color changes: Neatly switching between yarn colors.
- Fastening off: Securing your yarn.
- Weaving in ends: The essential finishing touch.
Finished Coaster Dimensions (Approximate):
Using worsted weight yarn and the suggested hook, your finished coaster will typically measure around 4-5 inches (10-12.5 cm) in diameter. This is a standard size for most mugs and glasses.
Materials You’ll Need:
Gathering your materials beforehand makes for a smoother crocheting experience.
- Yarn: Approximately 20-30 yards (18-27 meters) of Worsted Weight (Medium #4) Cotton Yarn per coaster.
- Why Cotton? Cotton yarn is highly recommended for coasters because it’s absorbent (great for condensation from drinks), heat-resistant, durable, and easy to wash. Acrylic yarn can melt under hot mugs, so it’s generally not recommended for hot pads or coasters.
- Color Choices:
- Color A (Center): This will be the innermost color of your flower (e.g., yellow for a classic center).
- Color B (Inner Petal Layer/Base): This color will form the first ring around the center, adding depth (e.g., light green, cream, or a pastel shade).
- Color C (Outer Petals): This will be the main color of your flower petals (e.g., pink, red, blue, purple).
- Crochet Hook: Size H/5.0mm. This hook size works well with worsted weight cotton yarn to create a solid, firm fabric for your coaster.
- Yarn Needle (Tapestry Needle): Essential for seamlessly weaving in your loose yarn tails. It has a blunt tip and a large eye, making it easy to thread yarn through.
- Scissors: Any pair of sharp scissors for cutting your yarn.
Let’s Crochet Your Three-Color Flower Coaster!
This pattern builds in rounds from the center out, with each round introducing a new color to create a layered flower effect.
Part 1: The Flower Center (Color A)
We’ll start with the very middle of your flower, forming a neat circle.
- Starting with Color A:
- Begin with a slip knot and place it onto your H/5.0mm crochet hook.
- Magic Ring (MR) Start: If you’re comfortable with a magic ring, create one. This makes a nice, tight center.
- (Alternative start if Magic Ring is tricky): Chain 4, then slip stitch (sl st) into the first chain to form a small ring.
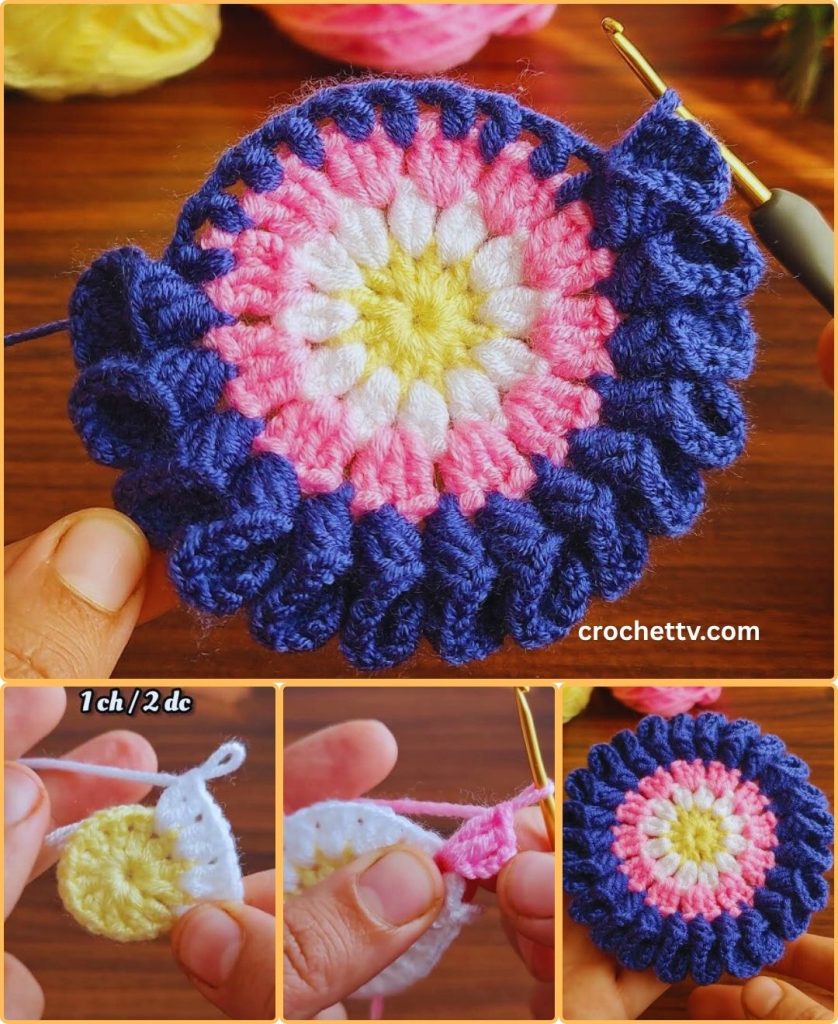
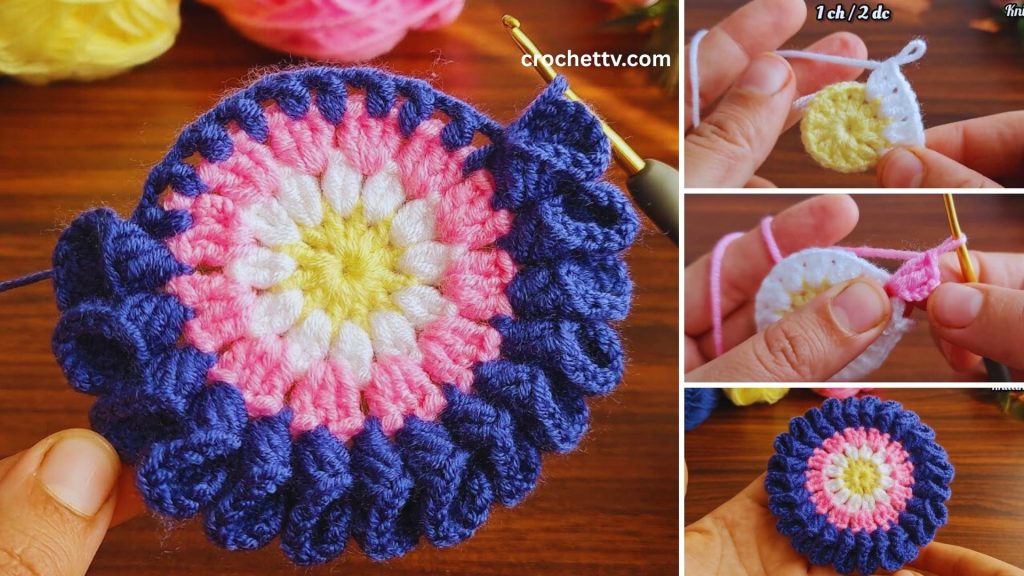
- Round 1: Chain 2 (ch 2 – counts as your first half double crochet (hdc)). Work 9 more half double crochet (hdc) stitches into the center of the ring. You’ll have 10 hdc stitches total.
- (If using Chain-4 start): Work 10 hdc stitches into the center of the chain-4 ring.
- If using a magic ring, gently pull the tail tightly to close the center hole.
- Slip stitch (sl st) into the top of the beginning Chain 2 to join the round.
- Fasten off Color A, leaving a 4-inch (10 cm) tail for weaving in.
Part 2: Inner Petal Layer / Base (Color B)
This round introduces your second color and starts to create the foundational shape for the petals.
- Join Color B:
- Join Color B yarn with a slip stitch (sl st) into any hdc stitch from Round 1.
- Round 2 (Expanding the base with Color B):
- Chain 1 (ch 1 – does NOT count as a stitch).
- Work 2 single crochet (sc) stitches into the same stitch where you just joined (the top of the hdc stitch where you attached Color B).
- Work 2 sc into each remaining hdc stitch around the round. You’ll have 20 sc stitches total.
- Crucial Step: Prepare for Color Change! When you make the very last single crochet of this round (the 20th sc), stop when you have two loops left on your hook.
- Drop Color B. Pick up Color C.
- With Color C, yarn over and pull through both loops on your hook to complete the stitch. Color C is now active on your hook.
- Now, complete the round by doing a slip stitch (sl st) with Color C into the first single crochet stitch you made at the beginning of this round.
- Fasten off Color B, leaving a 4-inch (10 cm) tail for weaving in.
Part 3: The Outer Petals (Color C)
Now, we’ll use Color C to create the prominent flower petals, giving your coaster its distinct floral shape.
- Round 3 (Creating Petals – with Color C):
- Locate the stitches from Round 2 (the 20 sc stitches). You will be working into them.
- *In the next stitch: Work (Chain 3, 3 double crochet (dc), Chain 3, slip stitch). This forms one petal.
- Skip the next stitch.
- Slip stitch into the next stitch.*
- Repeat from * to * around the round. You should create 10 petals evenly spaced around your coaster.
- Tip: The “skip 1, sl st into next” ensures you have enough stitches for 10 petals. If you find yourself off, adjust by skipping 0 or 2 stitches occasionally to make the petals even. The key is to have 10 separate points for your petals.
- After the 10th petal, slip stitch one last time into the very first slip stitch you made when joining this color at the beginning of this round, to really secure the round.
- Fasten Off:
- Cut your yarn, leaving a 4-6 inch (10-15 cm) tail.
- Yarn over with your hook, pull the cut tail completely through the loop left on your hook, and gently tug to secure the knot.
Part 4: Final Finishing Touches
- Weave in All Ends:
- This is a crucial step for a neat, durable, and professional-looking coaster. You’ll have tails from your starting ring, all your color changes, and the final fasten-off.
- Thread each yarn tail onto your yarn needle.
- Carefully weave the tail into the stitches of the same color on the back of your coaster. Go in one direction for a few stitches (about 1-2 inches / 2.5-5 cm), then subtly change direction (e.g., weave back through some of the same stitches diagonally or perpendicularly) to “lock” the tail in place and prevent it from unraveling.
- Trim any excess yarn close to the fabric, being careful not to cut any of your actual stitches.
- Blocking (Optional but Recommended):
- Blocking can help your coaster lay perfectly flat, even out any tension inconsistencies, and define the petal shape more clearly.
- Method (Wet Blocking – Ideal for Cotton):
- Gently mist your coaster evenly with cool water using a spray bottle until it’s damp but not soaking wet.
- Carefully stretch and pin your coaster to its desired flat, round, flower shape on a blocking mat or a clean, dry towel. Ensure the petals are nicely fanned out.
- Allow the coaster to air dry completely and thoroughly. This can take several hours to a full day, depending on humidity and ventilation. Ensure it’s bone dry before removing pins or using it.
Congratulations! You’ve successfully crocheted a beautiful and easy three-color flower coaster! These are perfect for adding a vibrant, handmade touch to your home decor or for giving as thoughtful gifts. Which color combinations will you try next?