 by
by Absolutely! Here’s a detailed, step-by-step tutorial on how to knit adorable bunny slippers, perfect for cozy lounging or thoughtful handmade gifts. This long-form article covers everything: materials, stitches, construction, customization, and finishing touches. Let’s get started!
🐰 How to Knit Cute Bunny Slippers | Step-by-Step Pattern for Beginners
Knitting cozy, bunny-themed slippers is one of the most delightful and rewarding projects you can take on — especially if you love functional, cute creations. Whether you’re a beginner looking for your next step or an experienced knitter seeking a fun gift idea, these knitted bunny slippers will hop right into your heart.
This tutorial will guide you through the entire process in a beginner-friendly way, and you’ll end up with a pair of charming bunny slippers, complete with ears, a little tail, and an adorable face.
🧶 Materials Needed
Here’s what you’ll need to make one pair of bunny slippers (adult women’s size, but easily adjustable):
🧵 Yarn:
- Worsted weight (category 4) yarn or bulky yarn (category 5) for warmer slippers
- Main Color (MC): Bunny body (e.g., white, grey, pink, or cream)
- Accent Color: Inner ears, nose (e.g., pink or soft red)
- Optional: Contrasting yarn for eyes or embroidery
🧵 Amount:
- Approx. 150–200 yards of main yarn
- Small scraps of accent yarn
🧷 Tools:
- Knitting needles: Size US 8 (5.0 mm) straight needles (or circulars used flat)
- Yarn needle
- Scissors
- Stitch markers (optional)
- Stuffing or yarn scraps (for the pom-pom tail)
🐇 Optional:
- Safety eyes or buttons for eyes
- Pom-pom maker (or DIY with cardboard)
- Fabric glue (for added grip on the soles)
🧵 Skills You Should Know
This is a beginner-friendly pattern, but you’ll want to know the following:
- Cast on
- Knit stitch (k)
- Purl stitch (p)
- Knit two together (k2tog) – for shaping
- Sewing seams
- Making pom-poms (optional)
📏 Sizing & Fit
This pattern is designed for adult women’s medium (US size 7–9). You can adjust sizing by:
- Using a different needle size
- Adding/subtracting rows in the foot section
- Casting on more/less stitches for a wider or narrower foot
🧩 Bunny Slipper Pattern – Step-by-Step
We’ll knit the slipper in one flat piece and seam it up afterward. Then we’ll add ears, facial features, and the pom-pom tail.
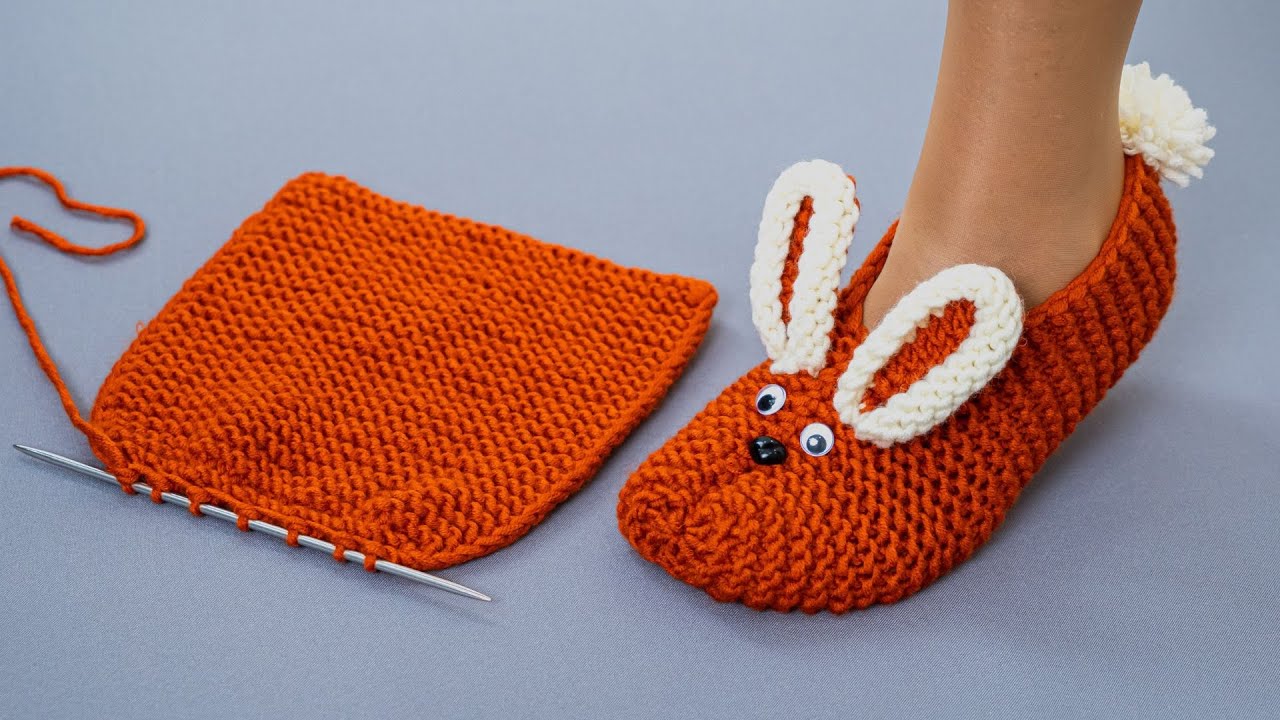
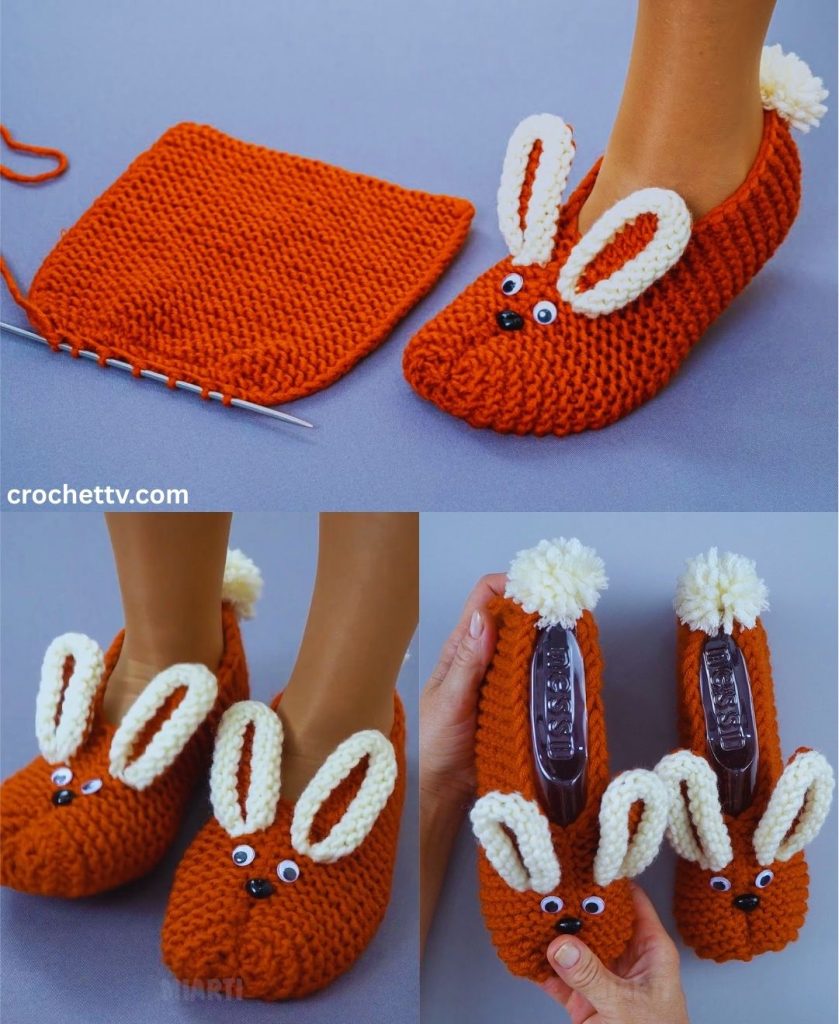
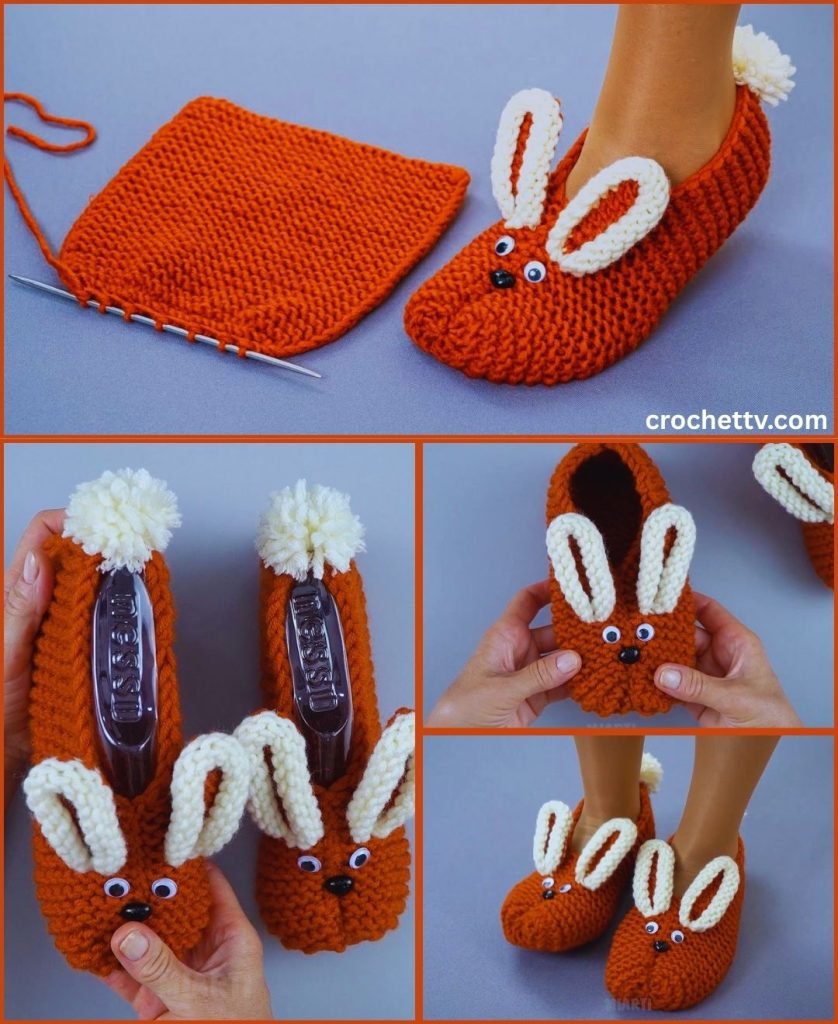
🐾 Part 1: Knit the Slipper Body
Using main color yarn:
Cast On:
- 32 stitches (for adult medium)
Knit in garter stitch (knit every row):
Rows 1–24: Knit every row (creates the foot base).
Shape Toe:
Row 25: K12, k2tog, k4, k2tog, k12 (30 sts)
Row 26: Knit all
Row 27: K11, k2tog, k4, k2tog, k11 (28 sts)
Row 28: Knit all
Continue decreasing every other row like this until you have **16 stitches**.
Top of the Toe:
Knit 8 more rows in garter stitch (these rows will go over the top of the foot).
Bind off all stitches loosely.
🧵 Assembly: Forming the Slipper Shape
Lay the piece flat.
Step 1: Fold in half lengthwise.
This forms the foot — the toe shaping should be at one end.
Step 2: Sew the top flap to the sides to form the toe. Use whip stitch or mattress stitch for an invisible seam.
Step 3: Sew the back heel seam by folding the cast-on edge together and sewing up about 2–3 inches.
You now have a slipper shape!
Repeat for the second slipper.
🐰 Part 2: Knit the Bunny Ears
Make 4 ears total (2 per slipper).
Using main color:
Cast on 6 stitches.
Work in stockinette stitch (alternate knit and purl rows):
Row 1: Knit
Row 2: Purl
Row 3: Knit
Row 4: Purl
Row 5: K2tog, k2, k2tog (4 sts)
Row 6: Purl
Row 7: K2tog, k2tog (2 sts)
Row 8: Purl
Row 9: K2tog (1 st)
Cut yarn, pull through the last stitch.
Repeat to make 4 ears.
Optional Inner Ear (Contrast Color):
Repeat the same pattern with thinner yarn or fewer stitches (e.g., cast on 4) and sew onto the main ears for a pink inner ear effect.
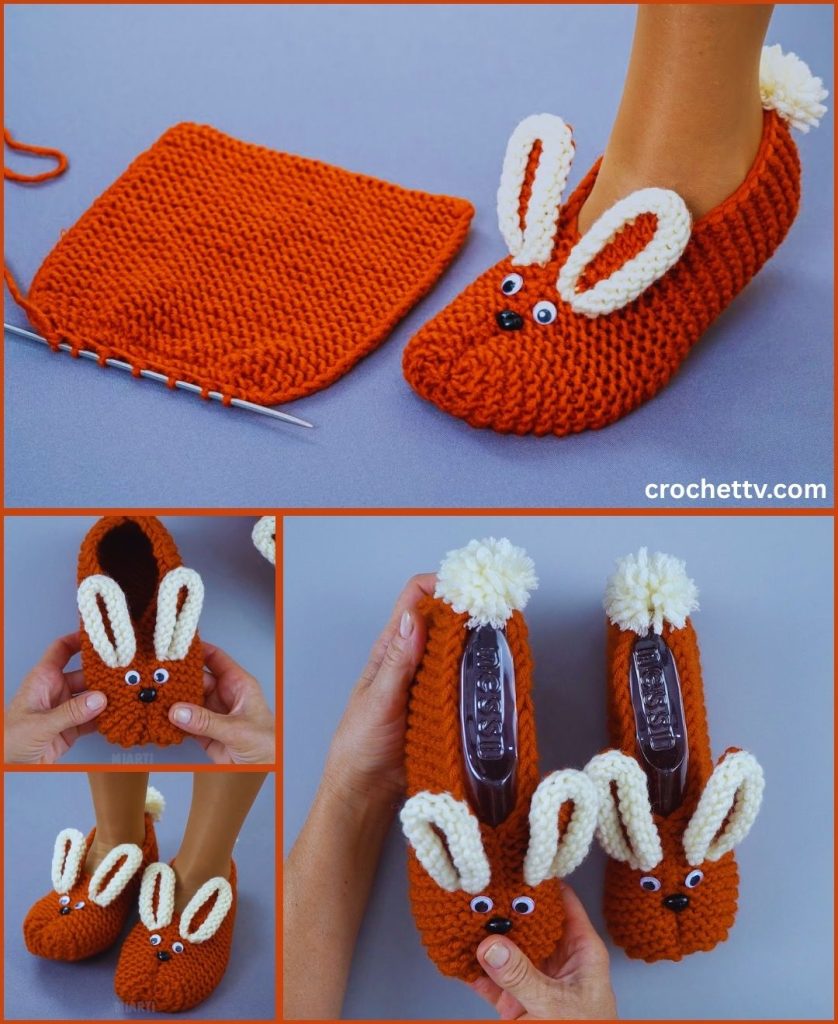
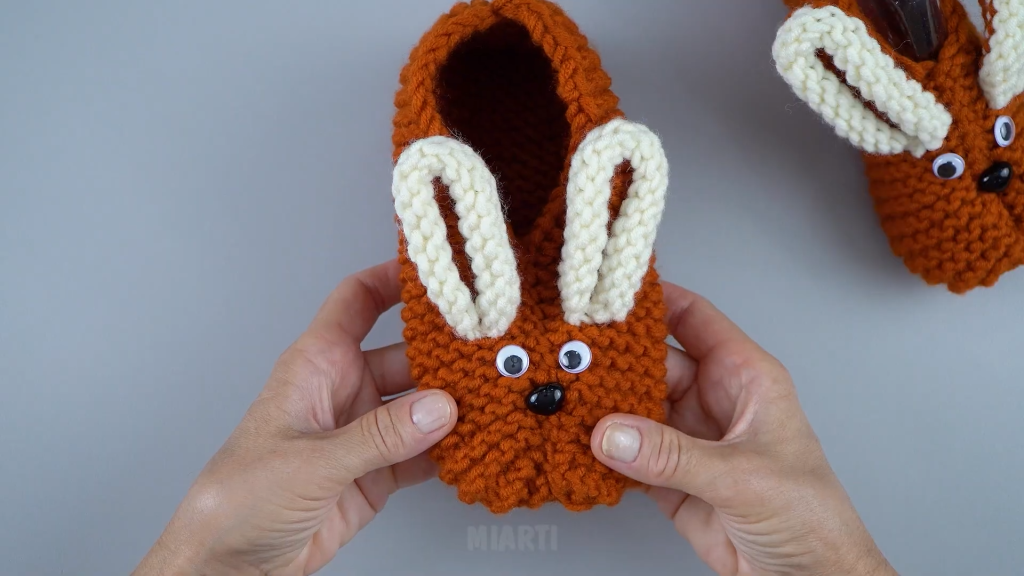
🧵 Attach the Ears
- Sew each ear to the top edge of the slipper.
- Pinch the bottom of the ear to fold it and sew it on slightly curved for a 3D effect.
- Position the ears about 1.5–2 inches apart.
🧸 Part 3: Make the Bunny Tail (Pom-Pom)
Create a fluffy tail for each slipper.
Option 1: Pom-Pom Maker
- Wrap yarn around the maker, tie tightly, and trim into a round ball.
Option 2: DIY Pom-Pom
- Wrap yarn around your fingers or cardboard ~50 times.
- Slide off, tie tightly in the center.
- Cut loops and trim into shape.
Attach to the back of each slipper heel securely.
🎨 Add the Face
Use embroidery or buttons to create a bunny face.
Eyes:
- Sew on small black buttons or use black yarn to embroider “V” or “dot” shapes.
- Safety eyes also work well if you’re confident they’re secure.
Nose:
- Using pink yarn, embroider a small triangle shape.
- Add small whiskers with black or gray yarn (3 stitches on each side).
🧼 Finishing Touches
- Weave in all loose ends using a yarn needle.
- Add non-slip soles if desired:
- Use fabric paint or hot glue to draw dots/lines on the bottom.
- You can also sew on suede or grippy fabric pieces.
🧺 Care Instructions
- Hand wash recommended, especially if you’ve used wool yarn.
- Lay flat to dry.
- For machine-washable yarns, use a gentle cycle in a laundry bag.
🧠 Customization Ideas
- Use fuzzy yarn (like faux fur or boucle) for a fluffier bunny.
- Try multicolor yarns for tie-dye or spotted bunnies.
- Add tiny bows or flower appliqués near the ears.
- Make holiday versions (e.g., red noses for Christmas bunnies).
⏱️ Estimated Time
- Beginner: 6–8 hours total
- Intermediate: 4–6 hours
Perfect for weekend crafting or gift-making.
🧵 Summary Pattern (Quick Overview)
Slipper:
- Cast on 32 sts
- Knit 24 rows (garter)
- Decrease 2 sts every other row to 16 sts
- Knit 8 more rows
- Bind off and sew up

Ears (make 4):
- Cast on 6 sts
- Work 9 rows with shaping (k2tog)
- Sew to slipper

Tail:
- Make pom-pom and attach

Face:
- Embroider eyes, nose, whiskers
🧣 Final Thoughts
These cute knitted bunny slippers are the perfect blend of comfort, fun, and creativity. Once you make one pair, you’ll want to knit them for your entire family (and they’ll probably ask you to!). They make thoughtful gifts, cozy winter essentials, or just a playful way to show off your knitting skills.
You can customize them endlessly — experiment with different yarn textures, colors, and features to give each bunny its own personality.