
 by
by Crocheting a table runner from square motifs is a fantastic project for anyone looking to create a custom piece of home decor. This tutorial will guide you through all the necessary steps, from making the individual squares to joining them and adding a beautiful border. It’s an easy and customizable project that’s perfect for a confident beginner ready to tackle a multi-piece project.
Skill Level: Confident Beginner
This pattern is ideal if you’re comfortable with:
- Magic Ring (MR) or Chain Start: Both methods will be covered for a neat center.
- Chain (ch): The fundamental stitch.
- Slip Stitch (sl st): For joining stitches and rounds.
- Double Crochet (dc): The main stitch for the squares.
- Joining Motifs: Connecting your finished squares.
Finished Table Runner Dimensions (Approximate):
The finished size will depend on the number and size of your squares. For a standard-sized runner, we’ll aim for a finished piece that is about 40-60 inches (100-150 cm) long and 12-15 inches (30-38 cm) wide.
Materials You’ll Need:
- Yarn: Approximately 200-300 yards (180-275 meters) of Worsted Weight (Medium #4) Cotton or Cotton Blend Yarn. Cotton yarn is recommended because it’s durable and easy to wash. A solid color will give your runner a clean, modern look, while multiple colors will make it more vibrant.
- Crochet Hook: Size H/5.0mm.
- Yarn Needle (Tapestry Needle): Essential for weaving in ends and sewing the squares together.
- Scissors: Any sharp pair for cutting your yarn.
- Stitch Markers (Optional): Helpful for marking corners.

Part 1: Making the Granny Square Motifs
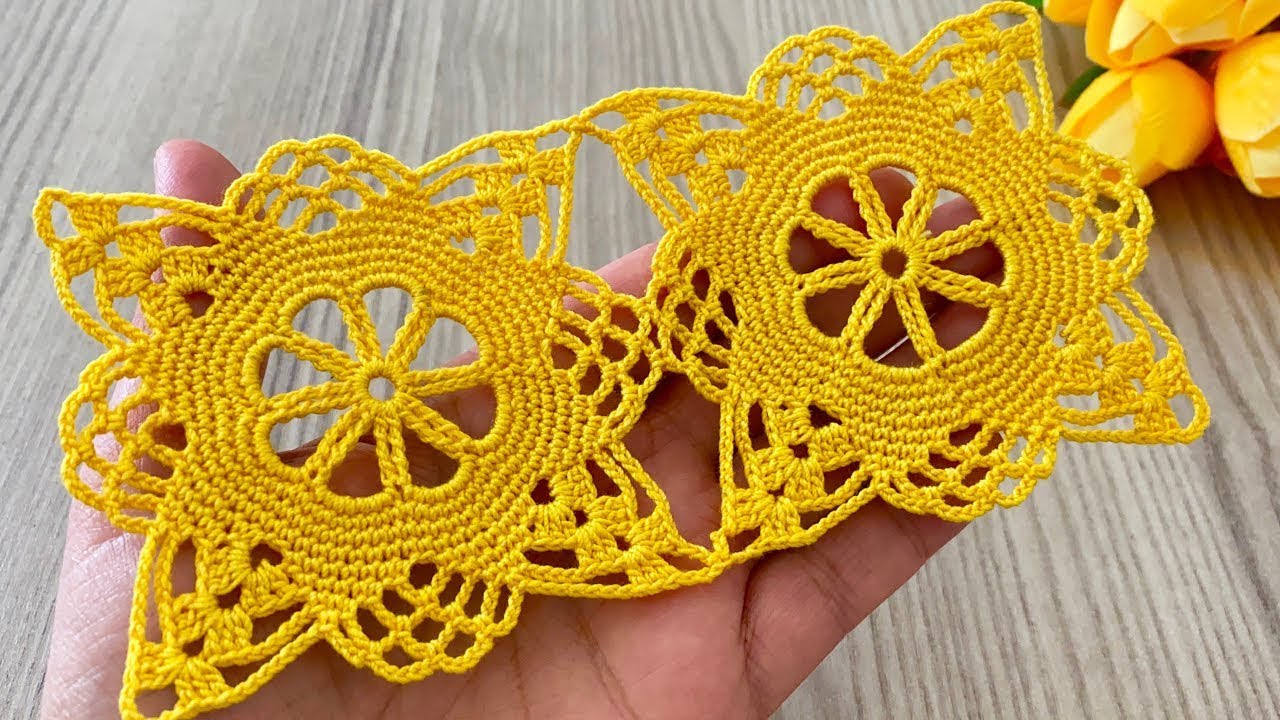
You will need to make a number of identical squares, depending on how long you want your runner to be. For a 4-square-by-2-square runner, you’ll need 8 squares.
For each square, follow these steps:
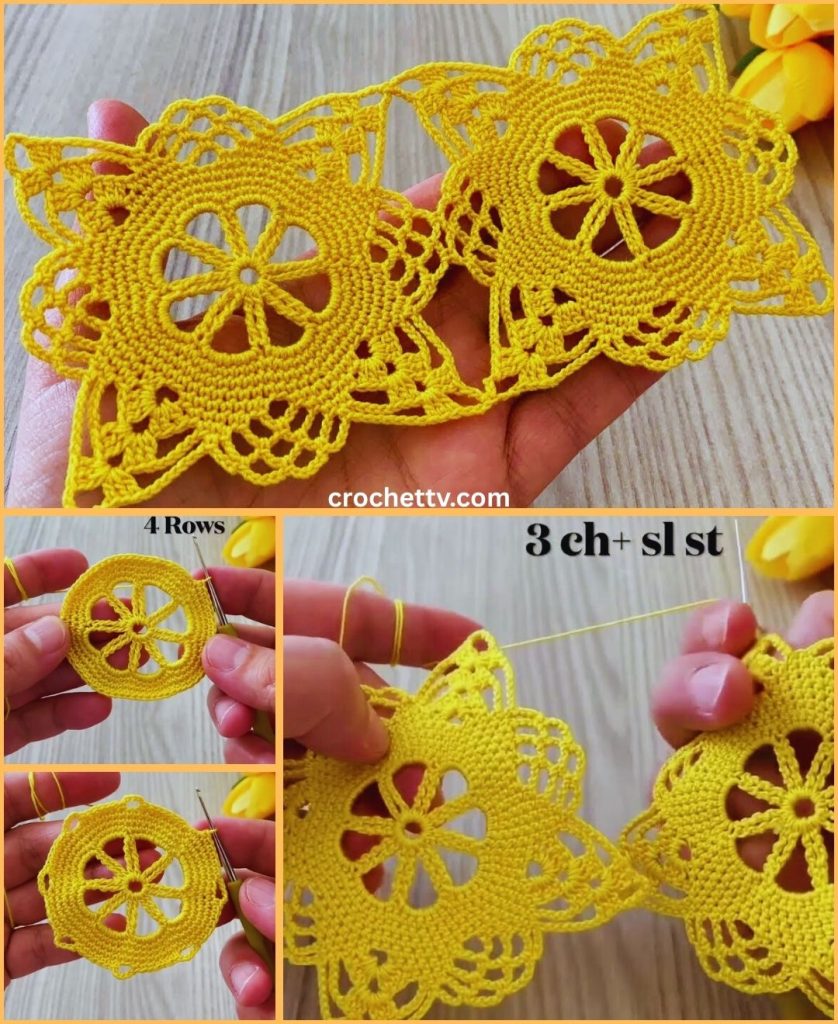
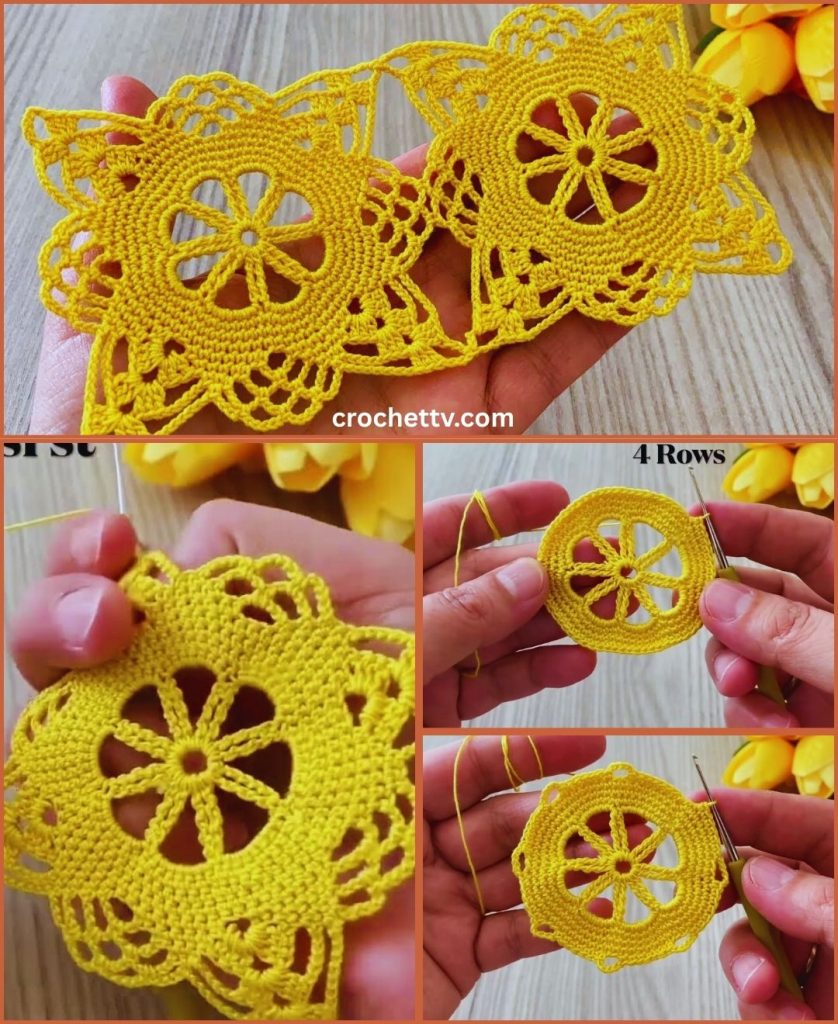
- Round 1 (Magic Ring or Chain Start):
- Magic Ring: Create a Magic Ring. Ch 3 (counts as first dc), work 2 dc, ch 2, *
3 dc,ch 2*, repeat from * to * two more times. Join with a sl st to the top of the beginning ch 3. (4 clusters of 3 dc, 4 corner spaces) - Chain Start: Ch 4, join with a sl st to form a ring. Ch 3, work 2 dc, ch 2, *
3 dc,ch 2*, repeat from * to * two more times. Join with a sl st to the top of the beginning ch 3.
- Magic Ring: Create a Magic Ring. Ch 3 (counts as first dc), work 2 dc, ch 2, *
- Round 2:
- Sl st into the next two stitches and into the next corner space.
- Ch 3 (counts as first dc), work 2 dc, ch 2, 3 dc into the same corner space.
- Ch 1 (this creates a side space).
- *In the next corner space, work (3 dc, ch 2, 3 dc). Ch 1.*
- Repeat from * to * two more times.
- Join with a sl st to the top of the beginning ch 3.
- Round 3:
- Sl st into the next two stitches and into the next corner space.
- Ch 3, work 2 dc, ch 2, 3 dc into the same corner space.
- Ch 1.
- Work 3 dc into the next side space.
- Ch 1.
- Continue this pattern: 3 dc into each side space and (3 dc, ch 2, 3 dc) into each corner space.
- Join with a sl st to the top of the beginning ch 3.
- Repeat Round 3 until your squares measure about 6 inches (15 cm) per side. Fasten off and weave in all tails.
Part 2: Assembling the Table Runner
Once you have all your squares, it’s time to join them together. The most common arrangement for a table runner is a long row.
- Arrange the Squares:
- Lay out your squares in a grid, for example, two squares wide and four squares long. This is a classic and elegant arrangement.
- Join the Squares:
- We’ll use a simple whip stitch for a clean, durable seam. Thread your yarn needle with your joining color.
- Lay two squares next to each other, with the wrong sides facing.
- Insert your needle into the corner stitch of both squares and begin a whip stitch, sewing through both loops of each corresponding stitch.
- Continue sewing down the side until you reach the next corner.
- Repeat this process to join all of your squares together.
Part 3: Adding the Border
A beautiful border gives your table runner a polished, finished look.
- Set Up the First Border Round:
- With your chosen border color, join your yarn with a slip stitch to any stitch on the edge of the runner.
- Chain 1. Work 1 single crochet (sc) into each stitch around the entire perimeter of the runner.
- When you reach a corner, work 3 sc into the corner space to turn smoothly.
- When you reach a seam where two squares are joined, work a
scinto the corner space of the first square, then ascinto the corner space of the next square. This will secure the seam. - Join with a sl st to the first sc.
- Add a Decorative Round:
- Chain 1. Work 1 sc into the first stitch.
- Chain 3. Skip the next stitch. Work 1 sc into the next stitch. This creates a small loop.
- *
ch 3, skip the next stitch, work1 scinto the next stitch.* - Repeat from * to * around the entire perimeter.
- Join with a sl st to the first sc.
- Final Touches:
- Fasten off and weave in all remaining tails securely.
- Blocking (Optional but Recommended): Gently mist the runner with water and pin it to a foam mat, ensuring it is a perfect rectangle with all the edges straight. Allow it to air dry completely.
Congratulations! You’ve successfully created a stunning and unique Crochet Square Motif Table Runner.