 by
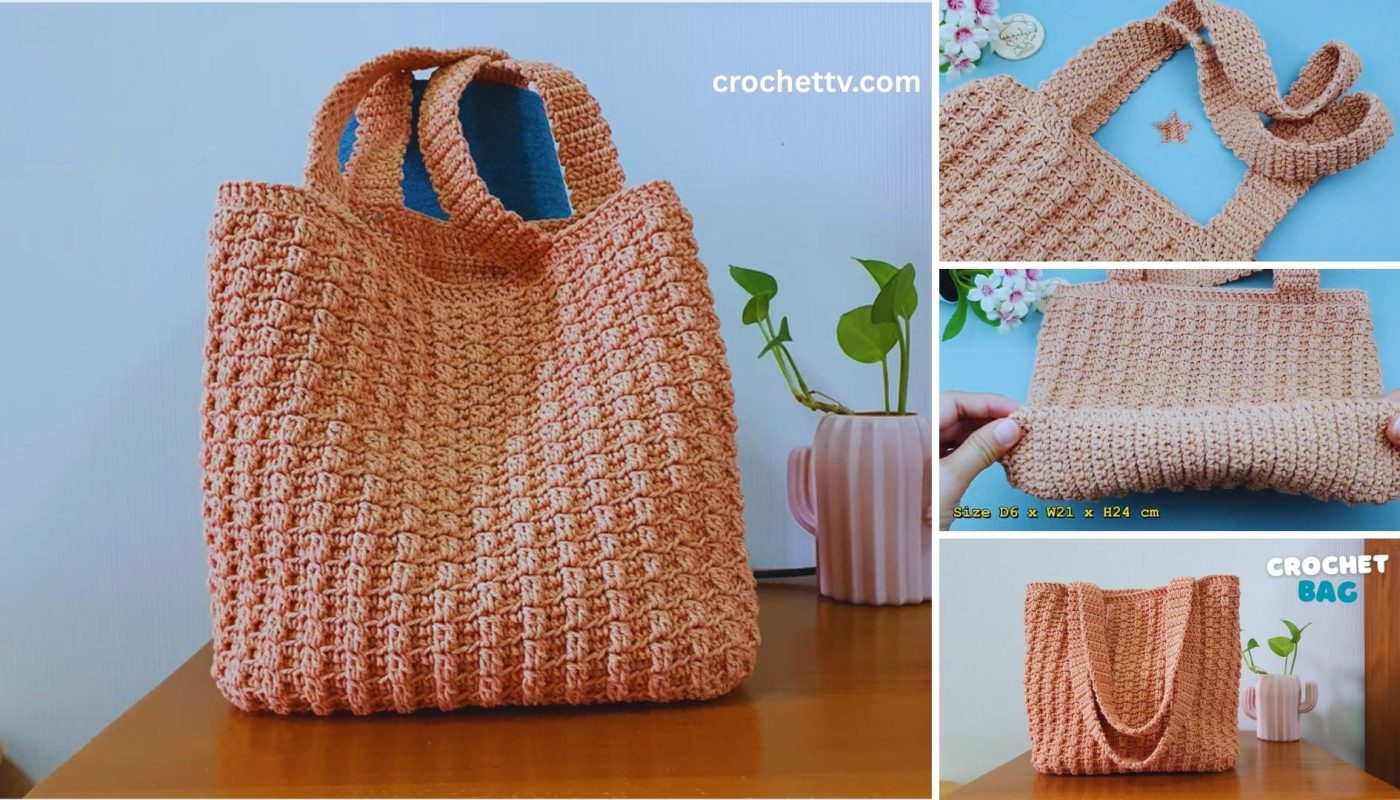
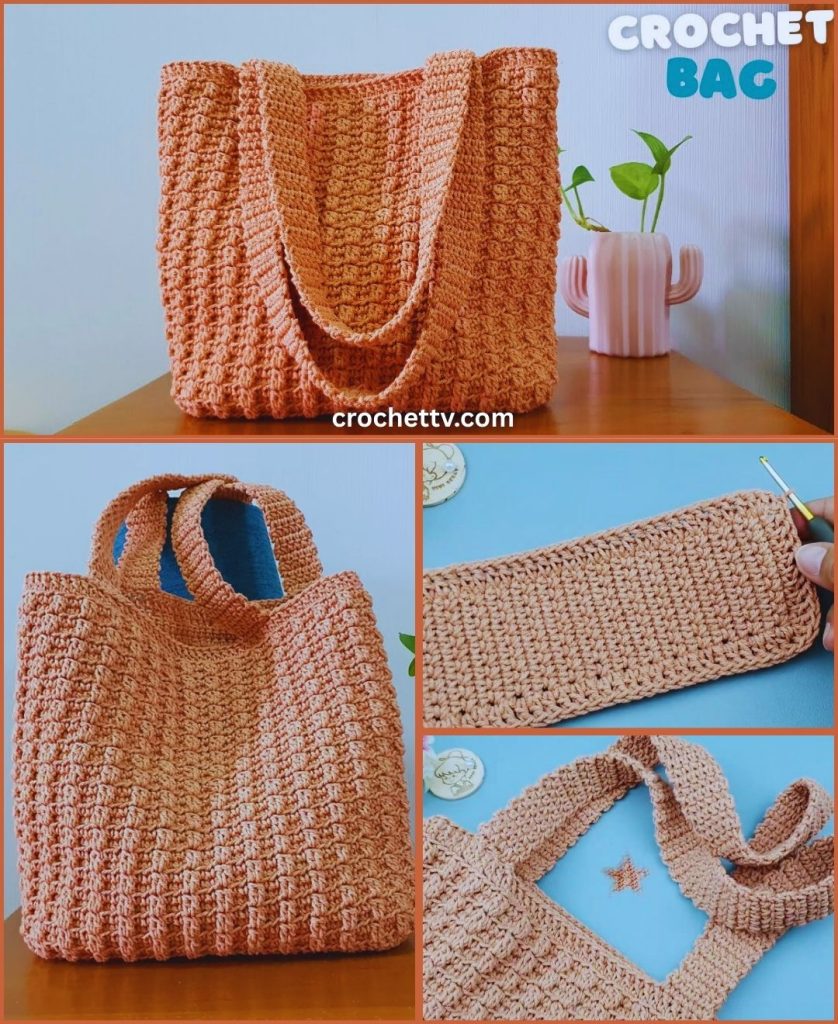
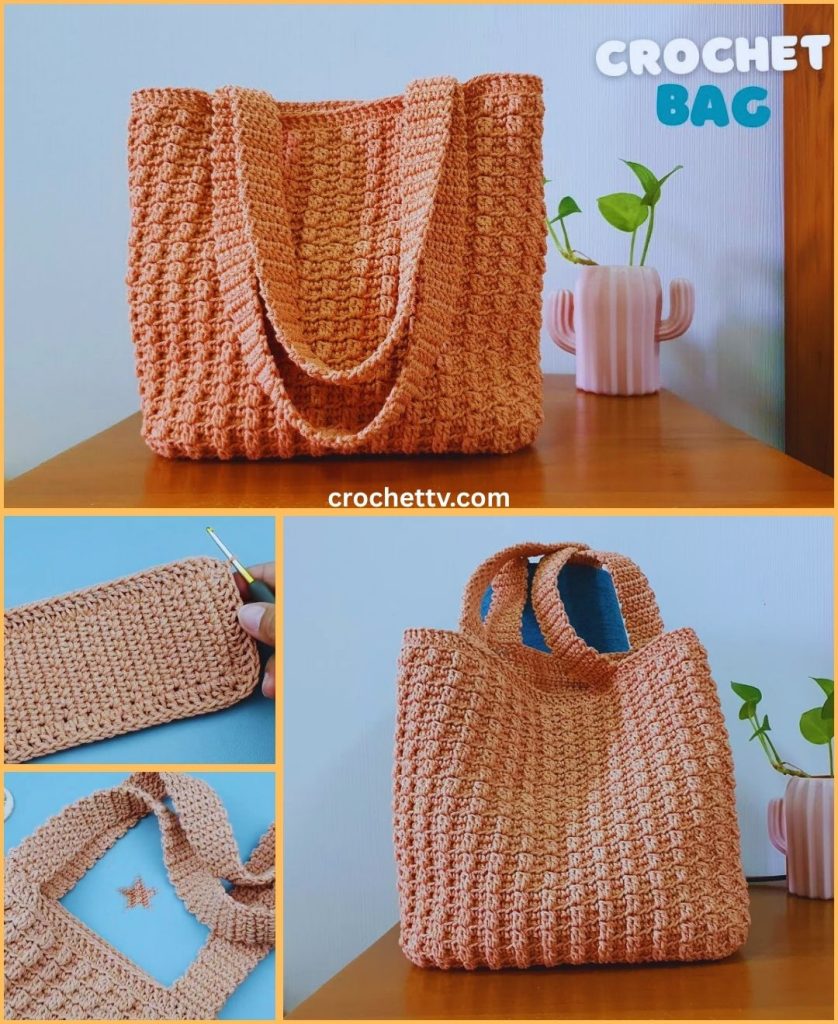
by Crocheting a structured, clean-looking bag is all about choosing the right yarn and mastering a few key techniques. This tutorial will guide you through making a super neat crochet shoulder bag that looks polished and professional. We’ll use a dense, sturdy stitch and focus on consistent tension to ensure your bag holds its shape beautifully.
The Secret to a Neat Bag
The secret to a polished, professional-looking bag lies in these three things:
- Yarn Choice: Use a yarn with great stitch definition. Cotton yarn is an excellent choice as it’s not stretchy and holds its shape well. A T-shirt yarn or macrame cord will give your bag an even more structured, clean look.
- The Moss Stitch (or Linen Stitch): This simple stitch, made of single crochets and chains, creates a tight, woven-like fabric. It prevents your belongings from falling out and gives the bag a dense, high-end feel.
- Consistent Tension: This is the most crucial part. Keep your stitches at an even tension throughout the project. Practice a few rows until you find your rhythm, and you’ll be on your way to a perfectly neat finish.
Skill Level: Confident Beginner
This pattern is a great next step if you’re comfortable with:
- Chain (ch): The foundation of crochet.
- Single Crochet (sc): The main stitch for this pattern.
- Slip Stitch (sl st): For joining rounds and finishing.
- Working in Rounds: Crocheting in a continuous circle.
- Fastening Off and weaving in ends.
Finished Bag Dimensions (Approximate):
This pattern creates a small to medium-sized shoulder bag, perfect for everyday essentials.
- Base: 10 inches (25 cm) long x 4 inches (10 cm) wide.
- Height: 8 inches (20 cm).
Materials You’ll Need:
- Yarn: Approximately 200-250 yards (180-230 meters) of Worsted Weight (Medium #4) Cotton Yarn or T-shirt Yarn. A solid, dark color will enhance the elegant look.
- Crochet Hook: A smaller hook than the yarn label recommends will give you a tighter fabric. A Size G/4.0mm or H/5.0mm will work well with cotton yarn.
- Yarn Needle (Tapestry Needle): Essential for weaving in ends.
- Scissors: Any sharp pair for cutting your yarn.
- Stitch Marker: To mark the beginning of each round.
- Optional: A piece of plastic canvas or a sturdy bag liner for a more structured base.
Part 1: Crocheting the Base of the Bag
We’ll start by making a flat, oval-shaped base to give your bag a solid foundation.
- Foundation Chain:
- Chain 26.
- Work 1 sc into the second chain from the hook and into each chain across. (25 sc)
- In the last chain, work 3 sc.
- Continue to crochet on the opposite side of the chain. Work 1 sc into each of the next 24 stitches.
- In the last chain, work 2 sc.
- Join with a sl st to the first sc of the round. You should have 54 stitches.
- Continue the Oval Base:
- Round 2: Chain 1. Work 2 sc into the first stitch. Work 1 sc into the next 24 stitches. Work 2 sc into each of the next 3 stitches. Work 1 sc into the next 24 stitches. Work 2 sc into each of the last 2 stitches. Join with a sl st.
- Continue this pattern of increasing on the corners of the oval for 1-2 more rounds until your base is your desired size and lays flat. A great tip is to use a piece of plastic canvas cut to the shape of your base and place it inside for extra structure.
Part 2: Crocheting the Body of the Bag (Moss Stitch)
Now we’ll move from a flat oval to working the walls of the bag using the beautiful moss stitch.
- Transition Round:
- Chain 1. Work 1 sc into the back loop only (BLO) of each stitch around the entire oval. This creates a neat ridge that separates the base from the body of the bag and helps it stand up straight.
- Join with a sl st to the first sc.
- Start the Moss Stitch:
- Chain 1 (does not count as a stitch).
- Work 1 sc into the first stitch.
- Chain 1, skip the next stitch.
- Work 1 sc into the next stitch.
- *
ch 1, skip the next stitch, work1 scinto the next stitch.* - Repeat from * to * around the round.
- Join with a sl st to the first sc.
- Moss Stitch Rounds:
- From here on, you’ll work into the chain spaces from the previous round.
- Chain 1.
- Work 1 sc into the first
ch 1space. - *
ch 1, work1 scinto the nextch 1space.* - Repeat from * to * around the round.
- Join with a sl st to the first sc.
- Repeat this round until the bag reaches your desired height (about 8 inches).

Part 3: Adding the Handles
For a super neat finish, we’ll create simple handles that are crocheted directly onto the bag.
- Handle Placement:
- Work a round of
scinto each stitch andch 1space around the top of the bag. This creates a solid top edge. - Using stitch markers, mark where you want your handles to be. A good placement is about 5-8 stitches apart for the inside of the handle, with a 10-stitch gap on each side.
- Work a round of
- Create the Handles:
- Chain 1.
- Work
scto your first stitch marker. - Chain 40 (or to your desired length).
- Skip the stitches between the first two markers and
scinto the next marked stitch. - Work
scto your third stitch marker. - Chain 40.
- Skip the stitches between the last two markers and
scinto the final marked stitch. - Continue
scto the end of the round. - Join with a sl st to the first
scof the round.
- Strengthen the Handles:
- Work one or two more rounds of
scaround the entire top of the bag, working ascinto each chain of the handles. This will give the handles a strong, finished look. - Fasten off and weave in all ends securely.
- Work one or two more rounds of
Congratulations! You’ve successfully crocheted a super neat and professional-looking shoulder bag. Enjoy your new accessory!