 by
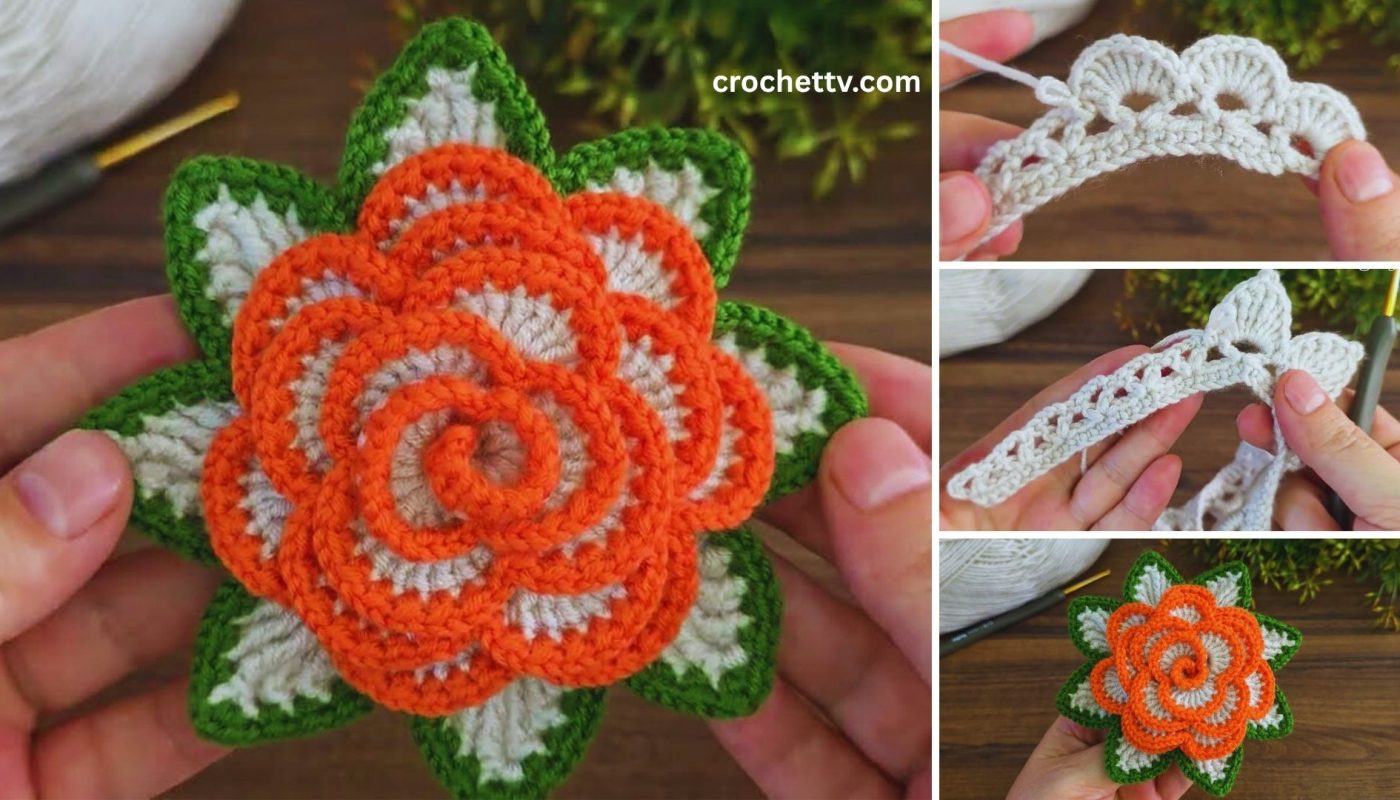
by Let’s crochet a charming rose with leaves that’s both quick and easy to make! These delightful little flowers are perfect for adding a touch of handmade beauty to anything—from hats and scarves to gifts and home decor. This tutorial focuses on simplicity and speed, making it great for crocheters who know the basics.
How to Crochet a Rose with Leaves: Quickly and Easily Tutorial 🌺
This detailed guide will show you how to crochet a spiraling rose and a simple leaf, which you’ll then assemble into a lovely floral embellishment.
Skill Level: Advanced Beginner
This project is ideal if you’re comfortable with:
- Chain (ch): The basic foundation of nearly all crochet.
- Slip Stitch (sl st): For joining and neat finishes.
- Single Crochet (sc): A compact stitch.
- Half Double Crochet (hdc): A medium-height stitch.
- Double Crochet (dc): A taller stitch.
- Working in rows: Crocheting back and forth.
- Fastening off: Securing your yarn.
- Weaving in ends: The essential finishing touch.
Finished Rose Dimensions (Approximate):
Using worsted weight yarn and the suggested hook, your finished rose will be about 1.5 – 2 inches (4 – 5 cm) in diameter. The size can vary slightly depending on your yarn, hook, and how tightly you roll it.
Materials You’ll Need:
Gathering your materials before you start helps everything go smoothly!
- Yarn:
- A small amount (5-10 yards) of Worsted Weight (Medium #4) Yarn in your chosen rose color (pinks, reds, yellows, whites, etc.). Cotton or acrylic blends work wonderfully.
- A small amount (2-3 yards) of Worsted Weight (Medium #4) Yarn in green for the leaf.
- Crochet Hook: Size H/5.0mm. This hook size balances speed and a nice, defined stitch for the rose petals.
- Yarn Needle (Tapestry Needle): Crucial for weaving in tails and, most importantly, for sewing your rose into shape.
- Scissors: Any sharp pair.
Let’s Crochet Your Rose!
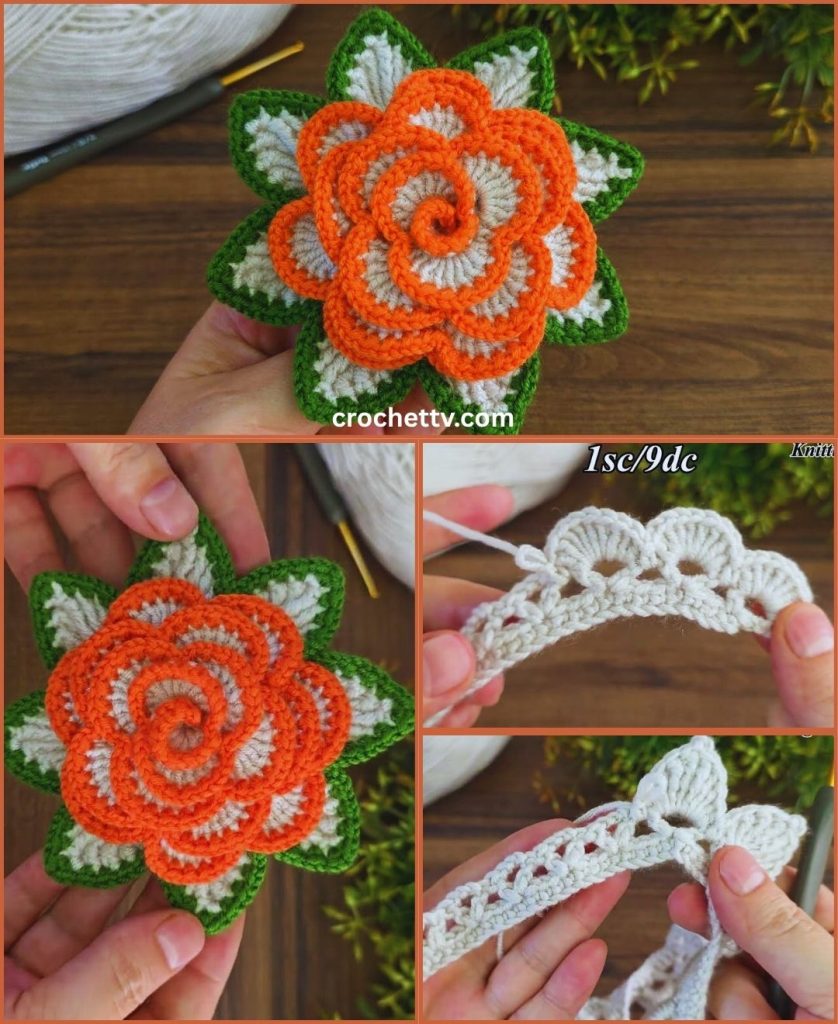
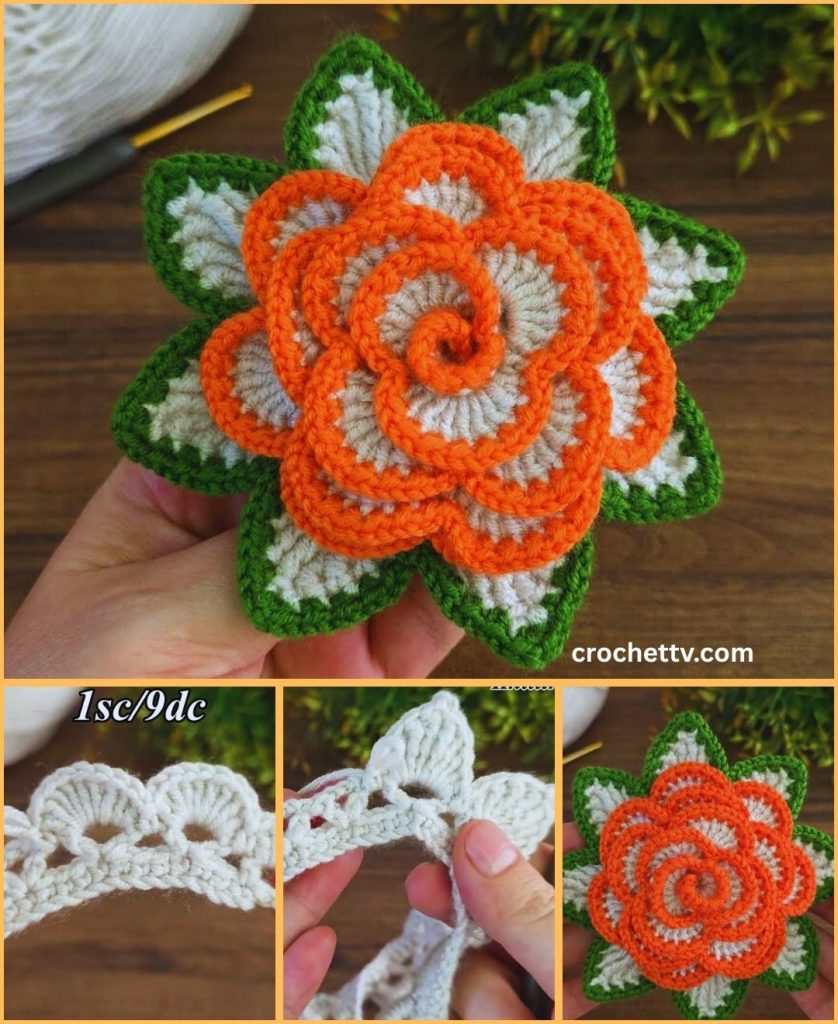
We’ll start by making a flat strip of crochet that has varying stitch heights. This strip will then be coiled to create the rose.
Part 1: Crocheting the Rose Strip
This strip is the foundation of your rose. We’ll work into the back loop only (BLO) in the second row to create a subtle ridge, which helps define the petals as you roll the flower.
- Starting Chain:
- Make a slip knot with your rose color yarn.
- Chain (ch) 36. (This chain length determines the size and fullness of your rose. For a slightly smaller rose, chain around 30. For a fuller rose, chain 40-45. This pattern works well with chains that are multiples of 6, but it’s flexible.)
- Row 1 (Foundation Row):
- Work 1 single crochet (sc) into the 2nd chain from your hook.
- Work 1 sc into each remaining chain across the row. (You’ll have 35 sc stitches if you started with 36 chains).
- Chain 1 and turn your work. (This chain 1 does NOT count as a stitch; it just gives height for the next row).
- Row 2 (Creating the Petal Shapes):
- This row is the key to creating the different petal heights. You’ll work a repeating sequence of stitches into the back loop only (BLO) of each stitch from Row 1. Working into the BLO leaves a front loop unworked, which creates a visible ridge that helps the petals form when rolled.
- Work 1 sc into the BLO of the first stitch.
- Work 1 hdc (half double crochet) into the BLO of the next stitch.
- Work 1 dc (double crochet) into the BLO of the next stitch.
- Work 1 dc into the BLO of the next stitch.
- Work 1 hdc (half double crochet) into the BLO of the next stitch.
- Work 1 sc into the BLO of the next stitch.
- *Repeat this sequence (sc, hdc, dc, dc, hdc, sc) from * until you reach the end of the row. You should end with an sc. (You’ll have 6 full “petal groups” if you started with 36 chains).
- Fasten off, leaving a long tail (about 12-15 inches / 30-38 cm). This tail is crucial for sewing the rose together later.
Part 2: Shaping and Securing the Rose
Now for the fun part: turning your flat strip into a beautiful rose!
- Coil the Center:
- Take the end of the strip where you started (the beginning of Row 1, with the short starting tail).
- Start by tightly coiling the strip around itself, beginning with the shorter stitches (the sc/hdc end). This will form the tight central bud of your rose.
- Continue Coiling:
- Continue to coil the rest of the strip, letting it spiral outwards. Don’t pull too tightly; let the natural varying heights of the stitches create the layers of petals. The ridge you made by working in BLO will help these petals lay nicely over each other.
- Secure the Base:
- Once you’ve coiled the entire strip and are happy with the shape of your rose, hold the base firmly with one hand.
- Thread the long tail you left at the end of Row 2 onto your yarn needle.
- Begin to sew through all the layers of the coiled rose at the base. Make several strong stitches, going back and forth across the base, catching every layer to securely hold the rose in its coiled shape.
- Try to make your stitches neat and inconspicuous, so they don’t show through the front of the petals. Aim to make the bottom of the rose relatively flat so it’s easy to attach to other projects.
- When the rose feels stable, tie a small knot with the tail on the back and then carefully weave in any remaining yarn tail to hide it.
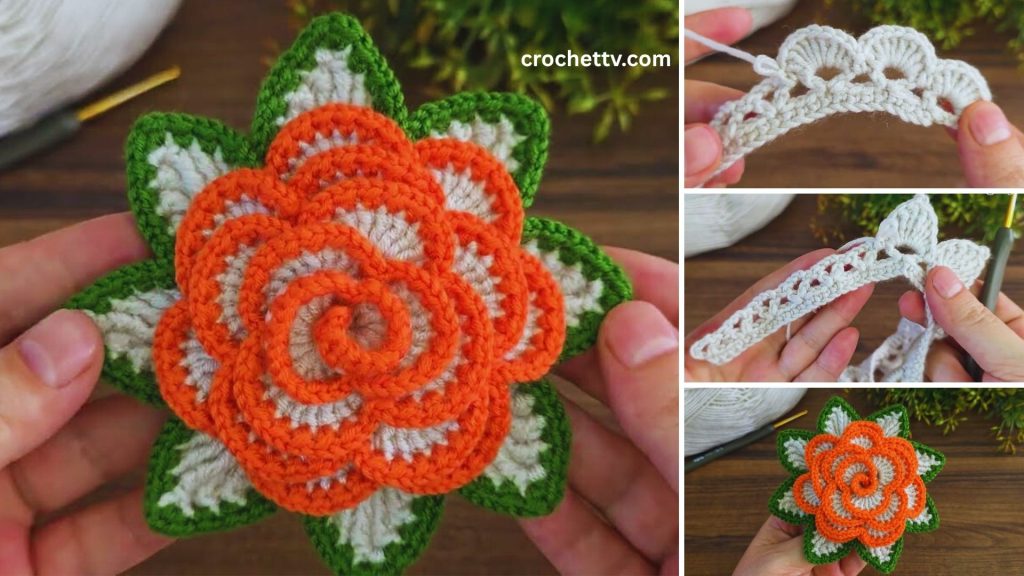
Part 3: Adding the Simple Leaf
A small green leaf completes the classic rose look.
- Crocheting the Leaf:
- With your green yarn, make a slip knot.
- Chain (ch) 7.
- Work 1 single crochet (sc) into the 2nd chain from your hook.
- Work 1 half double crochet (hdc) into the next chain.
- Work 1 double crochet (dc) into the next 2 chains.
- Work 1 half double crochet (hdc) into the next chain.
- Work 1 single crochet (sc) into the last chain.
- Chain 1, and then continue working down the other side of your starting chain (into the unused loops from the original chain):
- Work 1 sc into the next stitch.
- Work 1 hdc into the next stitch.
- Work 1 dc into the next 2 stitches.
- Work 1 hdc into the next stitch.
- Work 1 sc into the last stitch.
- Slip stitch (sl st) into the first sc of the round to join and finish the leaf shape.
- Fasten off, leaving a 6-inch (15 cm) tail for attaching.
- Attaching the Leaf:
- Position the leaf at the base of your rose, where you think it looks best.
- Use your yarn needle and the tail from the leaf to sew it securely to the back of the rose. Make sure it’s firmly attached. Weave in any remaining yarn tail.
Part 4: Final Touches
- Weave in All Remaining Ends:
- Double-check that all your yarn tails—the short one from the rose’s start, and any from the leaf—are neatly and securely woven into the corresponding colors on the back of your rose. This prevents them from unraveling and gives your rose a professional finish.
- Gentle Shaping:
- Gently use your fingers to fluff and arrange the petals of your rose to achieve your desired look. Your beautiful, quickly crocheted rose with leaves is now ready!
Congratulations! You’ve successfully crocheted a lovely Rose with Leaves! These small, charming flowers are perfect for adding a personal touch to so many items.
What will you decorate with your beautiful new rose?