 by
by Crocheting a flower coaster is a delightful and practical project that adds a touch of handmade beauty to your home. These coasters are not only functional, protecting your surfaces from condensation and heat, but also serve as charming decorative accents. Perfect for gifts or simply to brighten your own space, this detailed tutorial will guide you through creating a beautiful, multi-layered flower motif coaster, ideal for crocheters looking to expand their skills beyond basic stitches.
Skill Level: Intermediate Beginner
While this project uses fundamental stitches, it introduces working in the round, creating specific petal shapes, and potentially changing colors, making it a great next step for those comfortable with the absolute basics. You’ll practice:
- Magic Ring (MR) / Adjustable Ring: For a tight, seamless center.
- Chain (ch): The foundation and connecting stitch.
- Slip Stitch (sl st): For joining rounds neatly.
- Single Crochet (sc): A compact, dense stitch for the center.
- Half Double Crochet (hdc): A medium-height stitch.
- Double Crochet (dc): A taller stitch, used extensively for petals.
- Treble Crochet (tr): An even taller stitch (optional, for more pronounced petals).
- Puff Stitch (optional): For added texture in the center.
- Working in the Round: Crocheting in continuous circles.
- Working into Chain Spaces: Creating stitches into gaps, not just stitch tops.
- Changing Colors (optional): Seamlessly switching yarns for a multi-color effect.
- Fastening Off: Securely ending your yarn.
- Weaving in Ends: The crucial final step for a polished and durable coaster.
Finished Coaster Dimensions (Approximate):
Using worsted weight yarn (Medium #4) and the suggested hook, your finished coaster will be approximately 4-5 inches (10-12.5 cm) in diameter. This size is perfect for most mugs and glasses.
- To make a larger coaster: Use a bulkier yarn and/or a larger hook, or add more rounds to the pattern.
- To make a smaller coaster: Use a lighter weight yarn (e.g., sport or DK) and a smaller hook, or reduce the number of petals/rounds.
Materials You’ll Need:
Gathering your supplies beforehand ensures a smooth and enjoyable crocheting session!
- Yarn: Small amounts (e.g., 20-30 yards per color) of Worsted Weight (Medium #4) Cotton Yarn.
- Why Cotton? Cotton yarn is highly recommended for coasters because it’s absorbent (great for condensation!), heat-resistant, durable, and lays flat nicely. Avoid acrylic for coasters if they will be used with hot drinks, as acrylic can melt or warp with direct heat.
- Colors: You can make a solid color coaster or use multiple colors for a more vibrant flower!
- Color A (Flower Center): Yellow, brown, or a contrasting color for the middle.
- Color B (Inner Petals): A lighter shade of your chosen flower color (e.g., light pink, cream, light blue).
- Color C (Outer Petals/Background): A darker shade of your chosen flower color, or green if you want a leafy look (e.g., dark pink, red, green, purple).
- Note: Yarn quantities are estimates. A single 100g skein of worsted weight cotton is usually enough for 3-5 coasters.
- Crochet Hook: Size H/5.0mm. This hook size works well with worsted weight cotton to create a dense, firm fabric that prevents liquids from seeping through easily.
- Yarn Needle (Tapestry Needle): Essential for weaving in yarn tails seamlessly.
- Scissors: Any sharp pair for cutting your yarn.
- Stitch Marker (Optional but Recommended): Helpful for marking the first stitch of a round if you tend to lose your place.
Let’s Crochet Your Beautiful Flower Coaster!
We’ll build this coaster in rounds, starting from the center and working outwards to create the distinct petal layers.
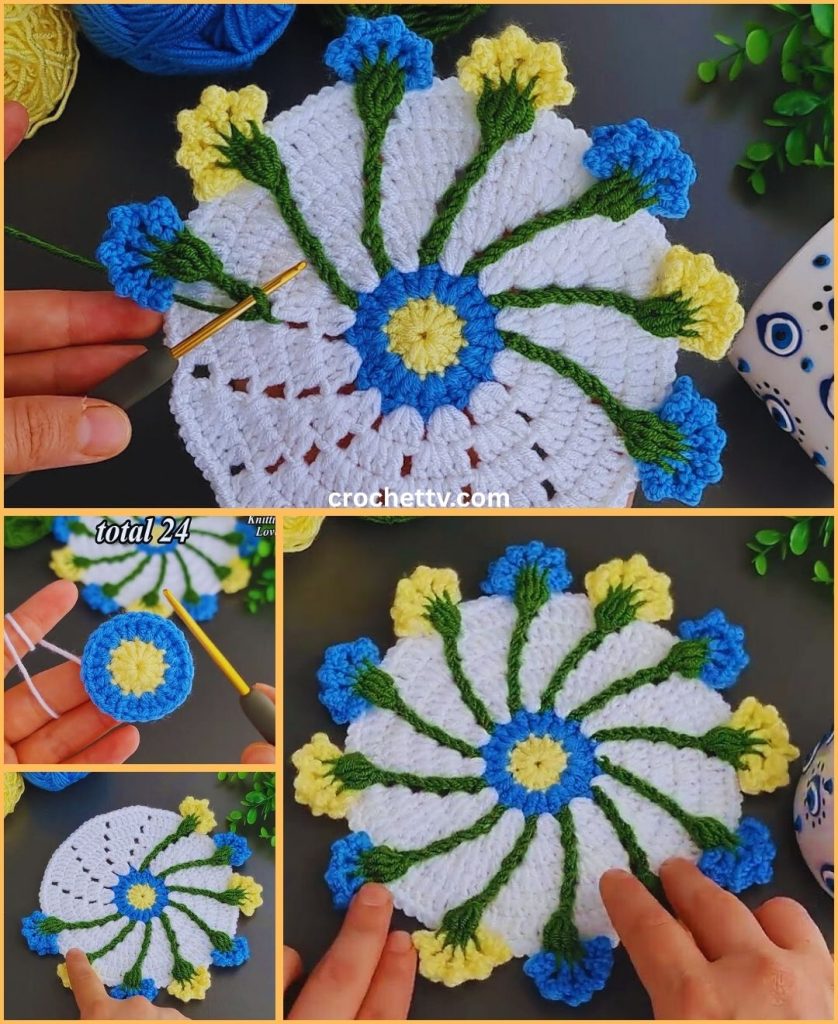
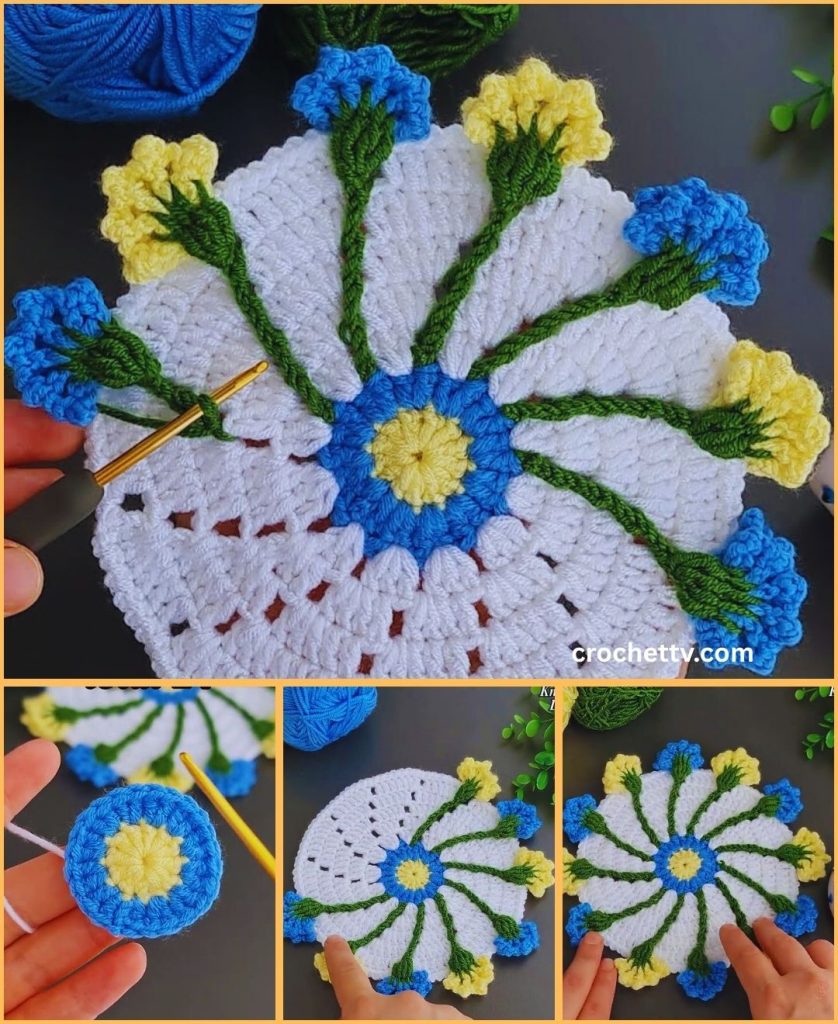
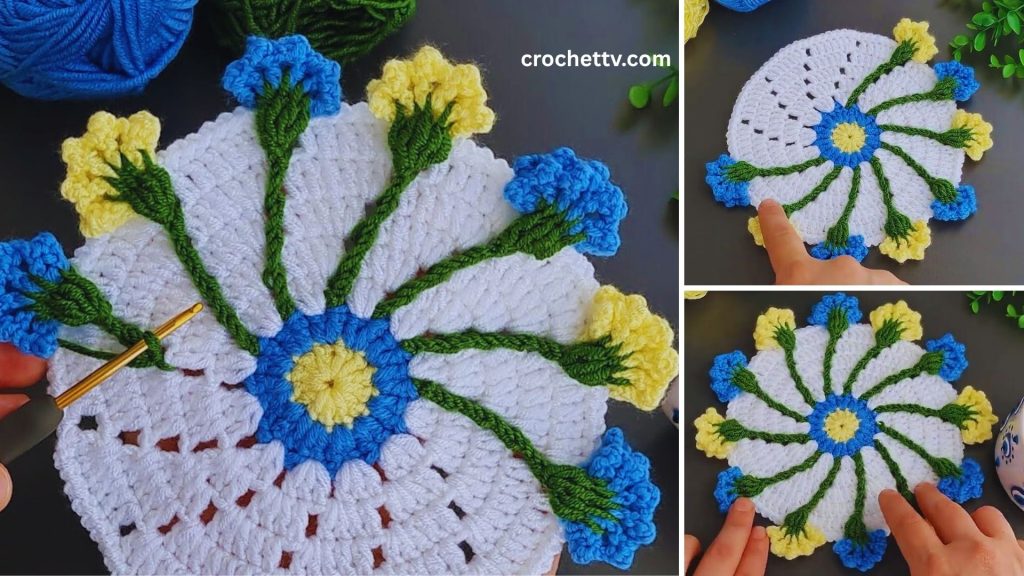
Part 1: The Flower Center
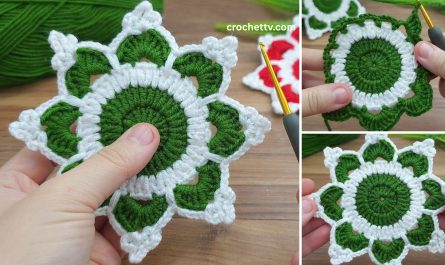
We’ll begin with a Magic Ring, which creates a very tight, neat center for your flower, preventing a hole in the middle of your coaster.
Start with Color A (e.g., Yellow or Brown for a Sunflower look, or a contrasting center color)
- Round 1 (Center):
- Create a Magic Ring (MR): Loop the yarn around your fingers (usually index and middle) to form a ring. Insert your hook into the ring. Yarn over and pull up a loop.
- Chain 1 (ch 1) (this chain does NOT count as a stitch, it just secures the ring and gives height for your first single crochet).
- Work 8 single crochet (sc) stitches into the Magic Ring.
- Pull the yarn tail of the Magic Ring tightly to close the hole in the center.
- Join with a slip stitch (sl st) to the first sc you made (not the ch 1). (8 sc)
- Alternative start (if MR is tricky): Chain 3, join with sl st to first ch to form a ring. Ch 1, work 8 sc into the ring. Join with sl st to first sc.
- Fasten Off (FO) Color A, leaving a 4-6 inch tail.
Part 2: The First Layer of Petals
Now we’ll add the first layer of petals. These will typically be shorter petals, creating a foundation for the larger ones.
Switch to Color B (e.g., Light Pink, or a lighter shade for inner petals)
- Round 2 (Inner Petals):
- Join Color B with a sl st into any stitch from Round 1.
- Chain 1 (ch 1) (does NOT count as a stitch).
- Work (1 sc, ch 2, 1 sc) all into the same stitch where you joined. (This forms your first small petal cluster).
- * Skip 1 stitch. Work (1 sc, ch 2, 1 sc) into the next stitch.*
- Repeat from * to * 3 more times around. You should have 4 such clusters.
- After the last cluster, skip 1 stitch.
- Join with a sl st to the first sc you made in this round. (5 petal clusters of (sc, ch 2, sc)).
- Fasten Off (FO) Color B, leaving a 4-6 inch tail.
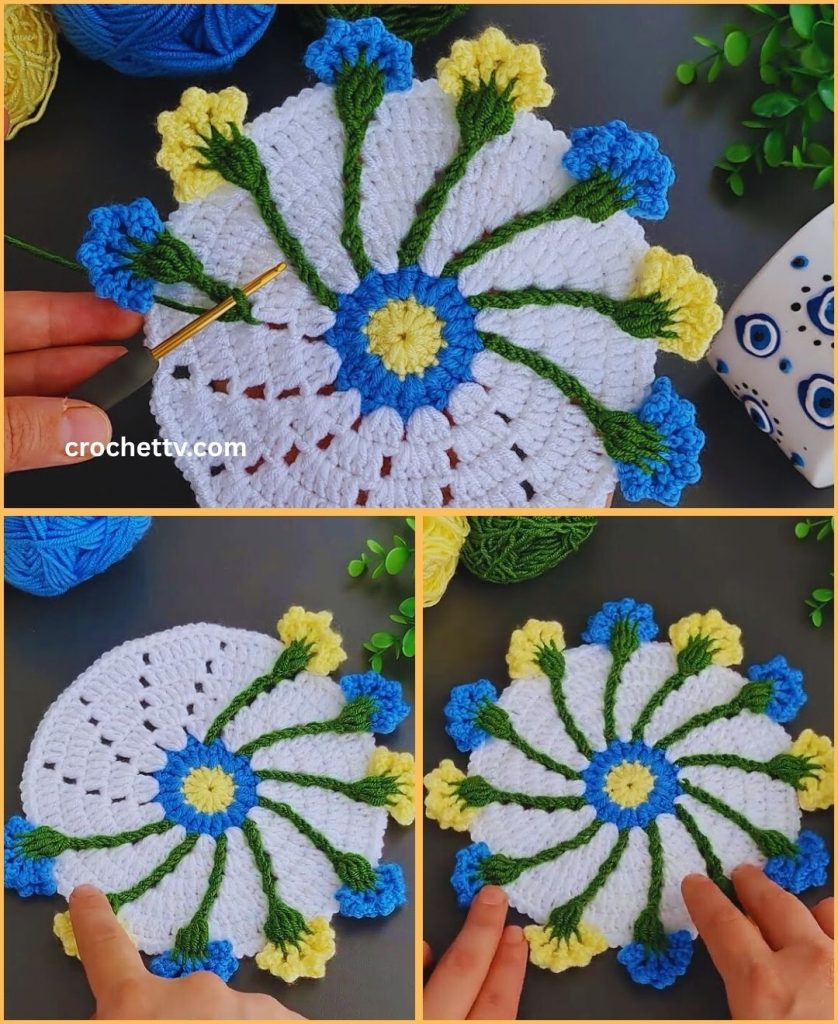
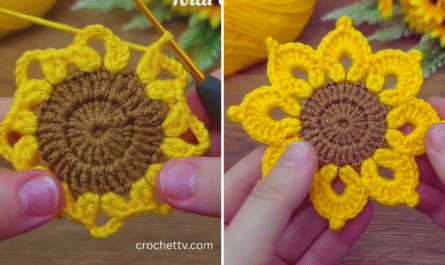
Part 3: The Second Layer of Petals
This layer will create fuller, more pronounced petals that sit slightly behind the first layer, giving the flower more dimension. We’ll work into the chain-2 spaces of the previous round.
Switch to Color C (e.g., Dark Pink, or a darker/complementary color for outer petals)
- Round 3 (Outer Petals):
- Join Color C with a sl st into any chain-2 space from Round 2.
- Chain 2 (ch 2) (counts as your first hdc).
- Work (1 dc, 1 tr, 1 dc, 1 hdc) all into the same chain-2 space. (This creates your first full petal).
- To make a dc: Yarn over, insert hook, yarn over, pull up loop, [yarn over, pull through 2 loops] 2 times.
- To make a tr: Yarn over twice, insert hook, yarn over, pull up loop, [yarn over, pull through 2 loops] 3 times.
- * Sl st into the next sc stitch (this anchors the petal down).
- Sl st into the next chain-2 space (this positions you for the next petal).
- Work (1 hdc, 1 dc, 1 tr, 1 dc, 1 hdc) all into the same chain-2 space.*
- Repeat from * to * 3 more times. You should have 5 full petals.
- After the last petal, sl st into the last sc stitch to anchor.
- Join with a sl st to the top of the beginning ch 2. (5 large petals).
- Fasten Off (FO) Color C, leaving a 4-6 inch tail.
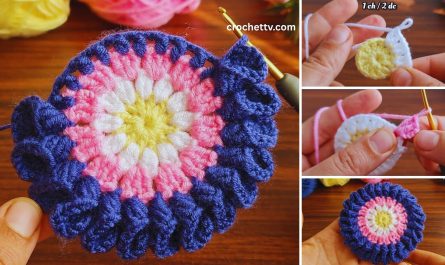
Part 4: Squaring Off the Motif (Optional, but recommended for a flatter coaster)
This step helps to flatten the flower and can be used to add a contrasting border or a “leaf” effect. If you prefer a completely round, fluffy flower coaster, you can skip this part and go directly to finishing, but it might not lie as flat.
Using Color C again, or introduce a new color (e.g., a darker green for a leafy look, or a neutral)
- Round 4 (Squaring/Base Layer):
- Join your chosen yarn with a sl st into the sl st between any two large petals from Round 3. This is where your corners will form.
- Chain 3 (ch 3) (counts as your first dc).
- Work 2 dc into the same slip stitch space.
- Chain 2 (ch 2) (this forms a corner).
- Work 3 dc into the same slip stitch space. (This is your first corner cluster).
- * Chain 1 (ch 1). Work 3 hdc into the top of the tr stitch of the next petal.
- Chain 1 (ch 1). Work (3 dc, ch 2, 3 dc) into the next sl st space between petals.*
- Repeat from * to * 3 more times.
- After the last corner, Chain 1.
- Join with a sl st to the top of the beginning ch 3.
- Fasten Off (FO), leaving a 4-6 inch tail.
- Round 5 (Final Edge/Stability):
- Join your chosen yarn (the same as Round 4, or a new complementary color) with a sl st into any ch-2 corner space from Round 4.
- Chain 3 (ch 3) (counts as first dc).
- Work 2 dc into the same corner space.
- Chain 2 (ch 2).
- Work 3 dc into the same corner space. (This is your first corner).
- * Work 3 dc into the next ch-1 space.
- Work 3 dc into the next 3-hdc cluster (or simply work into the top of the middle hdc).
- Work 3 dc into the next ch-1 space.
- Work (3 dc, ch 2, 3 dc) into the next ch-2 corner space.*
- Repeat from * to * 2 more times.
- Work 3 dc into the next ch-1 space.
- Work 3 dc into the next 3-hdc cluster.
- Work 3 dc into the next ch-1 space.
- Join with a sl st to the top of the beginning ch 3.
- Fasten Off (FO), leaving a 6-inch tail.
Part 5: Final Finishing Touches (Crucial for a Beautiful Coaster!)
This stage is essential for making your coaster look polished, lay flat, and last longer.
- Weave in All Ends (Meticulously!):
- You’ll have a few yarn tails from starting each color and fastening off. This is perhaps the most important step for a professional-looking finish.
- Thread each yarn tail onto your yarn needle.
- How to Weave Neatly: Insert the needle into existing stitches of the same color as the tail. Weave the tail through the stitches for at least 2-3 inches (5-7.5 cm). To make it extra secure and prevent unraveling, subtly change direction within the stitches (e.g., weave along a stitch, then turn and weave back through some of the same stitches diagonally or perpendicularly) to “lock” the tail in place.
- Once secured, trim any excess yarn very close to the fabric, being careful not to snip any of your actual crocheted stitches.
- Blocking (Highly Recommended!):
- Blocking is a simple process that can dramatically improve the appearance of your coaster. It helps to flatten it, even out your stitches, and make the petals lay nicely. For cotton, wet blocking is ideal.
- Method for Cotton Yarn (Wet Blocking):
- Gently submerge your finished coaster in cool water (you can add a tiny bit of mild soap if desired, then rinse thoroughly).
- Gently squeeze out excess water (do NOT wring or twist, as this can distort the stitches).
- Lay the damp coaster flat on a clean towel or a blocking mat.
- Gently shape the coaster into a perfect circle (or square, if you did the squaring rounds), making sure the petals are fanned out nicely. Pin it down using rust-proof pins if you have them.
- Allow the coaster to air dry completely and thoroughly in a well-ventilated area. This might take several hours or even overnight, depending on humidity. Do not move or use the coaster until it’s bone dry.
Congratulations! You’ve successfully crocheted a beautiful and functional Motif Flower Coaster! This handmade item is not only practical but also a lovely piece of fiber art you can proudly display or gift.
What beautiful color combinations will you choose for your next set of flower coasters?