 by
by Crocheting a beautiful rose flower is a rewarding project that’s much simpler than it looks, even for complete beginners! This tutorial will guide you through every single step to create a flat, spiraling rose that mimics the natural beauty of a real bloom. Once you master this, you’ll want to add these charming motifs to everything from hats and headbands to blankets, bags, and clothing as delightful appliques.
This detailed guide breaks down the process, focusing on clarity and providing all the necessary information for you to succeed.
Skill Level: Absolute Beginner Friendly!
This project is perfectly suited for you if you’re comfortable with, or looking to get comfortable with, the absolute basics of crochet. You’ll practice:
- Making a Slip Knot: The very first step to starting any crochet project.
- Chain (ch): The fundamental foundation stitch that creates your starting length.
- Slip Stitch (sl st): A very short stitch used for joining and neat finishing.
- Single Crochet (sc): A compact and sturdy stitch.
- Double Crochet (dc): A taller stitch that works up quickly and creates lovely drape.
- Fastening Off: Securely ending your yarn.
- Weaving in Ends: The crucial final step for a clean, professional finish, often overlooked by beginners but vital for durability and appearance.
Finished Rose Motif Dimensions (Approximate):
The size of your finished rose will vary slightly based on your yarn weight, hook size, and personal tension (how tightly or loosely you crochet).
- Using worsted weight yarn (Medium #4) and the suggested H/5.0mm hook, your rose will typically measure around 1.5 to 2.5 inches (4-6 cm) in diameter.
- Want a smaller rose? Use a lighter weight yarn (like DK or sport weight) and a smaller hook (e.g., 3.5mm or 4.0mm). You can also start with a shorter foundation chain (e.g., ch 16-18).
- Want a larger, fuller rose? Use a chunkier yarn (like bulky weight) and a larger hook (e.g., 6.0mm or 6.5mm). Alternatively, start with a longer foundation chain (e.g., ch 25-30).
Materials You’ll Need:
Before you begin, gather all your supplies. Having everything ready will make your crocheting experience much smoother and more enjoyable!
- Yarn: You’ll only need a small amount, typically 10-20 yards (9-18 meters) for one rose.
- Weight: Worsted Weight (Medium #4) is highly recommended. It’s easy to handle for beginners, the stitches are clearly visible, and it provides a nice, full rose shape.
- Fiber Content: Acrylic yarn is a fantastic choice for beginners as it’s affordable, widely available, easy to work with, and holds its shape well. Cotton yarn also works beautifully, giving a crisp, defined petal edge.
- Color: Choose any color that inspires you! Classic rose colors like red, various shades of pink (light to fuchsia), white, or cream are always popular. Don’t be afraid to experiment with other colors like lavender, peach, or even a soft yellow.
- Crochet Hook: Size H/5.0mm. This hook size pairs perfectly with worsted weight yarn to create a fabric that’s firm enough to hold its shape but soft enough to be pliable for shaping.
- Yarn Needle (Tapestry Needle): This is a blunt-tipped needle with a large eye, specifically designed for weaving in yarn ends. It’s crucial for securely assembling your rose and hiding tails.
- Scissors: Any pair of sharp scissors will do for cutting your yarn.
Let’s Crochet Your Easy Rose Flower Motif!
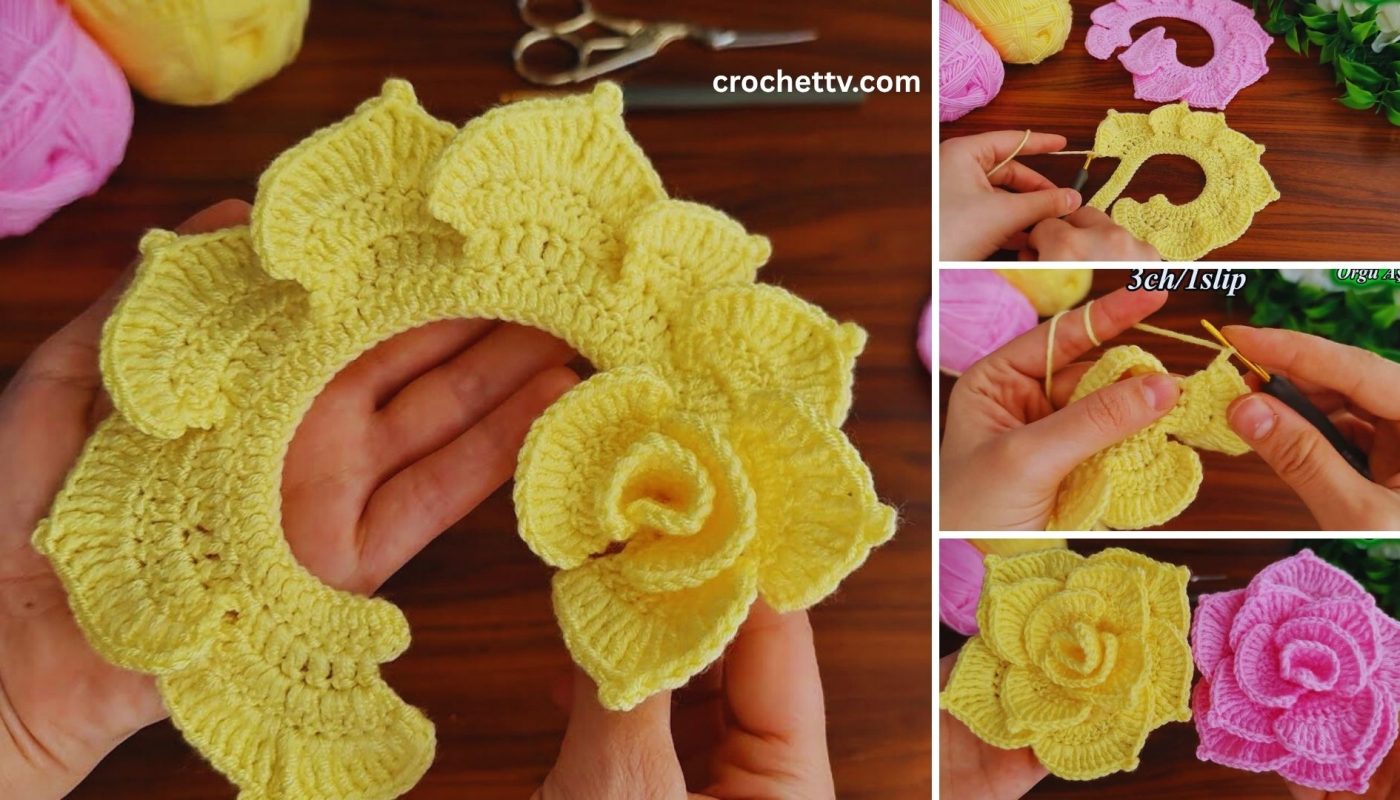
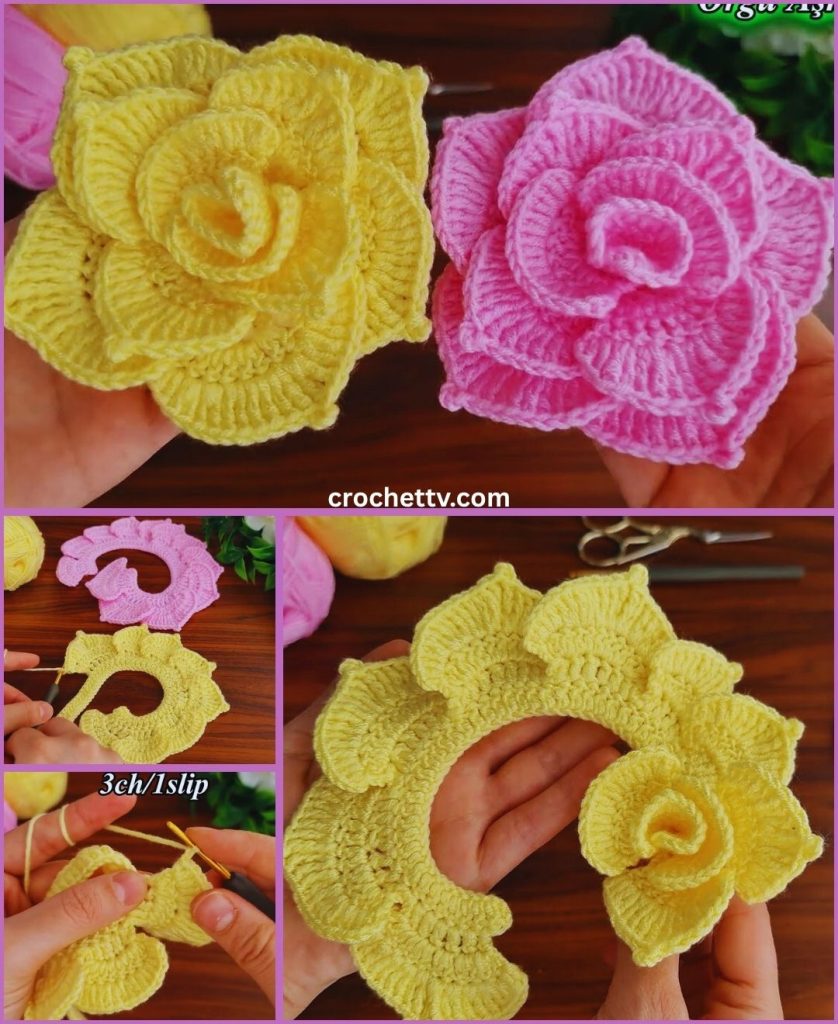
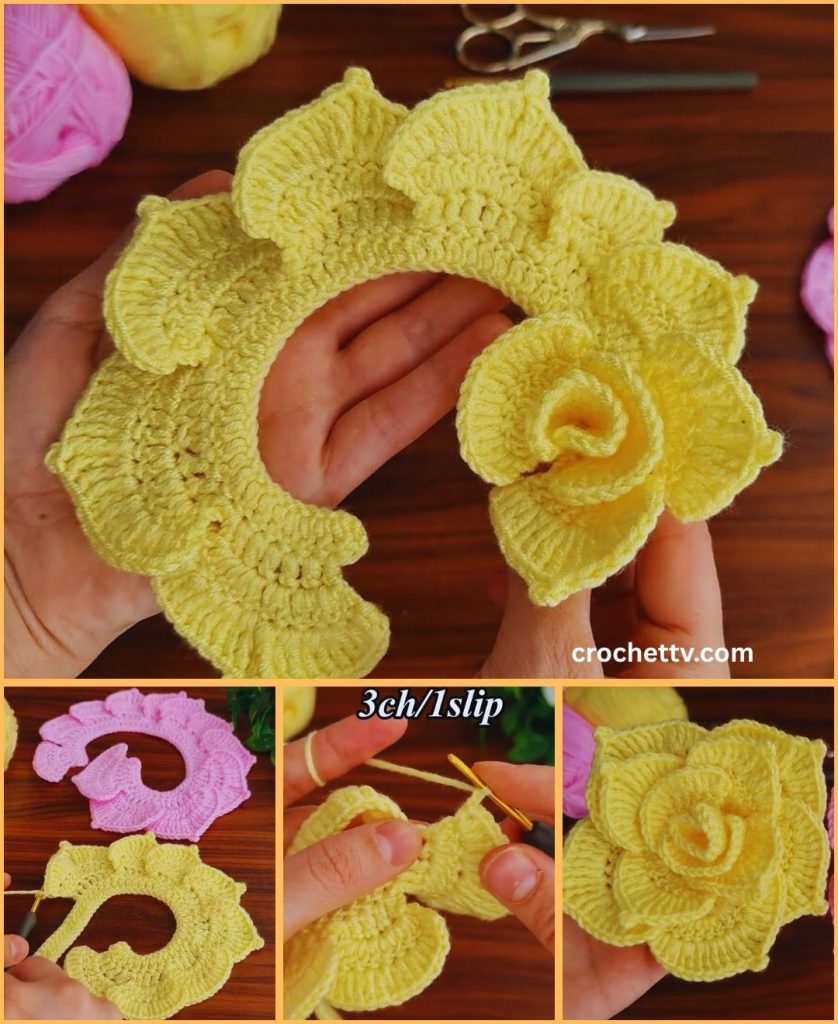
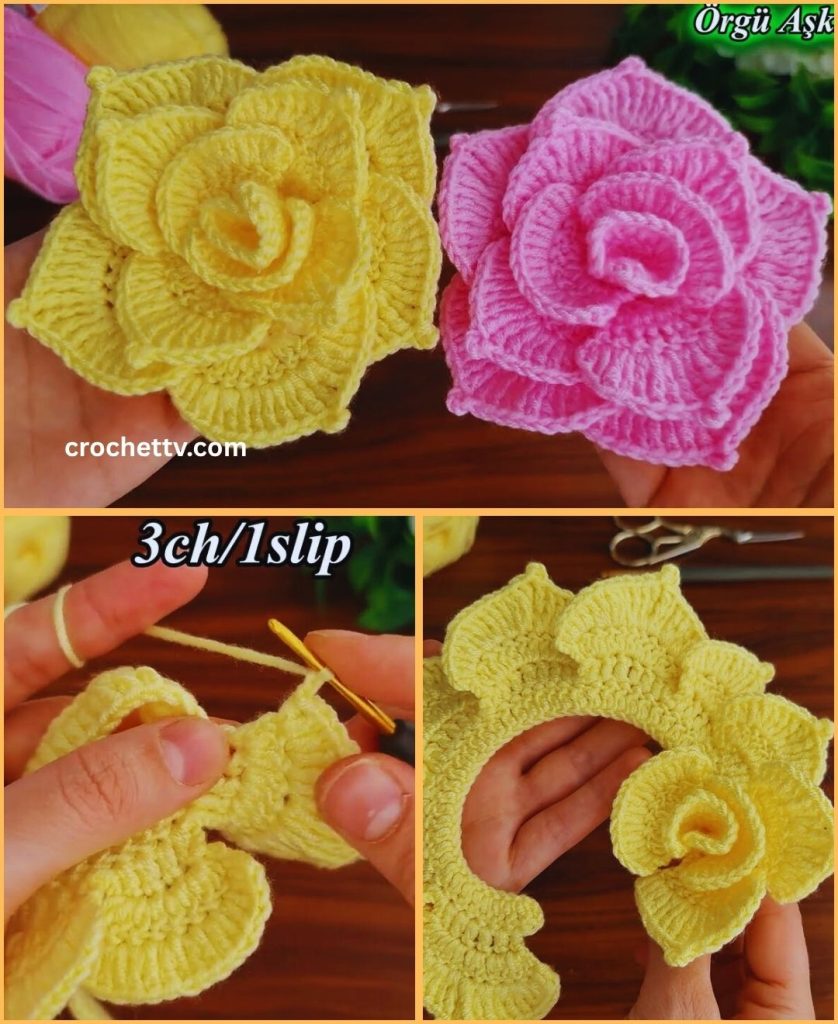
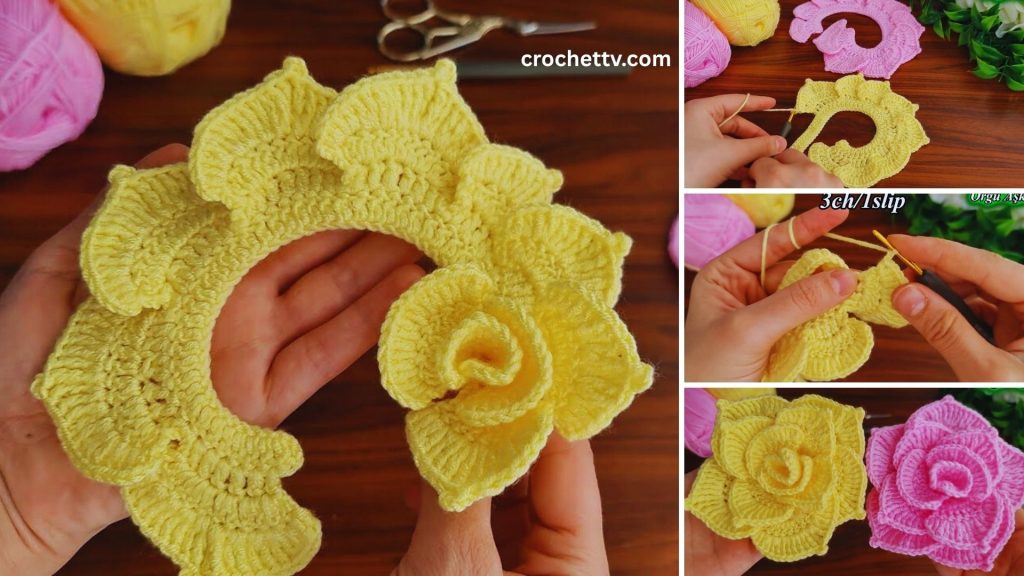
The magic of this rose comes from crocheting a single, long, straight strip that is then coiled up and sewn into a spiral. The stitch pattern itself creates the natural curl and ruffled edges that mimic real petals.
Step 1: Create the Foundation Chain
This is the very beginning of your rose strip. The length of this chain will determine how many “petals” and how full your rose will be.
- Make a Slip Knot:
- Take your chosen yarn.
- Lay the yarn over your palm.
- Wrap the yarn around two fingers (index and middle) once, then again, crossing the first wrap.
- Insert your crochet hook under the first loop and grab the second loop with your hook.
- Pull the second loop under the first loop.
- Remove your fingers and gently pull the working yarn (the yarn coming from the ball) to tighten the knot around your hook, but not too tightly that it’s difficult to move.
- Chain (ch) 21:
- With the slip knot on your hook, yarn over (wrap the yarn from back to front over your hook).
- Pull the yarn through the loop on your hook. You’ve just made your first chain stitch!
- Repeat this process 20 more times until you have a total of 21 chains.
- Self-Correction Tip: If your chain looks too tight or too loose, practice a few more times to get a consistent tension. The tension of your foundation chain affects the overall shape of your rose.
Step 2: Work the First Row of Petals (The “V-Stitch” Row)
This row creates the foundational shape for your petals using a stitch combination called a “V-stitch” (dc, ch 2, dc). These V-stitches will form the individual sections that will later puff out into petals.
- Starting the First V-Stitch:
- Count 3 chains from your hook (do not count the loop currently on your hook).
- Work 1 double crochet (dc) into this 3rd chain.
- To make a dc: Yarn over, insert your hook into the designated chain, yarn over again, pull up a loop (you should now have 3 loops on your hook). Yarn over, pull through the first 2 loops on your hook (you now have 2 loops left). Yarn over again, pull through the remaining 2 loops on your hook. You’ve completed one double crochet.
- Chain 2 (ch 2).
- Work 1 dc into the exact same chain space where you just made your previous dc. This completes your first V-stitch.
- Continuing V-Stitches Across the Row:
- Skip 2 chains in your foundation chain.
- Work (1 dc, ch 2, 1 dc) into the next chain. This creates your second V-stitch.
- Repeat these two steps (skip 2 chains, then work (1 dc, ch 2, 1 dc) into the next chain) all the way across your foundation chain.
- You should consistently skip 2 chains and work into the 3rd chain, ending with a V-stitch in the very last chain of your initial ch 21. If your count is correct, you will have a total of 7 V-stitches across this row.
- Visual Check: Your work should look like a flat strip with distinct “V” shapes along the top edge, separated by small gaps.
Step 3: Work the Second Row of Petals (Adding Fullness and Curl)
This is the most exciting row where your petals truly begin to take shape! By working multiple double crochets into the chain-2 spaces of the V-stitches from the previous row, you’ll create a lovely ruffled effect that naturally encourages the strip to curl into a rose.
- Prepare for the Next Row:
- Chain 1 (ch 1). This chain does not count as a stitch; it simply gives height for your next row.
- Turn your work. Your hook should now be ready to work into the V-stitches you just created.
- Creating the First Full Petal:
- Look for the first chain-2 space (the “hole” in the center of your very first V-stitch).
- Work 8 double crochet (dc) stitches directly into this chain-2 space. This substantial number of stitches in a small space will cause it to curve and form a full, ruffled petal.
- Anchoring and Moving to the Next Petal:
- Now, you need to anchor this petal and prepare for the next. Look at the two double crochet posts that form the “legs” of the next V-stitch.
- Work 1 single crochet (sc) into the space between the V-stitches, or you can work it into the top of the middle dc post of the next V-stitch. The goal is to simply secure the petal down before moving to the next.
- To make an sc: Insert your hook into the stitch/space, yarn over, pull up a loop (2 loops on hook), yarn over, pull through both loops.
- Repeat for Remaining Petals:
- Work 8 dc into the next chain-2 space.
- Work 1 sc into the stitch/space between this V-stitch and the next.
- Repeat these two steps all the way across the row, working 8 dc into each remaining chain-2 space and an sc to anchor between them.
- After working the last 8 dc into the final chain-2 space, finish with 1 sc into the last dc post/stitch to anchor the end.
- Fasten Off:
- Cut your yarn, leaving a very long tail – about 12-18 inches (30-45 cm). This long tail is absolutely essential for sewing your rose together securely in the next step.
- Yarn over with your hook and pull the cut tail completely through the loop that’s still on your hook. Gently tug to secure the knot.
- Visual Check: You should now have a long, flat crocheted strip with a very ruffled edge. You’ll notice it already has a natural tendency to curl or spiral – this is exactly what we want!
Step 4: Assemble Your Rose (The Magic!)
This is the truly magical part where your flat, ruffled strip transforms into a beautiful three-dimensional flower.
- Identify Rolling Direction:
- Lay your crocheted strip flat on a table. You’ll instinctively see one end that feels more natural to start rolling from. Often, the end where you started your foundation chain is a little firmer and makes a good core.
- The side with the 8-dc clusters should be facing you (this will be the “right side” of your petals).
- Begin Rolling:
- Starting from one end, begin to gently roll the strip tightly into a spiral.
- Keep the bottom edge (the foundation chain side) of the strip as aligned as possible as you roll. This is the part you’ll be sewing through.
- As you roll, the ruffled edge with the 8-dc clusters will naturally fan out and create the beautiful “petals” of your rose. Don’t worry if it looks a bit messy at first; you’ll refine it.
- Shape and Secure:
- Once you’ve rolled the entire strip, hold the coiled rose firmly in one hand, especially the bottom base, to prevent it from unraveling.
- Thread the long yarn tail (the one you left when fastening off) onto your yarn needle.
- Working from the back (the flat, rolled-up base) of the rose, begin to sew through all layers of the coiled strip. You want to make stitches that go through the bottom edge of the entire spiral to secure it.
- Make several stitches in different directions across the base to ensure all the coiled layers are firmly held together. Try to pass the needle through the very center of the rose’s base and out to the outer coiled layers.
- Pull your stitches snug, but do not pull them so tightly that they distort the petals on the front of the rose. The goal is to make the base secure, not to flatten the flower.
- Continue stitching until the rose feels very firmly secure and you’re confident it won’t unravel with use. This might take 10-15 stitches, crisscrossing the base.
Step 5: Final Finishing Touches (The Polishing Touches!)
These last steps are crucial for making your rose look truly professional and ensuring its longevity.
- Weave in All Remaining Yarn Tails:
- You’ll likely have two tails: the long one you just used for sewing, and the shorter starting tail from your very first slip knot.
- Thread each yarn tail onto your yarn needle.
- How to Weave Neatly: On the back of the rose, insert the needle into existing stitches of the same color as the tail. Weave the tail through the stitches for at least 3-4 inches (7.5-10 cm). To make it extra secure and prevent unraveling, subtly change direction within the stitches (e.g., weave along a stitch, then turn and weave back through some of the same stitches diagonally or perpendicularly) to “lock” the tail in place. This prevents it from pulling out later.
- Once secured, trim any excess yarn very close to the fabric, being careful not to snip any of your actual crocheted stitches.
- Why is this important? Unwoven ends can unravel your beautiful work, especially with repeated handling or washing.
- Gently Fluff and Arrange Petals:
- Once all tails are hidden, take a moment to gently fluff and shape your petals with your fingers.
- You can carefully pull some petals outwards to make the rose look more open and “blooming,” or leave them a bit tighter for a bud-like appearance. This is where you can truly personalize the look of your unique rose.
Congratulations! You’ve successfully crocheted your very own beautiful Rose Flower Motif! You now have a versatile, handmade embellishment ready to add a charming and personal touch to countless projects.
Now that you’ve mastered the basic rose, imagine the possibilities! You could create them in different sizes, experiment with two colors (one for the V-stitch row, one for the 8-dc row for a layered effect), or even add a small green leaf.
What creative project will be the first to be adorned by your lovely new crochet rose?