 by
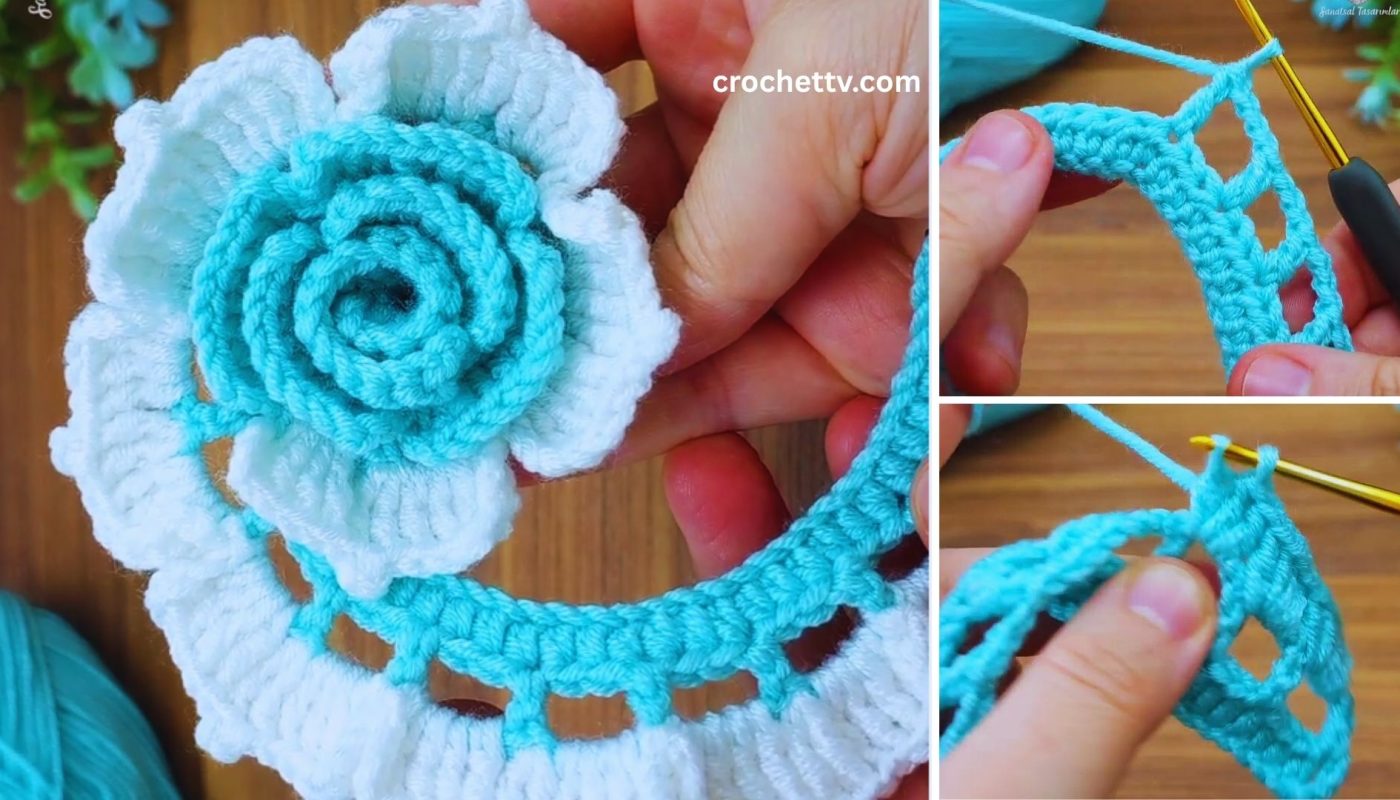
by Adding a second color to a crochet rose motif might seem intimidating, but it’s surprisingly simple and adds a beautiful, realistic depth to your flower! This tutorial will guide you through creating a flat, spiraling rose that looks intricate but is incredibly easy to achieve using just a few basic stitches and a clever color change.
These two-color roses are perfect for embellishing hats, bags, headbands, scarves, or as charming decorative appliques on blankets and clothing.
Skill Level: Absolute Beginner Friendly!
This project is excellent if you’re ready to learn or practice:
- Chain (ch): The fundamental starting stitch.
- Slip Stitch (sl st): For joining stitches neatly.
- Single Crochet (sc): A compact, sturdy stitch.
- Half Double Crochet (hdc): A medium-height stitch.
- Double Crochet (dc): A taller stitch, creating more drape and height.
- Changing Colors: A simple, effective technique.
- Fastening off: Securing your yarn.
- Weaving in ends: The crucial final step for a polished finish.
Finished Rose Motif Dimensions (Approximate):
Using worsted weight yarn and the suggested hook, your finished rose will be approximately 1.5 to 2.5 inches (4-6 cm) in diameter, depending on your tension and the yarn thickness. You can make larger or smaller roses by adjusting your hook size, yarn weight, or by adding/subtracting stitches in the pattern.
Materials You’ll Need:
Gathering your supplies beforehand ensures a smooth and enjoyable crocheting session!
- Yarn: Small amounts (e.g., 10-20 yards / 9-18 meters per color) of Worsted Weight (Medium #4) Acrylic or Cotton Yarn.
- Color A (Inner Petals): A lighter shade of your chosen rose color (e.g., light pink, cream, or light yellow).
- Color B (Outer Petals): A darker or contrasting shade of your chosen rose color (e.g., dark pink, red, or a complementary color like purple).
- Why Worsted Weight? It’s easy to handle for beginners and shows stitch definition well. Cotton provides crispness, while acrylic is soft and widely available.
- Crochet Hook: Size H/5.0mm. This hook size is a versatile choice for worsted weight yarn.
- Yarn Needle (Tapestry Needle): Essential for weaving in yarn tails.
- Scissors: Any sharp pair for cutting your yarn.
Let’s Crochet Your Easy Two-Color Rose Flower Motif!
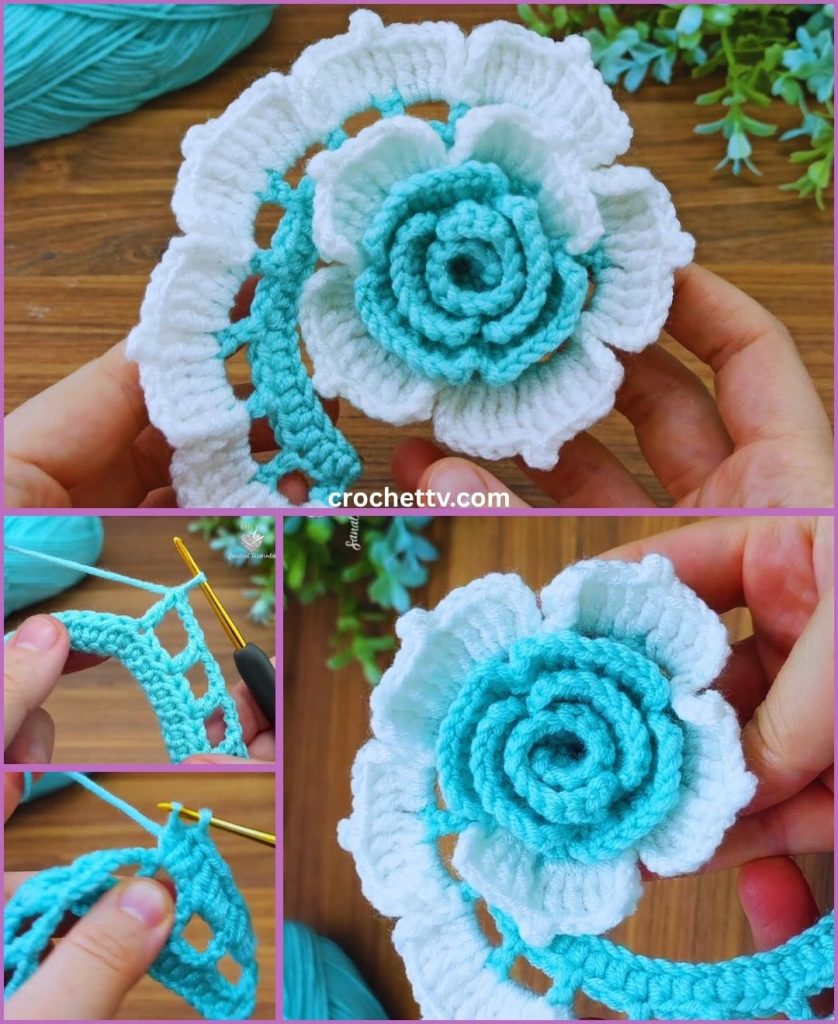
This rose is created by crocheting a long, straight strip that naturally curls into a spiral when you’re done. The key to the two-color effect is changing yarn colors between the two main rows of the strip.
Step 1: Create the Foundation Chain (Color A)
- Make a slip knot with Color A yarn and place it onto your H/5.0mm crochet hook.
- Chain (ch) 21. This is the starting chain that will form the length of your rose strip.
- (For a smaller rose, chain about 16-18 stitches. For a larger, fuller rose, chain 25-30 stitches. Just ensure your chain is a multiple of 3 plus a turning chain, or simply adjust as you go.)

Step 2: Work the First Row of Petals (Color A)
This row establishes the base of your rose’s “petals” using taller stitches to create a ruffled edge.
- Work 1 double crochet (dc) into the 3rd chain from your hook.
- (To make a dc: Yarn over, insert hook into the chain, yarn over, pull up a loop (3 loops on hook), yarn over, pull through 2 loops (2 loops on hook), yarn over, pull through last 2 loops.)
- Chain 2 (ch 2).
- Work 1 dc into the same chain space where you just made your previous dc. (This creates a “V-stitch” which forms a petal section).
- Skip 2 chains.
- Work (1 dc, ch 2, 1 dc) into the next chain. (This creates another V-stitch).
- Repeat steps 4 and 5 all the way across your starting chain.
- You should end with a V-stitch in the very last chain. You will have 7 V-stitches if you started with ch 21.
- Do NOT fasten off. Instead, prepare to change color.
Step 3: Change Color and Work the Second Row of Petals (Color B)
This is where the two-color magic happens! You’ll change to Color B at the end of the previous row and then work your next row into the chain-2 spaces, making the petals fuller and helping the strip curl.
- To change color at the end of a row:
- Insert your hook into the last stitch where you completed the final dc of your previous row (the last dc of the last V-stitch).
- Yarn over with Color A, pull up a loop (2 loops on hook).
- Drop Color A. Pick up Color B.
- Yarn over with Color B and pull it through both loops on your hook to complete the stitch. Color B is now on your hook.
- Chain 1 (ch 1) with Color B and turn your work.
- Work 8 double crochet (dc) stitches into the first chain-2 space (the very first “V” you made in Color A). This forms the first full petal in your new color.
- Work 1 single crochet (sc) into the dc post (the middle vertical bar of the next dc stitch from the previous row), or into the stitch right between the V-stitches, to anchor it down slightly.
- Work 8 dc into the next chain-2 space.
- Work 1 sc into the dc post (or between the V-stitches) before the next chain-2 space.
- Repeat steps 4 and 5 all the way across the row.
- After working the last 8 dc into the final chain-2 space, finish with 1 sc into the last dc post/stitch to anchor.
- Fasten off, leaving a long tail (about 12-18 inches / 30-45 cm) of Color B for assembly. You’ll use this tail to sew your rose together.
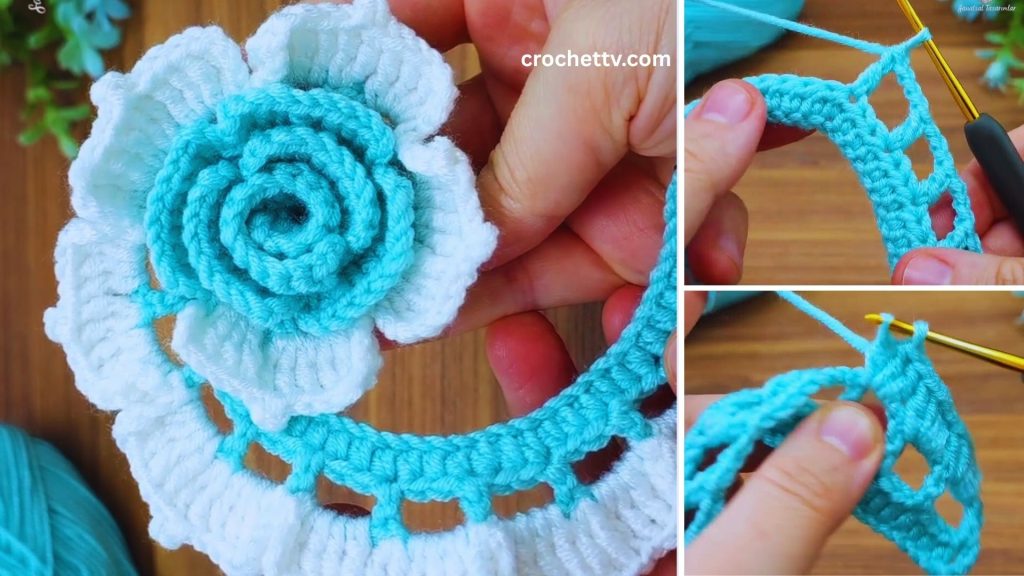
Step 4: Assemble Your Rose
This is the magical part where your flat strip transforms into a beautiful flower!
- Lay your crocheted strip flat. You’ll notice it naturally wants to curl.
- Starting from one end (either end works, but often the starting chain end is a bit firmer for the center), begin to gently roll the strip tightly into a spiral.
- The “bottom” (the foundation chain side in Color A) will form the center base of your rose, appearing as the inner petals.
- The “top” (the side with the 8-dc clusters in Color B) will naturally ruffle outwards, forming the fuller outer petals.
- As you roll, try to keep the bottom edges aligned so you can sew through them easily.
- Once you’re happy with the shape and fullness of your rose, hold it firmly with one hand.
- Thread the long yarn tail of Color B onto your yarn needle.
- Working from the back (the flat, rolled-up base of the rose), begin to sew through all layers of the coiled strip. Make several stitches in different directions across the base to secure all the layers together. Go through the very center and out to the outer layers. Pull the stitches snug, but not so tight that they distort the petals.
- Continue stitching until the rose feels firmly secure and won’t unravel.
Step 5: Final Finishing Touches
- Weave in any remaining yarn tails. You’ll have the starting tail from the foundation chain (Color A) and any small tail from where you joined Color B. Use your yarn needle to weave them discreetly into the back of the rose.
- Trim any excess yarn close to the fabric.
- Gently fluff and arrange the petals to your liking. You can carefully pull some petals outwards to make the rose look more open, or leave them tighter for a bud-like appearance. The two colors will now beautifully highlight the different layers of the petals!
Congratulations! You’ve successfully crocheted an amazing and easy Two-Color Rose Flower Motif! You now have a beautiful handmade embellishment ready to add a charming, layered touch to any project.
What beautiful two-color combination will you choose for your next rose?