 by
by Creating a green flower crochet baby blanket is a truly special project! This tutorial will guide you through making individual flower motifs in varying shades of green, then seamlessly joining them to form a beautiful, textured blanket. We’ll focus on a beginner-friendly approach, making it accessible even if you’re new to motif-based blankets.
Skill Level: Easy (Perfect for Ambitious Beginners!)
This project is excellent if you’re comfortable with or ready to learn:
- Magic Ring (MR) / Chain-2 Start: For a tight, seamless center.
- Chain (ch): The fundamental starting stitch.
- Slip Stitch (sl st): For joining stitches and rounds neatly.
- Single Crochet (sc): A compact stitch.
- Half Double Crochet (hdc): A versatile, medium-height stitch.
- Double Crochet (dc): A taller stitch, used for petals and the main body of the square.
- Working in the round: Crocheting in a circular motion.
- Changing Colors: Essential for creating depth in your flowers.
- Joining Motifs: A simple method for connecting your flower squares.
- Fastening off: Securing your yarn.
- Weaving in ends: The crucial final step for a polished finish.
Finished Blanket Dimensions (Approximate):
A common size for a baby blanket is approximately 30 x 40 inches (75 x 100 cm). Each flower motif (once squared off) will be approximately 6 x 6 inches (15 x 15 cm).
To achieve a 30×40 inch blanket, you’ll need approximately:
- 5 squares wide (5 x 6 inches = 30 inches)
- 7 squares long (7 x 6 inches = 42 inches – close enough to 40)
- Total Motifs Needed: 35 flower squares
You can easily adjust the size by making more or fewer motifs.
Materials You’ll Need:
Gathering your supplies beforehand ensures a smooth and enjoyable crafting session!
- Yarn:Worsted Weight (Medium #4) Acrylic Yarn is highly recommended for baby blankets. It’s soft, durable, easy to wash, and comes in a huge range of colors.
- Color A (Flower Center): A lighter green, yellowish-green, or even a cream/white for contrast (e.g., about 150-200 yards for 35 motifs).
- Color B (Inner Petals): A medium green (e.g., about 200-250 yards for 35 motifs).
- Color C (Outer Petals / Square Background): A darker green, forest green, or even a sage green to complement (e.g., about 250-300 yards for 35 motifs).
- Color D (Joining / Border Color): A neutral like white, cream, or a very light green to tie it all together (e.g., about 300-400 yards).
- Note: Yarn quantities are estimates. It’s always a good idea to buy a bit extra to be safe!
- Crochet Hook: Size H/5.0mm. This size works well with worsted weight yarn for a soft, yet not too open, fabric.
- Yarn Needle (Tapestry Needle): Essential for weaving in ends and joining squares.
- Scissors: Any sharp pair for cutting your yarn.
- Stitch Markers (Optional but Recommended): Helpful for marking corners or the first stitch of a round, especially for squaring off motifs.
Let’s Crochet Your Green Flower Baby Blanket!
We’ll break this down into three main parts:
- Making the individual Flower Motif.
- Joining the motifs together.
- Adding a border to the blanket.
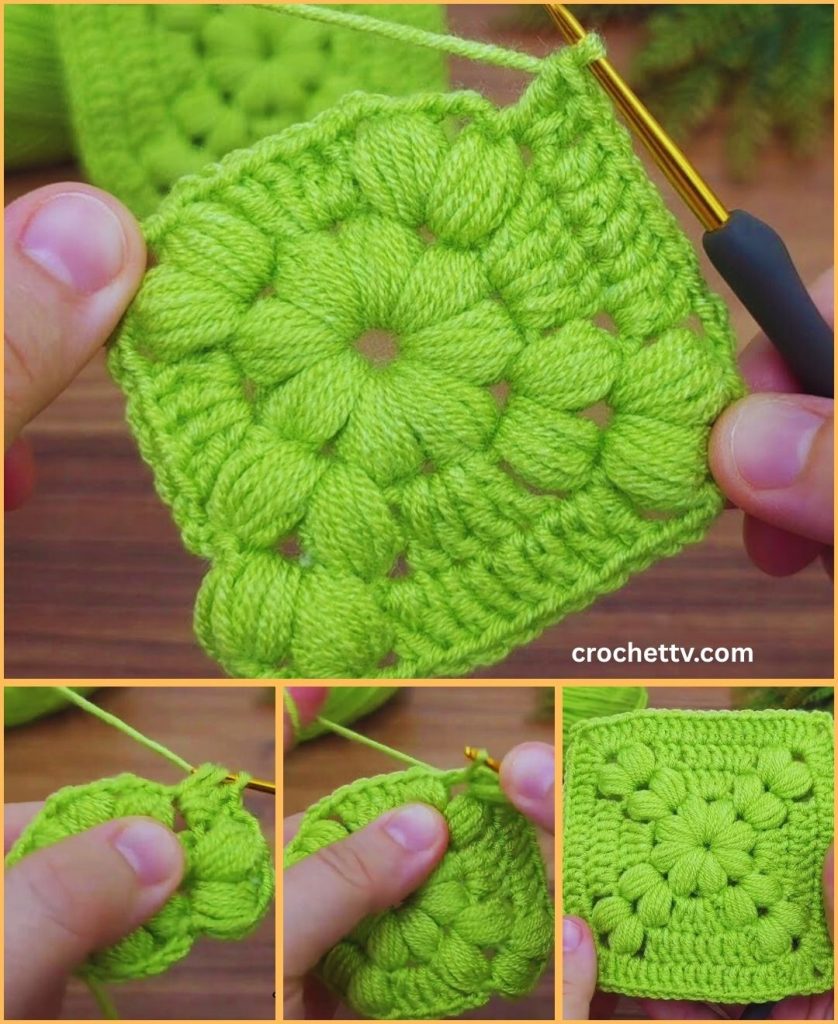
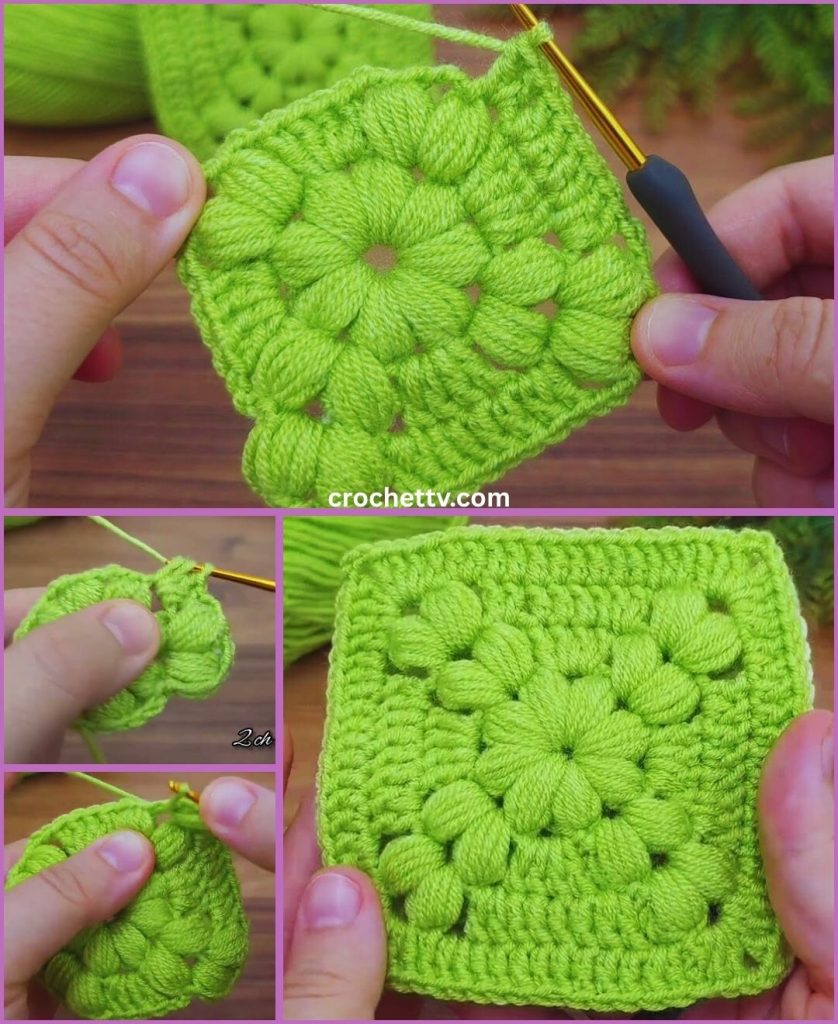
Part 1: Crocheting the Individual Flower Motif
Each flower motif will be worked in rounds, changing colors to create the flower and then squaring it off.
Abbreviations Used:
- MR: Magic Ring
- ch: chain
- sl st: slip stitch
- sc: single crochet
- hdc: half double crochet
- dc: double crochet
- tr: treble crochet (yarn over twice, insert hook, yarn over, pull up loop, [yarn over, pull through 2 loops] 3 times)
- FO: fasten off
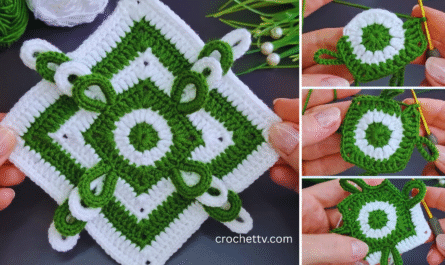
Flower Motif Pattern (Make 35 or your desired number)
Start with Color A (Lighter Green/Center)
- Round 1 (Center): Make a Magic Ring. Chain 2 (counts as first hdc). Work 9 hdc into the MR. Join with a slip stitch (sl st) to the top of the beginning ch 2. Pull the MR tight to close. (10 hdc)
- Alternative Start: Chain 3, join with sl st to first ch to form a ring. Ch 2, work 9 hdc into the ring. Join with sl st to top of ch 2.
- Round 2 (Inner Petals): Chain 2 (counts as first hdc). Work 1 hdc into the same stitch. Work 2 hdc into each of the remaining stitches around. Join with a sl st to the top of the beginning ch 2. (20 hdc)
- Fasten off (FO) Color A.
Switch to Color B (Medium Green – for the main petals)
- Round 3 (Petals):
- Join Color B with a sl st into any stitch.
- *Chain 2. Work 1 double crochet (dc) into the same stitch. Work 1 treble crochet (tr) into the next stitch. Work 1 dc into the next stitch. Chain 2. Sl st into the next stitch.* (This creates one petal cluster).
- Repeat from * to * 4 more times around (for a total of 5 petals). After the last sl st, you’ll be at the end of the round.
- FO Color B.
- Note: For slightly more defined petals, you can try: *Chain 2. (1 dc, 1 tr, 1 dc) into the same stitch. Sl st into the next stitch.* Repeat around. This makes the petal “pop” a bit more.
Switch to Color C (Darker Green – for squaring off the motif)
- Round 4 (Squaring Off – First Layer):
- Join Color C with a sl st into any sl st space between two petals from Round 3.
- Chain 3 (counts as first dc). Work 2 dc into the same space. Chain 2 (this creates a corner). Work 3 dc into the same space. (This is your first corner cluster).
- *Chain 1. Skip the next petal. Work (3 dc, ch 2, 3 dc) into the next sl st space between petals.*
- Repeat from * to * 3 more times. After the last corner, Chain 1. Join with a sl st to the top of the beginning ch 3.
- FO Color C.
- Round 5 (Squaring Off – Second Layer):
- Join Color C with a sl st into any ch-2 corner space from Round 4.
- Chain 3 (counts as first dc). Work 2 dc into the same corner space. Chain 2. Work 3 dc into the same corner space. (This is your first new corner).
- *Work 3 dc into the next ch-1 space.
- Work (3 dc, ch 2, 3 dc) into the next ch-2 corner space.*
- Repeat from * to * 2 more times. Work 3 dc into the last ch-1 space.
- Join with a sl st to the top of the beginning ch 3.
- FO Color C.
- Round 6 (Final Squaring Off Layer for Size):
- Join Color D (your joining color, or a neutral) with a sl st into any ch-2 corner space from Round 5.
- Chain 3 (counts as first dc). Work 2 dc into the same corner space. Chain 2. Work 3 dc into the same corner space.
- *Work 3 dc into each of the next two spaces (these are the spaces created by the 3-dc clusters from the previous round).
- Work (3 dc, ch 2, 3 dc) into the next ch-2 corner space.*
- Repeat from * to * 2 more times. Work 3 dc into each of the next two spaces.
- Join with a sl st to the top of the beginning ch 3.
- FO Color D.
You have now completed one Green Flower Motif! Repeat this process for all 35 (or your desired number) of motifs.
Part 2: Joining the Motifs
There are many ways to join crochet squares. For beginners, a simple single crochet join from the right side (front) of the blanket is easy and creates a neat, slightly raised seam that can add a nice texture.
Method: Single Crochet Join (Creates a visible ridge)
- Lay out your finished motifs on a flat surface in the desired arrangement (e.g., 5 squares wide by 7 squares long). This helps you visualize the pattern and avoid mistakes.
- Take two motifs you want to join. Place them right sides facing up.
- Join Color D (your joining color) with a sl st into the corner stitch of both motifs.
- Chain 1.
- Working through both loops of both motifs simultaneously, single crochet across the edge, matching stitch for stitch.
- Tip: Aim to put 3 sc in the corner ch-2 space, and then 1 sc into each dc stitch across. When you reach the next corner ch-2 space, put 3 sc in it.
- When you reach the end of the first side, chain 1 (this can help with corner transition).
- Continue joining all motifs into long horizontal strips (e.g., 7 motifs long).
- Once you have all your horizontal strips joined, lay them out again.
- Now, join the strips together vertically using the same single crochet join method. Take two strips, align them, and sc through both loops, matching stitches and the chain-1 spaces at the strip intersections.

Part 3: Adding the Border
A border gives your blanket a finished, polished look and adds extra warmth. You can use your joining color (Color D) or any of the greens for this.
Using Color D (or a complementary green)
- Attach Yarn: Join Color D with a sl st into any corner stitch of your assembled blanket.
- Round 1 (Single Crochet Border):
- Chain 1 (does not count as a stitch).
- Work 3 single crochet (sc) into the same corner stitch.
- Work 1 sc into each stitch along the top and bottom edges of the blanket. When you reach the joined seams between motifs, try to work 1-2 sc stitches into the actual seam to keep the stitch count even and prevent gaps.
- Work 1 sc into each dc stitch along the sides of the motifs.
- When you reach a corner, work 3 sc into the corner stitch.
- Join with a sl st to the first sc of the round.
- Round 2 (Double Crochet Border – Optional):
- Chain 3 (counts as first dc).
- Work 1 dc into each stitch around the blanket.
- In each corner, work 3 dc into the center sc of the 3-sc corner from the previous round.
- Join with a sl st to the top of the beginning ch 3.
- Round 3 (Single Crochet Border – Optional):
- Chain 1 (does not count as a stitch).
- Work 1 sc into each stitch around.
- Work 3 sc into each corner stitch (the middle dc of the 3-dc corner from the previous round).
- Join with a sl st to the first sc of the round.
- Fasten off, leaving a 6-inch tail.
You can add more border rounds of single crochet or double crochet, or explore other simple border patterns for a more decorative edge. Just remember to work 3 stitches in each corner to keep the border flat.
Part 4: Final Finishing Touches
This stage is crucial for making your blanket look polished and durable.
- Weave in All Ends (Meticulously!): This is often the most time-consuming part, but it’s essential for a beautiful and long-lasting blanket. You’ll have many tails from starting each motif, changing colors within them, and joining them.
- Thread each yarn tail onto your yarn needle.
- How to Weave Neatly: Insert the needle into existing stitches of the same color for at least 3-4 inches (7.5-10 cm). Try to follow the path of existing stitches to make it invisible. To make it extra secure and prevent unraveling, subtly change direction (e.g., weave along a stitch, then turn and weave back through some of the same stitches diagonally or perpendicularly) to “lock” the tail in place.
- Once secured, trim any excess yarn close to the fabric, being careful not to cut any of your actual crocheted stitches.
- Blocking (Highly Recommended!): Blocking helps to even out your stitches, square up your motifs, straighten your edges, and give the blanket a beautiful, professional drape.
- Method for Acrylic Yarn (Steam Blocking): Lay your finished blanket flat on a heat-safe surface (like an ironing board or a blocking mat). Hold a steam iron just above the blanket (do NOT touch the iron to the yarn, as acrylic can melt). Allow the steam to penetrate the fibers. Gently pat or shape the motifs and the overall blanket into its desired rectangular shape. Let it cool and dry completely.
- Method for Cotton or Wool (Wet Blocking): Submerge the blanket in cool water for about 20 minutes (with a bit of gentle soap if desired). Gently squeeze out excess water (do not wring). Lay it flat on towels or blocking mats, gently stretching and pinning the blanket into its final dimensions. Allow it to air dry completely.
Congratulations! You’ve successfully crocheted an amazing and beautiful Green Flower Baby Blanket! This handmade gift, featuring delicate green floral motifs, will be cherished for years to come.
What shades of green are you excited to combine for your next flower blanket?